How Ice Dams Form and Cause Severe Roof Damage
To stop an ice dam, you first have to understand the thermal balance of your home during a Northern Illinois winter. Ice dams do not happen simply because it is freezing outside; they happen because your roof surface is experiencing two completely different temperatures at the same time.
For an ice dam to take shape, two conditions must exist: there must be snow sitting on the roof, and the upper section of the roof deck must warm above 32°F while the lower edges—the eaves and overhangs—remain below freezing.
When warm air escapes your living space into the attic, it heats the underside of the upper roof deck. The snow directly above that warm zone begins to melt, running down the sloped surface toward the gutters as liquid water. However, once that water reaches the eaves—which extend past the exterior walls of your house and receive no warmth from the attic—it encounters an outdoor environment that is below 32°F. The water refreezes, creating a ridge of ice.
As this process continues over days of freeze-thaw cycles, the ice ridge grows taller, creating a reservoir of trapped meltwater behind it. Because liquid water cannot drain off the edge, it seeks the path of least resistance. It backs up beneath your asphalt shingles, soaking through felt underlayment and penetrating the roof sheath, leading to structural damage that often requires professional roofing intervention.
The Thermodynamics Behind Winter Ice Accumulation
Heat transfer within a home operates through three core principles: conduction, convection, and radiation. Each plays a direct role in creating uneven roof temperatures:
- Conduction: Heat moves directly through solid building materials. If your attic floor lacks proper insulation depth, heat moves through the drywall ceiling straight into the attic space.
- Convection: Warm air naturally rises. Hot air inside your living quarters pushes upward through tiny unsealed gaps around light fixtures, attic hatches, and plumbing stacks—a process known as attic heat bypass.
- Radiation: The warm air trapped inside an uninsulated attic radiates thermal energy directly to the underside of the plywood roof sheathing, elevating its surface temperature above freezing even when outdoor temperatures are well below 0°F.
Physics also plays a severe role in how destructive this solid ice can be. Freshwater ice at 32°F has a density of roughly 57.2 lb/ft³ (916.8 kg/m³). As water freezes inside gutters and along eave edges, it expands with immense force. In fact, at 14°F (-10°C), the crushing strength of ice ranges between 1.1 to 1.5 kpsi (8 to 10 MPa). This tremendous physical force can crush metal flashing, warp wood trim, and split heavy-duty gutter channels.
Critical Risks of Ignoring Roof Ice Dams
Ignoring an active ice dam or treating it as a standard winter phenomenon can severely compromise your home’s structural shell. When backed-up water sits trapped behind an ice ridge, the consequences spread rapidly:
- Gutter and Eave Destruction: The extreme weight of solid ice, combined with its expansion force, tears gutters clean off fascia boards and warps soffit panels.
- Roof Decking Rot: Meltwater seeping under shingles saturates plywood sheathing, causing timber to rot, delaminate, and lose structural strength.
- Insulation Ruin: When water drips through ceiling joints into your attic insulation, the material becomes compressed and loses its thermal resistance (R-value). Wet fiberglass or cellulose insulation will never regain its insulating capability even after drying out.
- Interior Drywall Damage: Water creeps down inside interior and exterior wall cavities, staining ceilings, peeling paint, warping hardwood flooring, and ruining electrical wiring.
- Mold and Mildew Growth: Trapped moisture inside warm wall spaces creates an ideal environment for toxic mold spores to multiply within 24 to 48 hours, threatening indoor air quality.
Immediate and Seasonal Ice Dam Prevention Strategies
When a heavy winter storm drops a foot of wet snow across Northern Illinois, immediate action can prevent ice ridges from gaining a foothold. Taking seasonal maintenance steps before and during the deep freeze keeps drainage pathways open.
Before winter arrives, clear all autumn leaves, twigs, and organic debris from your gutters and downspouts. Clogged gutters trap standing water, which freezes into solid blockages during the first minor cold snap. When melting roof snow arrives later, it hits a blocked gutter system, speeding up the creation of an ice dam. Ensuring downspouts direct water safely away from your foundation is equally crucial.
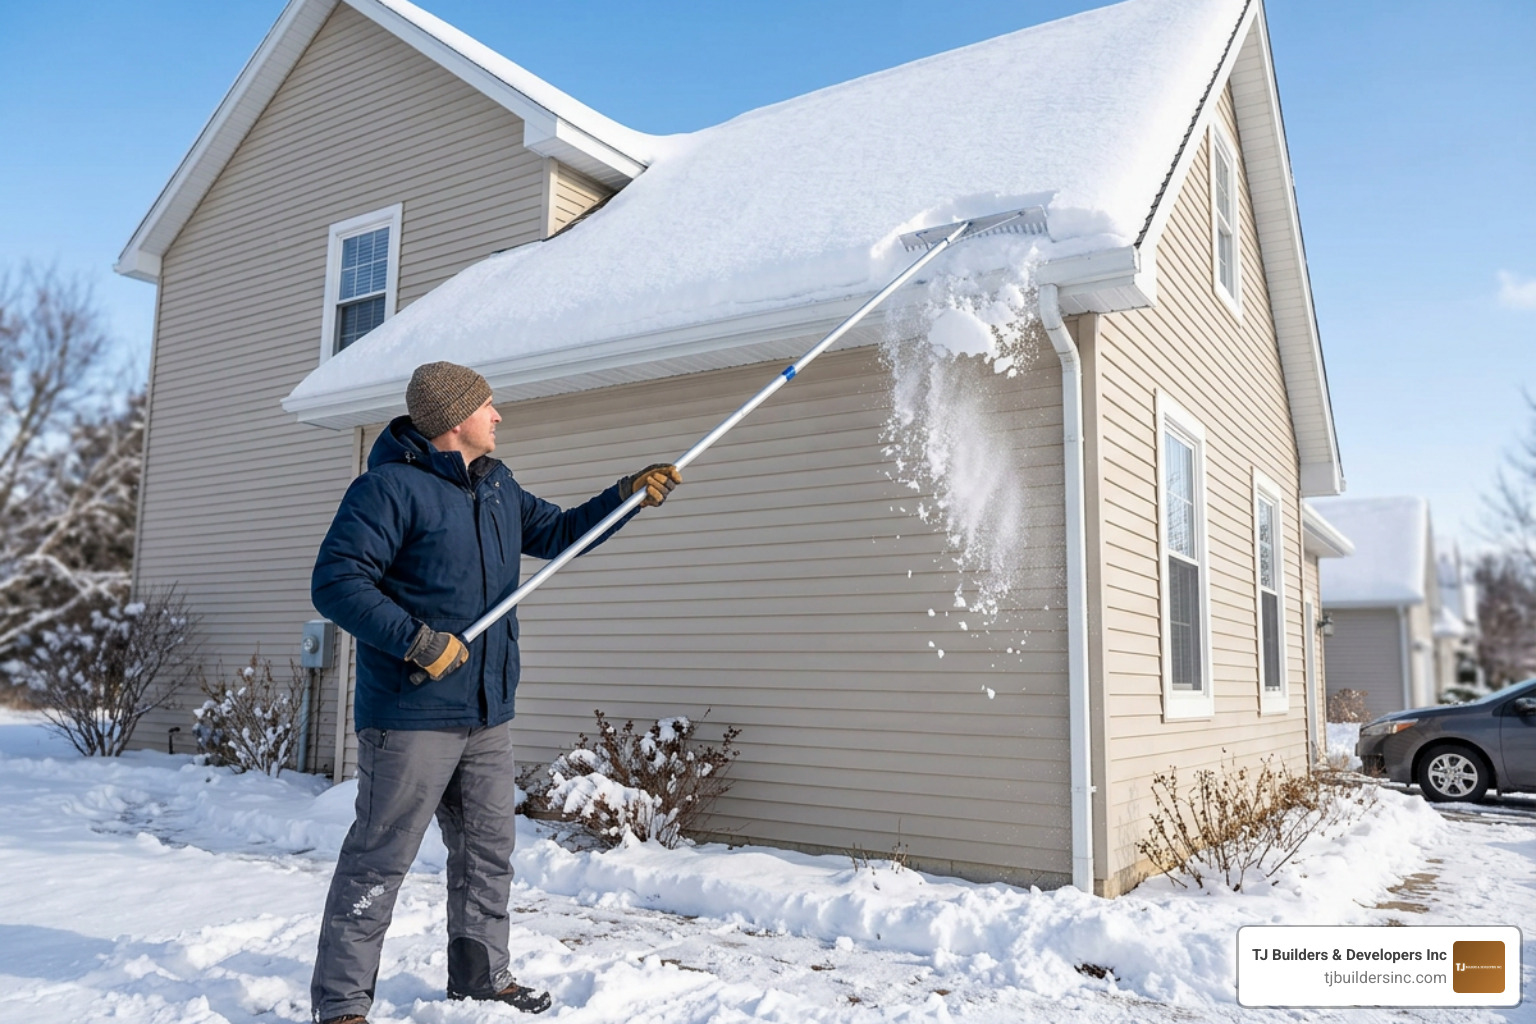
If snow builds up on your roof, utilizing targeted tools and services like roof snow removal reduces the total volume of potential meltwater.
Safe Roof Snow Removal Techniques
Clearing snow off your roof is one of the most effective short-term ice dam prevention methods, but it must be done safely.
- Always Work from the Ground: Use a specialized telescoping roof rake with built-in rollers. Ground-level operations keep you safe from dangerous slips and falls.
- Avoid Shingle Damage: Never scrape the rake blade directly against the shingle surface. Leave a thin 2- to 3-inch layer of snow on the roof to avoid stripping off protective asphalt granules.
- Focus on the Lower Edges: You do not need to clear the entire roof surface. Clearing the lower 3 to 6 feet of snow above the eaves removes the supply water that feeds the ice dam.
- Never Climb onto a Snowy Roof: Standing on a pitched, icy roof during freezing conditions poses extreme personal safety risks. Never use metal shovels, pickaxes, or chisels to chop at ice, as these tools easily puncture shingles and underlayment.
Quick-Fix Measures and Heat Tape Applications
For areas prone to localized ice formation due to complex roof valleys or shaded architectural features, installing electric heat cables (also known as heat tape or electric heat tracing) can offer a temporary drainage solution.
De-icing cables are installed along eave edges in a zig-zag pattern, as well as inside gutters and downspouts. When powered on, these self-regulating cables generate enough surface heat to melt vertical drainage channels through accumulation, allowing trapped meltwater to escape safely off the roof edge. Products like specialized Canadian-designed edge-cutters are engineered specifically to preserve melt channels on vulnerable residential edges.
However, heat tape is a secondary line of defense rather than a permanent cure. Electric cables consume noticeable electricity, require seasonal inspections to avoid electrical fire risks, and do not address the core issue: interior heat escaping into your attic space.
Need Help With Your Home?
TJ Builders & Developers handles roofing, siding, gutters, windows, home additions, and fire damage restoration for homes and businesses in Lakewood, Crystal Lake, Schaumburg, and nearby McHenry County towns.
- Free, no-obligation estimates
- Licensed & insured
- 20+ years of local experience
Long-Term Ice Dam Prevention Through Insulation and Air Sealing
The true key to permanent ice dam prevention lies in creating a “cold roof” system. A cold roof exists when the air temperature inside your attic matches the temperature of the outside air. To achieve this, you must construct a continuous thermal and air barrier between your warm living spaces and the cold attic above.
Building science standards dictate that attic insulation in northern climates should meet an absolute minimum of R-30, with R-38 to R-49 being the recommended target for ideal energy performance. Upgrading your insulation helps keep conditioned heat inside your home where it belongs, saving on heating bills while preserving your roof surface. For a deeper look into thermal performance, explore The Hot And Cold Truth About Attic Insulation Upgrades.
Identifying and Air-Sealing Hidden Attic Bypasses
Adding extra insulation without air-sealing the ceiling floor first is like wearing a thick wool sweater in a winter gale without a windbreaker. Warm air will blow right through it. Air leaks (convective heat transfer) account for the vast majority of ice dam problems in homes throughout Lakewood, Schaumburg, and surrounding areas.
Professional home energy assessments utilize specialized diagnostic tools to locate air leaks:
- Blower Door Testing: A powerful fan mounted in an exterior door frame depressurizes the house, pulling cold outside air inward through hidden leaks.
- Thermal Imaging Cameras: Infrared cameras pinpoint cold air drafts and hot spots across ceiling surfaces in real time.
- Smoke Pens: Technicians release non-toxic smoke near suspected penetrations to visually trace air leakage pathways.
Common bypass areas that require sealing with expanding foam, caulk, or fire-rated sealants include ceiling light fixtures, recessed “can” lights, bathroom exhaust fan housings, plumbing vent stack penetrations, chimney chasings, drop soffits, and attic access hatches. To review step-by-step techniques for sealing ceiling bypasses, check out This Old House’s Guide to Insulating Attics for Ice Dams.
Choosing Spray Foam and High R-Value Insulation Systems
When retrofitting an attic space for peak thermal resistance, selecting high-performance materials makes a substantial difference. Spray polyurethane foam provides both superior insulation value and a continuous air seal in a single application.
| Insulation Material | R-Value Per Inch | Air Sealing Capability | Moisture / Vapor Barrier |
|---|---|---|---|
| Blown Fiberglass | ~2.5 – 3.2 | Low (Permeable) | None (Requires separate barrier) |
| Blown Cellulose | ~3.5 – 3.8 | Moderate (Dense-packed) | Minimal |
| Open-Cell Spray Foam | ~3.6 – 3.9 | Excellent Air Seal | Moisture Permeable |
| Closed-Cell Spray Foam | ~6.0 – 7.0 | Superior Air Seal | Impermeable Vapor Barrier |
For attics housing HVAC ductwork or converted living spaces, an unvented attic assembly using spray foam along the underside of the roof deck is highly effective. Applying a 2-inch layer of closed-cell foam delivers a rigid R-14 vapor barrier, which can then be paired with 7.5 inches of open-cell foam to achieve an impressive total of R-44 insulation strength. This hybrid approach isolates the roof deck completely from conditioned home temperatures.
Cold Roof Systems: Proper Attic Ventilation and Ice Shields
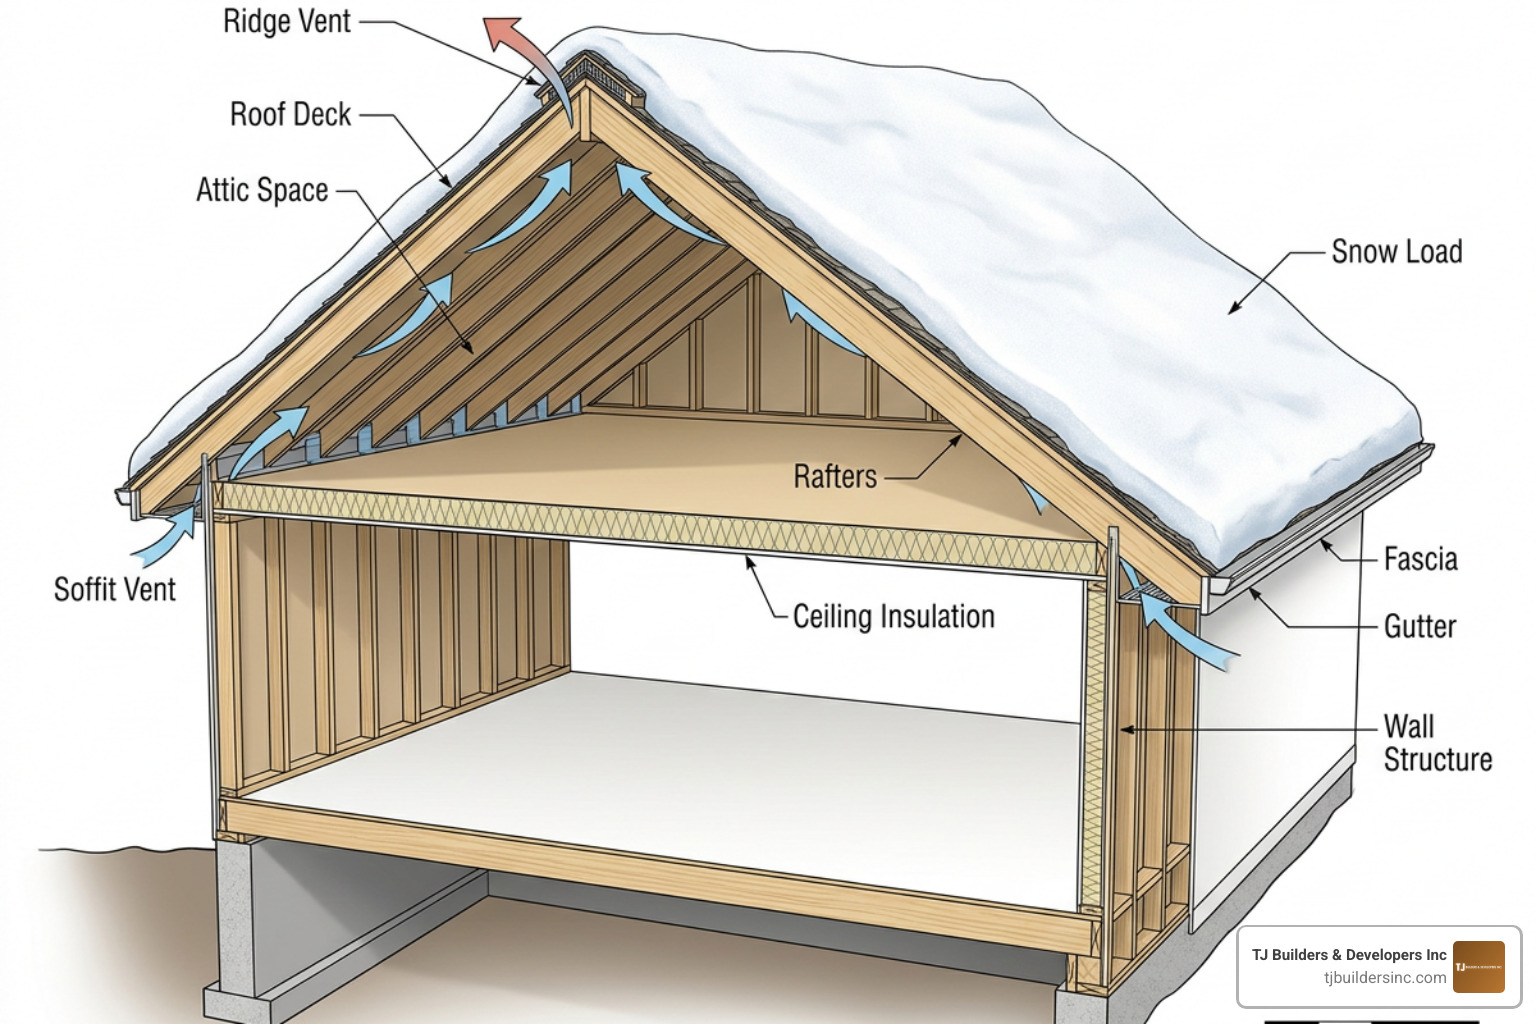
Insulation alone is only half of the cold roof equation; attic ventilation provides the other half. Proper ventilation pulls cold outdoor air into the attic space through eave or soffit vents and flushes out any remaining residual heat through ridge vents installed along the top peak of the roof.
Keeping fresh air moving across the underside of the roof deck maintains an even temperature, stopping localized snow melt before it can begin.
Optimizing Attic Airflow and Avoid Mechanical Fans
A balanced, passive ventilation system relies on natural air pressure differences and thermal buoyancy. Cool air enters low along the soffit intake vents, travels up beneath the roof deck, and exits high through the ridge vent.
To keep this pathway open:
- Install Soffit Baffles: Ensure insulation baffles (rafter vents) are installed at every rafter bay where the roof meets the exterior wall. These plastic or foam channels keep loose-fill insulation from blocking the soffit vents.
- Avoid Powered Mechanical Attic Fans: Many homeowners install motorized attic fans expecting them to lower attic temperatures. However, mechanical exhaust fans often pull conditioned air directly out of the house through unsealed ceiling penetrations, increasing indoor heat loss and making ice dams worse.
For complete details on configuring balanced roof ventilation, read our articles on The Fresh Air Guide To Attic Ventilation Installation, The Ultimate Guide To Keeping Your Roof Dry With Ridge Ventilation, and Venting Out A Guide To The Best Roof Ventilation Systems Available.
Code-Compliant Ice Barrier Underlayments for Ice Dam Prevention
Even with optimized insulation and ventilation, severe Midwest winter storms can still cause localized melt cycles. That is where a self-adhering ice barrier membrane acts as your roof’s waterproof safety net.
Under the International Residential Code (IRC) and local Northern Illinois building standards, roofers must install a polymer-modified bitumen self-adhering underlayment (meeting ASTM D1970 standards) along vulnerable eave edges.
This rubberized membrane seals tightly around nails driven through it. Building codes require this barrier to extend from the lowest eave edge to a point at least 24 inches inside the interior wall line of the building. For more insight into protecting your roof edges, see our guide on Dont Let Your Roof Freeze Up Without An Ice Water Shield.
Need Help With Your Home?
TJ Builders & Developers handles roofing, siding, gutters, windows, home additions, and fire damage restoration for homes and businesses in Lakewood, Crystal Lake, Schaumburg, and nearby McHenry County towns.
- Free, no-obligation estimates
- Licensed & insured
- 20+ years of local experience
Professional Audits and Comprehensive Roof Upgrades
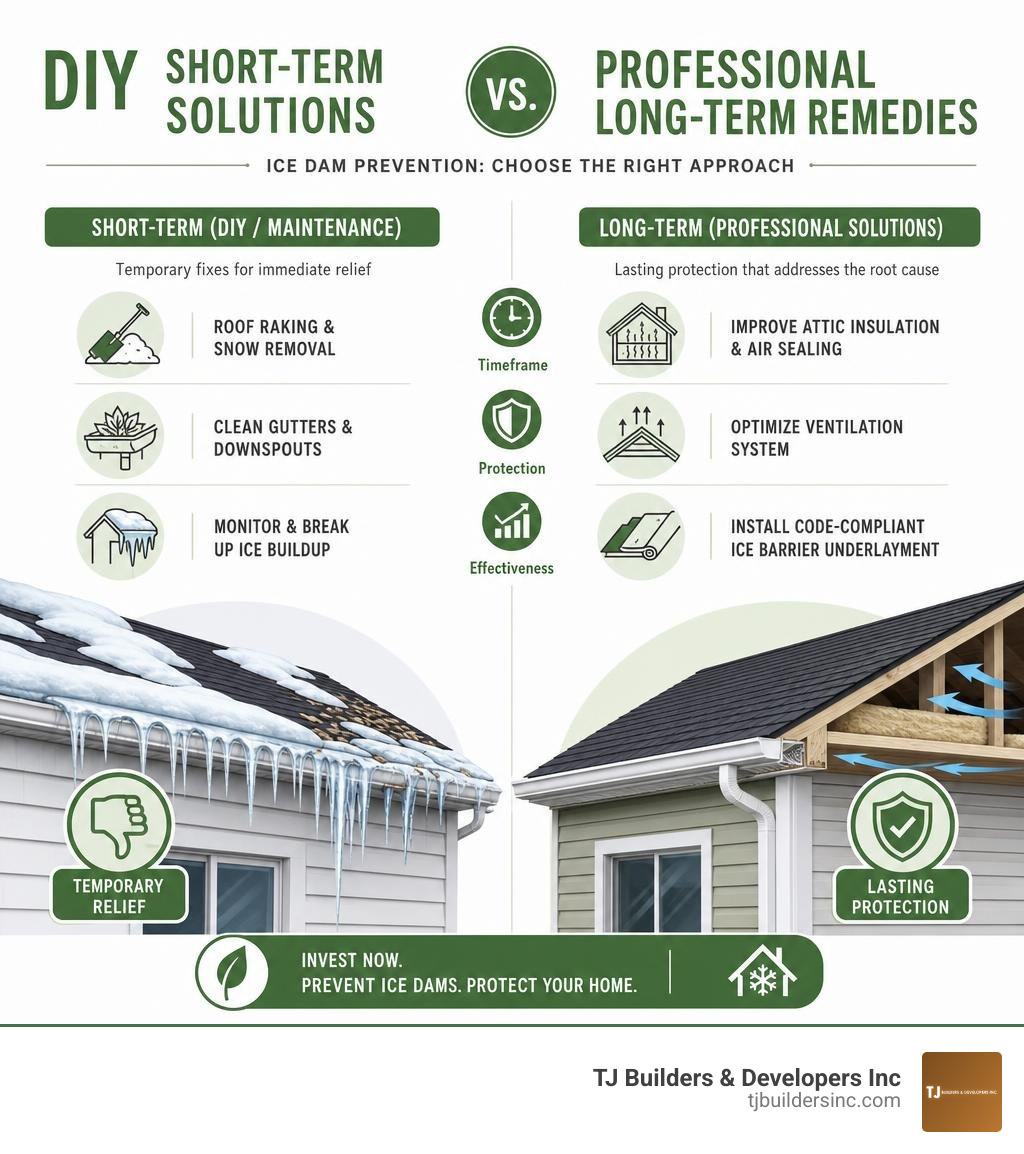
When winter weather hits hard, knowing whether you need a temporary quick fix or a complete attic restoration helps protect your investment:
| Solution Type | Action Required | Pros | Cons | Ideal Use Case |
|---|---|---|---|---|
| Short-Term (DIY/Maintenance) | Roof Raking & Clean Gutters | Immediate relief of standing snow weight | Temporary; requires physical effort in freezing cold | Post-storm snow accumulation |
| Targeted Spot Fix | De-Icing Heat Tape / Cables | Keeps melt channels open on eave edges | Increases electrical usage; doesn’t fix indoor heat loss | Complex valleys or shaded roof sections |
| Comprehensive (Professional) | Air Sealing, Spray Foam & Roof Ventilation | Permanently solves ice dams, lowers energy costs, protects structural integrity | Requires professional equipment and installation | Permanent prevention and total roof protection |
When severe ice dams develop during mid-winter, professional contractors use low-pressure industrial steamers to melt away solid ice blocks safely without driving water under shingles or damaging granules. If you suspect hidden damage, schedule an inspection through certified roofing inspection companies.
Frequently Asked Questions About Ice Dam Prevention
What is the single best method for long-term ice dam prevention?
The absolute most effective long-term solution is creating a cold roof assembly by completely air-sealing the ceiling floor, increasing attic insulation to at least R-38, and balancing passive soffit-to-ridge ventilation.
Can heat tape fully replace the need for attic insulation?
No. Heat tape only creates small drainage paths through ice at the roof edge. It does not prevent heat from escaping your living spaces, nor will it reduce high winter heating bills caused by air leaks and poor insulation.
Why shouldn’t I use a ladder to scrape ice dams off my roof?
Climbing ladders covered in snow or ice poses severe safety risks. Furthermore, hitting frozen shingles with hammers, chisels, or shovels shatters brittle asphalt, leading to leaks once the thaw begins.
Conclusion
Effective ice dam prevention isn’t about fighting ice after it forms—it’s about managing thermal energy inside your home so ice dams never have the chance to develop. By air-sealing ceiling bypasses, upgrading insulation levels, ensuring continuous attic ventilation, and installing code-compliant ice barrier membranes, you protect your structural investment for decades to come.
At TJ Builders & Developers Inc., we specialize in comprehensive exterior care—from professional roofing, gutter upgrades, and siding installation to long-term ice dam solutions tailored specifically for Northern Illinois homes in Lakewood, Crystal Lake, Schaumburg, Barrington, and neighboring communities.
If your roof is showing signs of winter stress or you need professional ice dam removal, reach out to our expert team today to keep your home warm, dry, and secure all winter long.