Why an Ice Water Shield Is Your Roof’s Last Line of Defense
An ice water shield is a self-adhering, waterproof membrane installed directly on your roof deck to protect against two of the most damaging threats a roof faces: ice dams and wind-driven rain.
Quick answer — what does an ice water shield do?
- Bonds directly to the roof deck (no fasteners needed)
- Self-seals around nail penetrations to stop water infiltration
- Blocks water backed up by ice dams from entering your home
- Protects against wind-driven rain during storms
- Acts as a vapor retarder with a moisture transmission rate below 0.5 perms
Most homeowners don’t think about what’s under their shingles — until water starts showing up inside. By then, the damage is already done.
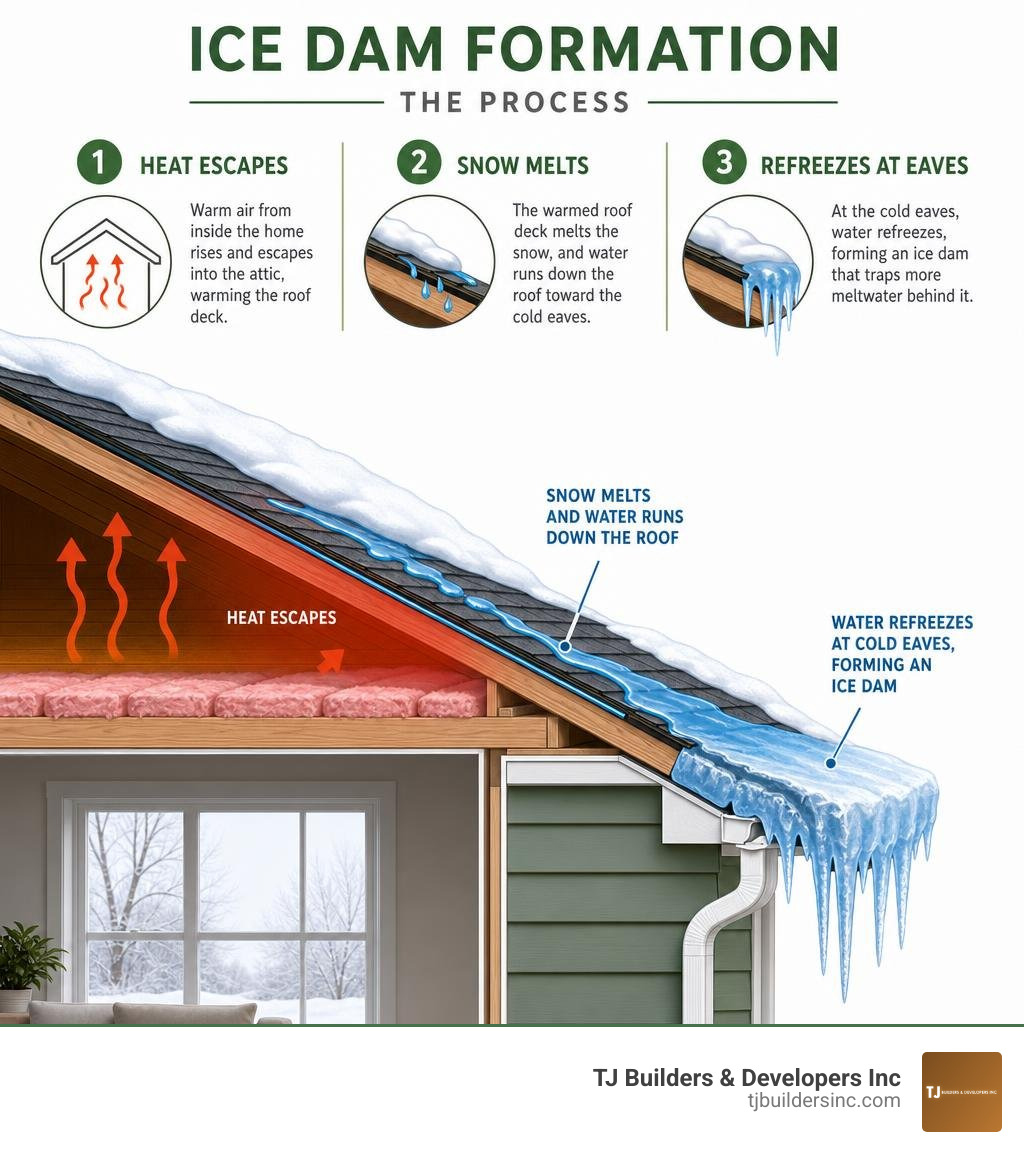
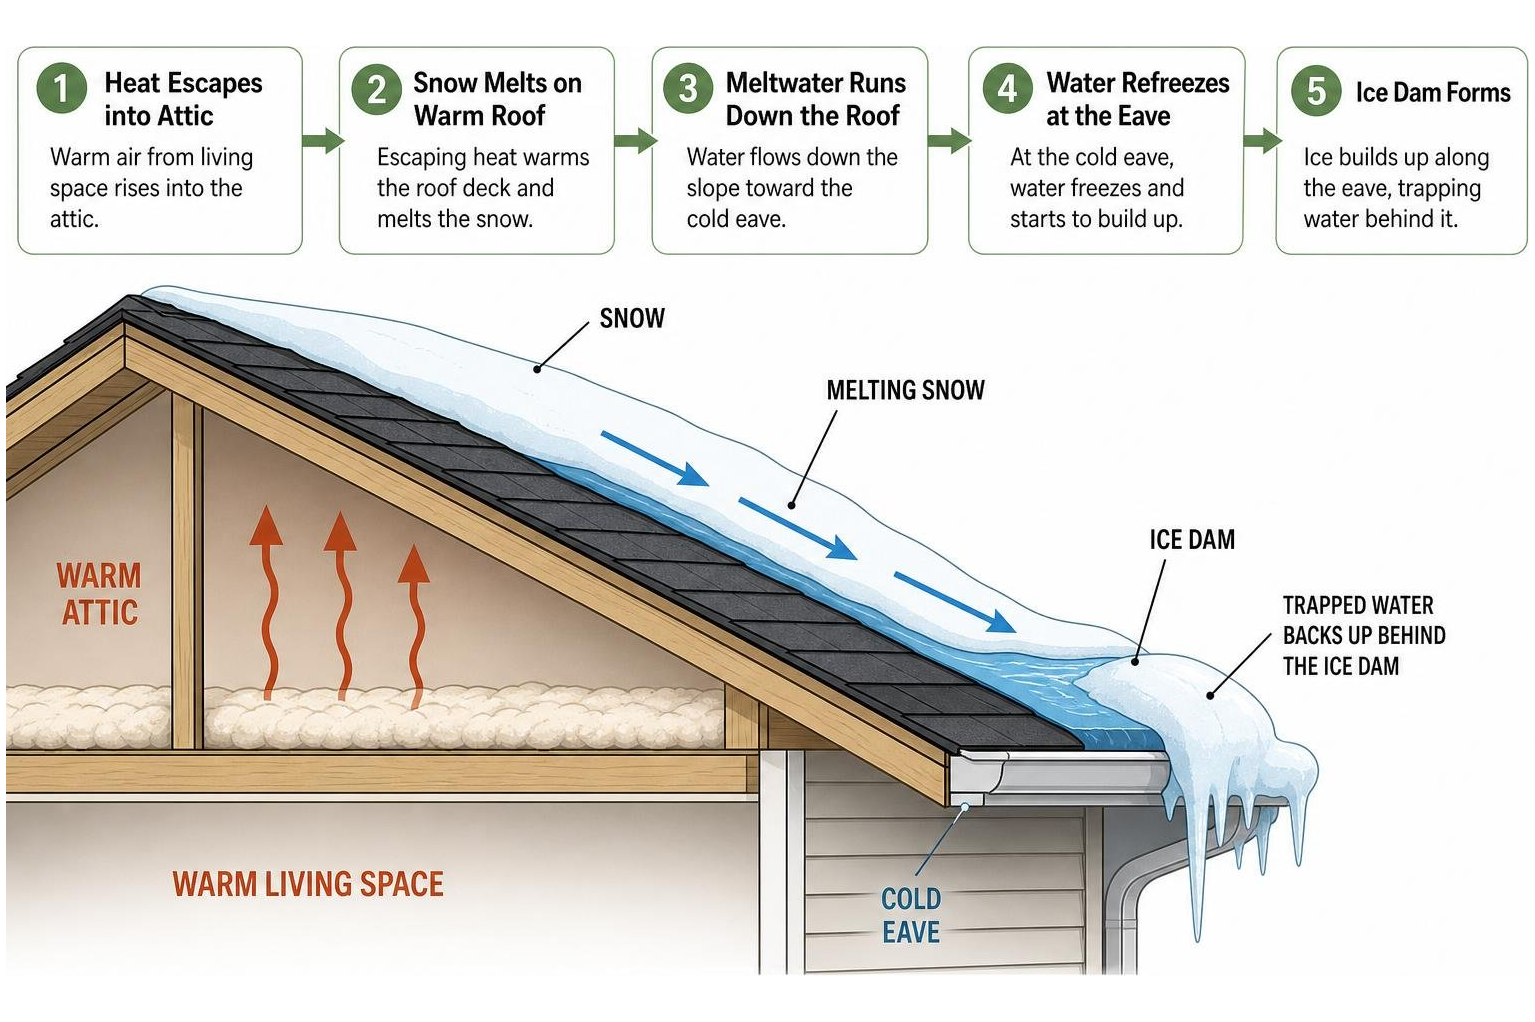
Ice dams form when heat escaping from your living space warms the roof deck, melts snow, and sends that water running down toward the cold overhang where it refreezes. That ridge of ice traps more meltwater behind it, and that water has nowhere to go except under your shingles. Standard felt underlayment wasn’t built to stop that. An ice water shield is.
In many parts of Northern Illinois — including communities like Crystal Lake, Schaumburg, and Lakewood — winters are brutal enough to make this protection not just smart, but often required by local building codes.
I’m Thomas Pruszynski of TJ Builders & Developers, and over more than 20 years of exterior renovation and roofing work across Northern Illinois, I’ve seen how the right ice water shield installation separates a roof that lasts from one that fails prematurely. In this guide, I’ll walk you through everything you need to know to protect your home the right way.
Similar topics to ice water shield:
What is an Ice Water Shield and How Does It Work?
To understand why an ice water shield is so crucial for houses in places like Crystal Lake and McHenry County, we have to look beneath the shingles. Your shingles are designed to shed water, but they are not entirely waterproof. Under severe weather conditions, water can easily get underneath them. That is where a high-performance underlayment comes into play.
Unlike traditional asphalt-saturated felt paper, which is simply tacked down with staples or cap nails, an ice and water protector is a peel-and-stick membrane. It features a heavy-duty adhesive backing that creates a continuous, watertight bond directly to your roof’s plywood or OSB decking.
This material is primarily composed of polymer-modified bitumen (often referred to as rubberized asphalt) backed by a layer of high-density, cross-laminated polyethylene or reinforced with a durable fiberglass mat. The result is a robust, rubbery sheet that behaves like a gasket for your entire roof structure.
Crucially, these membranes achieve a moisture transmission rate of fewer than 0.5 perms. Under building science classifications, this makes them highly effective vapor retarders. By blocking both liquid water and vapor transmission, they ensure that moisture cannot reach your wooden roof deck and cause rot, mold, or structural degradation. For a deeper dive into how waterproofing keeps your attic dry, you can read about our Roof Waterproofing Services Because Your Attic Isn’t a Swimming Pool.

How the Membrane Prevents Water Infiltration
The true magic of a premium ice water shield lies in its nail sealability. When roofers install your shingles, they drive thousands of nails through the underlayment and into the wood deck. With traditional felt or basic synthetic underlayments, every single nail creates a tiny hole. If water gets past the shingles, it will follow the nail shank directly into your attic.
A self-adhering membrane prevents this through its self-sealing compound. Because the modified bitumen is highly elastic and sticky, it tightly hugs and seals around every nail penetration. Even if a shingle is blown off or water backs up behind an ice dam, the rubberized asphalt keeps the nail holes perfectly watertight.
This performance is rigorously tested under industry standards like ASTM D1970, which measures a membrane’s ability to seal around fasteners and resist water under a head of water. Top-tier products, such as those detailed in the GRACE ICE & WATER SHIELD® Data Sheet | Resource, are engineered specifically to maintain this tight grip under extreme temperature fluctuations, ensuring your home remains dry even when the weather is at its worst.
The Science of Ice Dams and Wind-Driven Rain
To appreciate why this membrane is a necessity in Northern Illinois, we have to look at how ice dams form.
During our cold winters, heat can escape from your living areas into the attic if your insulation or ventilation is insufficient. This escaping heat warms the upper sections of your roof deck, causing the snow on top to melt. As the melted snow flows down the sloped roof, it eventually reaches the eave and overhang areas, which remain unheated because they extend past the exterior walls of your home.
When the runoff hits this cold zone (where temperatures are below 32°F), it refreezes. Over days of melting and refreezing, a thick ridge of ice builds up along your gutters and eaves. This is an ice dam.
When more snow melts on the upper roof, the runoff pool gets trapped behind this dam. Because the water cannot drain off the roof, it backs up under the shingles. Without a self-adhered waterproof barrier beneath those shingles, that standing water will quickly seep through the nail holes and into your ceilings, walls, and insulation.
In the spring and summer, we face a different threat: wind-driven rain. Strong storms can push rainwater upward, forcing it under the edges of shingles. Because standard homeowners’ insurance policies and the National Flood Insurance Program rarely cover interior damage caused by wind-driven rain unless there is a physical hole in the roof, having an active, secondary waterproofing barrier is your best financial protection. If you are already dealing with the aftermath of winter weather, you can learn more about our professional Ice Dam Removal services to protect your home.
Need Help With Your Home?
TJ Builders & Developers handles roofing, siding, gutters, windows, home additions, and fire damage restoration for homes and businesses in Lakewood, Crystal Lake, Schaumburg, and nearby McHenry County towns.
- Free, no-obligation estimates
- Licensed & insured
- 20+ years of local experience
Critical Areas for Installing Self-Adhered Waterproofing Membranes
While covering your entire roof deck with a waterproof membrane is sometimes done in specialized scenarios, it is generally reserved for highly critical, leak-prone areas. Knowing where to install an ice water shield is key to optimizing both protection and cost-efficiency.

Eaves, Valleys, and Low-Slope Transitions
The most critical area for any roof in Northern Illinois is the eave. This is where ice dams form and where water is most likely to pool. We install the membrane directly along the eaves, starting at the drip edge and extending upward.
Another high-risk zone is the roof valley. Valleys are formed where two roof planes meet, creating a natural channel for massive amounts of water and snow runoff. Because of the volume of water they carry, valleys are highly susceptible to wear and leaks. Laying a continuous strip of self-adhered membrane down the center of every valley before installing shingles is a non-negotiable step in professional roofing. For more practical advice on keeping water out of your home, check out our guide on How to Fix Roof Leaks with These 5 Easy Changes.
Additionally, low-slope transitions — areas where a steep roof meets a lower-pitched section (slopes between 2:12 and 4:12) — are highly vulnerable. Water drains much slower on low slopes, increasing the risk of water backing up. Building codes often dictate specific placement rules for these zones. You can explore the technical code requirements in detail through this resource on Ice & Water Shield Placement per Code: What’s Really….
Flashing and Roof Penetrations
Anywhere something penetrates your roof deck is a potential leak point. This includes:
- Chimneys: Water running down the roof can pool behind a chimney, making self-adhered membrane flashing essential around its base.
- Skylights: Because they sit flush with the roof plane, skylights are highly prone to leaks if the surrounding underlayment is not perfectly sealed.
- Vent Stacks and Pipes: Plumbing vents and exhaust pipes require a tight seal around their bases.
- Dormers and Rake Edges: The vertical walls of dormers meet the sloped roof at a joint that must be protected with an ice and water barrier before metal flashing is applied.
By wrapping these penetrations in a self-sealing membrane, we ensure that even if the primary metal flashing fails or gets clogged with debris, water still cannot penetrate the roof deck. If you suspect your current penetrations are leaking, you can read our comprehensive walkthrough on The Ultimate Guide to Professional Roof Leak Inspection and Repair.
Professional Installation Standards and Requirements
Installing an ice water shield is a precision job. Because the adhesive backing is incredibly strong and unforgiving, mistakes during installation can lead to wrinkles, bubbles, or improper adhesion, which compromise the roof’s waterproofing integrity.
Calculating How Much Ice Water Shield Your Roof Needs
Before starting a project, we calculate exactly how much material is required. Most standard rolls of ice and water protector are 3 feet (36 inches) wide.
To determine the coverage needed for your eaves, we don’t just measure the overhang. Building codes require that the membrane extend from the lowest edge of the roof to a point at least 2 feet (24 inches) inside the warm exterior wall line of the house.
In colder regions like McHenry County, where heavy snow and deep freezes are common, extending this coverage to 3 feet inside the warm wall line is highly recommended. Because of this requirement, a single 3-foot-wide roll is rarely enough to cover the eave and reach far enough inside the wall line. In most cases, we must install two parallel courses of membrane along the eaves to ensure complete code compliance.
To calculate your total material needs:
- Measure the total linear footage of your roof’s eaves, valleys, rakes, and valleys.
- Determine if a single or double course is required based on your roof’s pitch and overhang depth.
- Factor in standard roll dimensions (for example, a standard roll of Grace Ice and Water Shield 36 in. x 75 ft. Roll Self-Adhered Roofing … covers 225 square feet).
- Add a 10% waste factor to account for necessary laps and cuts around roof penetrations.
Step-by-Step Professional Application Guidelines
For the adhesive backing to bond properly, the roof deck must be completely clean, dry, and free of dust, sap, or protruding fasteners. We never install these membranes during rain or on a deck that has moisture on it, as water will ruin the adhesive bond.
- Prepare the Substrate: We sweep the deck clean. If we are performing a reroofing project, we ensure all old nails and felt remnants are completely removed.
- Install the Drip Edge: At the eaves, the metal drip edge is installed first, directly onto the wood deck. The ice and water membrane is then applied over the drip edge to prevent water from slipping behind the metal gutter apron. (At the rakes/sides, the membrane goes down first, and the drip edge goes on top).
- Roll and Align: We roll out the membrane across the eave, keeping it straight and taut. Many premium products feature a split-release backing (such as the RIPCORD® system in GRACE ICE & WATER SHIELD® | Resource | GCP Applied Technologies), which allows us to peel off half the backing at a time for easier positioning.
- Peel and Press: Once aligned, we peel back the remaining liner and press the membrane firmly onto the deck. We work from the center outward to eliminate air pockets and wrinkles.
- Manage the Laps: When overlapping sheets, we maintain a minimum of 3.5 inches for side laps and 6 inches for end laps to guarantee a watertight seam.
- Integrate with Flashing: Around chimneys and skylights, we run the membrane up the vertical walls of the structure before installing the metal flashing.
Proper installation ensures your roof has a seamless, continuous barrier. If you want to learn more about our reroofing and repair standards, read about our professional Roof Repair services. To understand how we address persistent leaks, see our detailed guide on How to Fix Roof Leakage Waterproofing Issues for Lasting Results.
Need Help With Your Home?
TJ Builders & Developers handles roofing, siding, gutters, windows, home additions, and fire damage restoration for homes and businesses in Lakewood, Crystal Lake, Schaumburg, and nearby McHenry County towns.
- Free, no-obligation estimates
- Licensed & insured
- 20+ years of local experience
Comparing Membrane Grades: Standard vs. High-Temperature
Not all ice and water shields are created equal. Depending on your roofing material and local climate conditions, choosing the right grade of membrane is critical for long-term durability.
| Feature / Specification | Standard Residential Grade | Premium / High-Temperature Grade |
|---|---|---|
| Primary Material | SBS-modified asphalt with organic/synthetic carrier | Polymer-modified asphalt with fiberglass reinforcement |
| Max Temperature Stability | Up to 180°F – 200°F | Up to 240°F |
| Recommended Under | Asphalt Shingles | Metal Roofing, Tile, Slate, South-facing slopes |
| UV Exposure Rating | Typically 30 Days | 45 to 90 Days |
| Nail Sealability | Standard ASTM D1970 | High-performance self-sealing |
| Core Material | Polyethylene film | 100% Inorganic Fiberglass Mat |
Standard and Premium Residential Grades
For standard asphalt shingle roofs in Northern Illinois, a high-quality residential grade membrane is typically the go-to choice. These products use SBS-modified asphalt to provide excellent flexibility and nail-sealing capabilities.
Some builder-grade options use cheap organic cores that can degrade over time if exposed to persistent moisture. In contrast, premium residential membranes utilize inorganic fiberglass cores or high-density polyethylene backing. These premium options, such as SecureGrip Ice & Water – TopShield, offer vastly superior tear resistance, better slip-resistant surfaces for installer safety, and longer UV exposure windows (often up to 30 days) before the shingles must be installed.
High-Temperature Membranes for Metal and Commercial Roofs
If you are installing a metal roof, slate, or tile, standard residential membranes are not sufficient. Metal roofs conduct heat exceptionally well, causing attic-facing temperatures beneath the panels to climb as high as 240°F during hot Illinois summers.
Standard asphalt underlayments will soften, melt, and degrade under this kind of thermal load, potentially oozing out from beneath the metal seams and staining your trim.
High-temperature membranes are engineered with specialized polymer-modified asphalt and fiberglass reinforcement. They are rated to withstand continuous temperatures up to 240°F without softening, losing adhesion, or breaking down. Additionally, these premium membranes can often be left exposed to the sun for up to 90 days, providing excellent temporary waterproofing during complex, multi-week commercial or residential installations.
Frequently Asked Questions About Ice and Water Protection
Is an Ice Water Shield Required by Building Codes?
Yes, in Northern Illinois, it is almost always required by local building codes. Because our region experiences freezing winter temperatures and heavy snow, municipal building departments from Crystal Lake to Schaumburg enforce the International Residential Code (IRC).
The IRC states that in areas where there has been a history of ice forming along the eaves causing a backup of water, an ice barrier must be installed. It must extend from the lowest edge of the roof to a point at least 24 inches inside the exterior wall line. When we replace a roof, we ensure all work is fully compliant with your specific town’s local codes and passes all municipal inspections.
Can You Install Underlayment in the Rain or Cold Weather?
We do not recommend installing self-adhered membranes in wet or extremely cold conditions.
For the adhesive backing to bond permanently to the wood deck, the surface must be completely dry. Moisture on the deck will trap water under the membrane, preventing adhesion and potentially leading to wood rot.
Furthermore, most standard self-adhered membranes require an installation temperature of 40°F (5°C) or higher to bond properly. If installed in freezing weather, the adhesive will not activate, causing the sheets to slip or blow off. If a roof must be repaired or replaced in cold weather, we use specialized low-temperature primers or high-temperature rated membranes designed to bond in colder environments.
Should You Cover the Entire Roof Deck with a Waterproof Membrane?
In almost all residential scenarios, no. You should not cover your entire roof deck with an ice water shield.
Because these membranes have a permeance rating of less than 0.5 perms, they act as a complete vapor barrier. If you seal your entire roof deck with a vapor barrier, you trap moisture inside your attic. Without a highly advanced, active ventilation system, this trapped moisture will condense on the underside of your roof deck, leading to mold growth, rotted wood, and ruined insulation.
Instead, the industry best practice is to install an ice and water protector in the critical areas (eaves, valleys, and penetrations) and use a highly breathable, synthetic underlayment on the rest of the roof deck. This allows your roof to “breathe” while maintaining absolute waterproofing where it matters most. To learn more about balancing attic moisture and airflow, read The Ultimate Guide to Keeping Your Roof Dry with Ridge Ventilation and The Complete Guide to Roof Ventilation Benefits.
Conclusion
Your roof is a complex system, and shingles are only the first line of defense. When severe winter storms bring heavy snow and ice dams, or summer storms bring wind-driven rain, a professionally installed ice water shield is what keeps your home dry and secure.
At TJ Builders & Developers Inc, we specialize in providing homeowners across Northern Illinois — including Lakewood, Crystal Lake, Schaumburg, and surrounding communities — with professional workmanship, durable materials, and long-term property protection. We don’t cut corners on underlayment because we know that what goes under your shingles is just as important as the shingles themselves.
If you are planning a roof replacement or suspect your roof has suffered winter damage, don’t wait for the next storm to test your home’s defenses. Contact our team today to discuss your next project. Explore our full range of services on our Roofing page and let us help you protect your home for decades to come.