Why Roof Leakage Waterproofing Is Critical for Your Home’s Long-Term Protection
Roof leakage waterproofing is the process of applying protective materials and coatings to your roof to stop water from penetrating your home’s structure — and it’s one of the most important investments a homeowner can make.
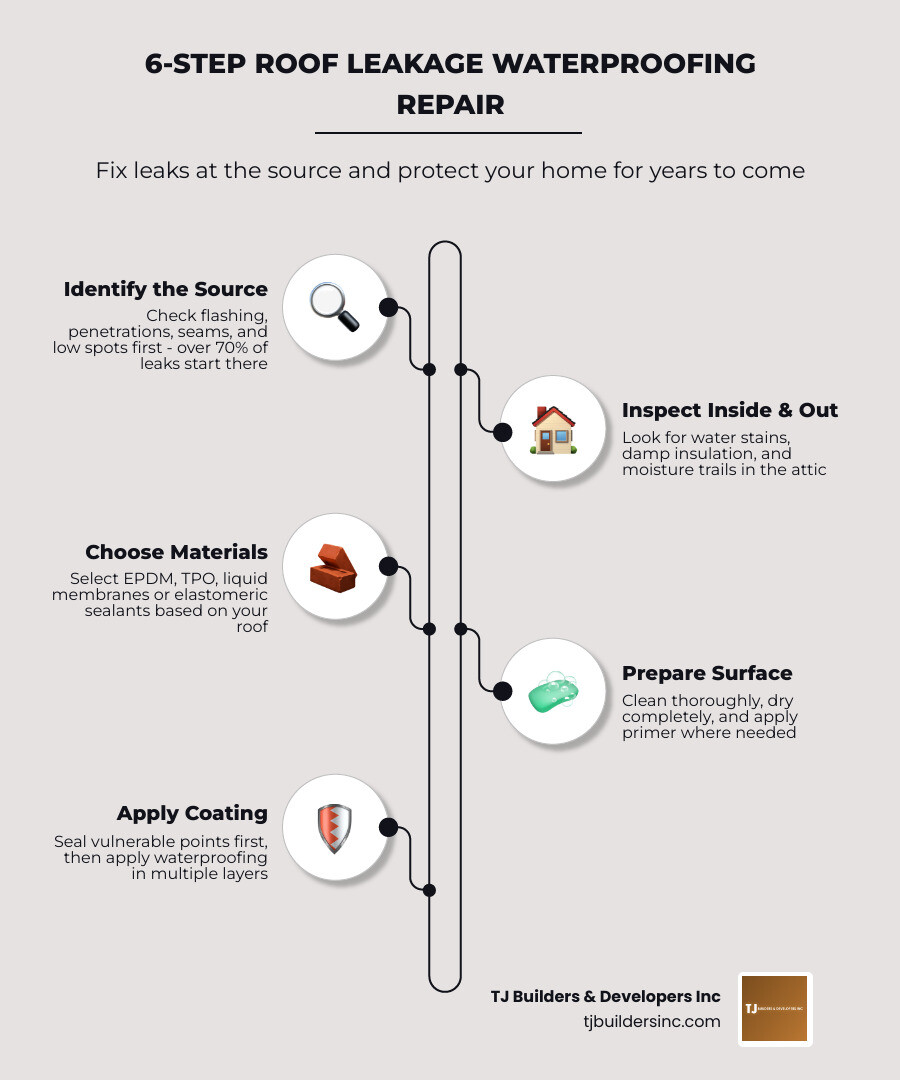
Quick answer: How do you fix roof leakage waterproofing issues?
- Identify the leak source — Check flashing, penetrations, seams, and low spots first. Over 70% of leaks start there, not across the main roof surface.
- Inspect from inside and outside — Look for water stains, damp insulation, and moisture trails in the attic.
- Choose the right waterproofing material — EPDM, TPO, liquid-applied membranes, or elastomeric sealants depending on your roof type.
- Prepare the surface — Clean thoroughly, dry completely, and apply primer where needed.
- Apply waterproofing in multiple layers — Seal vulnerable points first, then coat the full surface.
- Maintain regularly — Inspect twice a year and reapply coatings every 5–10 years.
That dark stain spreading across your ceiling is more than an eyesore — it’s a warning sign. Water damage accounts for roughly 40% of all home insurance claims in the U.S., and roof leaks are one of the leading causes. Left unaddressed, even a small leak can lead to rotting wood, mold growth within 24–48 hours, and structural damage that costs far more to fix than the original leak would have.
The tricky part? Water rarely drips straight down from where it enters. It travels along rafters, sheathing, and insulation before appearing on your ceiling — sometimes several feet away from the actual entry point. That’s what makes roof leakage waterproofing both a detection challenge and a repair science.
I’m Thomas Pruszynski from TJ Builders & Developers, and over more than 20 years of helping homeowners across Northern Illinois protect their properties, I’ve seen how proper roof leakage waterproofing — done right the first time — prevents the cycle of costly, recurring repairs. In this guide, I’ll walk you through exactly how to identify, fix, and prevent roof leaks for lasting results.
Roof leakage waterproofing terms simplified:
Identifying the Root Causes of Roof Leaks

Before we can apply a solution, we have to understand the enemy. In our experience serving areas from Crystal Lake to Schaumburg, we’ve found that roofs rarely fail all at once. Instead, they fail at the “weak links.”
Statistically, over 70% of roof leaks occur at penetrations, flashing, and seams rather than across the main expanse of the roof. Here are the most common culprits we encounter:
- Flashing Failure: Flashing is the thin metal material installed to direct water away from critical areas like chimneys, dormers, and skylights. Over time, the sealant around flashing cracks, or the metal itself rusts and separates.
- Roof Penetrations: Every time something pokes through your roof—like plumbing vents, HVAC curbs, or satellite mounts—it creates a potential entry point. Vent boots, often made of rubber, typically only last 10–15 years before UV radiation causes them to crack.
- Seam Separation: Particularly on flat roofs, seams are the most vulnerable point. As the building expands and contracts with Northern Illinois temperature swings, these seams can pull apart, creating a direct path for water.
- Ponding Water: Flat and low-slope roofs experience leaks at a rate 2–3 times higher than sloped roofs. If water sits for more than 48 hours without draining, it exerts constant pressure on the membrane, eventually finding a microscopic hole.
- UV Degradation: The sun is a slow-motion wrecking ball. Constant UV exposure warps shingles and makes membranes brittle, leading to “alligatoring”—a pattern of cracks that look like reptile skin.
Understanding these causes is the first step in How to Restore Your Roof After Water and Flood Damage. If you catch these issues early, you can often avoid a full replacement.
Need Help With Your Home?
TJ Builders & Developers handles roofing, siding, gutters, windows, home additions, and fire damage restoration for homes and businesses in Lakewood, Crystal Lake, Schaumburg, and nearby McHenry County towns.
- Free, no-obligation estimates
- Licensed & insured
- 20+ years of local experience
Professional Inspection Techniques for Accurate Leak Detection
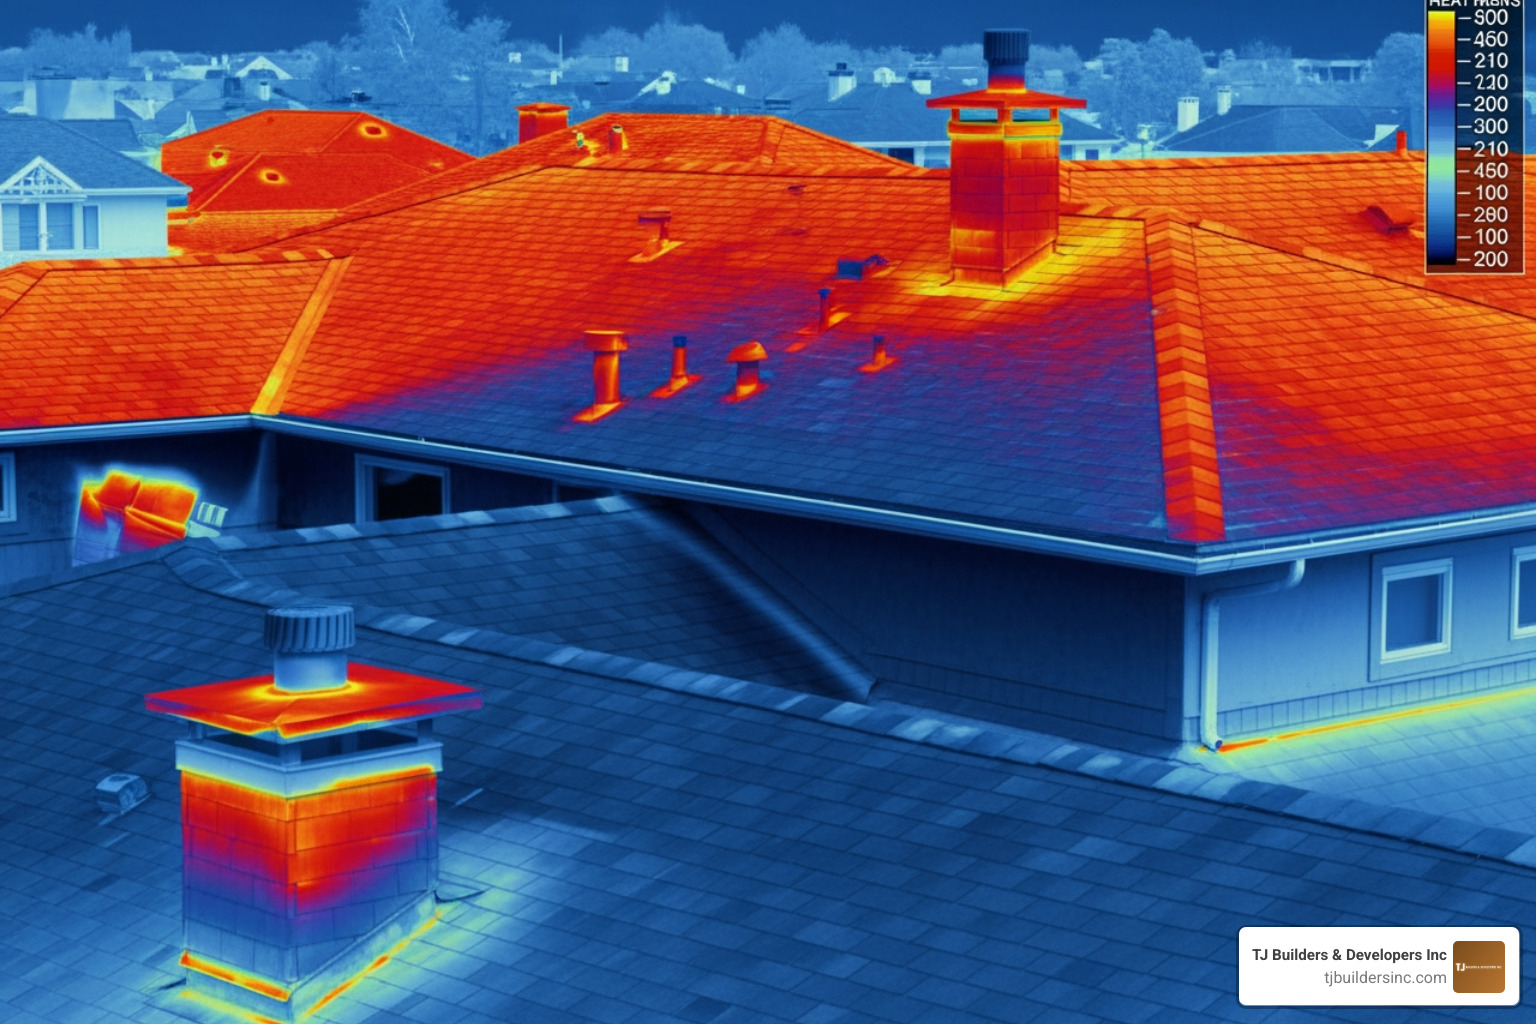
Finding a leak is often harder than fixing it. Because water is sneaky and follows the path of least resistance, the drip in your living room might be entering the roof ten feet away.
When we perform a professional inspection, we use a “top-down, inside-out” approach:
- The Attic Investigation: We head into the attic with high-powered flashlights. We look for “moisture trails” or dark stains on the rafters and the underside of the roof deck. Even if it hasn’t rained recently, water leaves behind tell-tale mineral deposits.
- Infrared Thermography: In May 2026, thermal imaging is a standard tool for pros. Wet insulation retains heat differently than dry insulation. By scanning the roof after sunset, we can see “hot spots” where moisture is trapped under the surface, pinpointing leaks that are invisible to the naked eye.
- Garden Hose Reproduction: For those stubborn leaks that only appear during “driving rain,” we use a controlled water test. Starting at the lowest point of the roof and working upward, we soak specific areas while a second technician monitors the interior for the first sign of a drip.
- Exterior Hotspot Check: We look for “nail pops” (nails that have backed out of the wood), cracked chimney crowns, and clogged gutters. A clogged gutter can cause water to back up under the shingles, mimicking a roof leak.
For more on our diagnostic process, check out our guide on Emergency Roof Repair Leak Detection or refer to the How to Find and Fix Roof Leaks | DIY Leak Repair Guide | Roofs Wiki for a breakdown of common visual signs.
Selecting the Best Materials for Roof Leakage Waterproofing
Choosing the right material is like choosing the right shoes; what works for a hike won’t work for a wedding. In roof leakage waterproofing, the substrate (the material your roof is made of) dictates the solution.

| Material Type | Best For | Estimated Lifespan | Key Benefit |
|---|---|---|---|
| EPDM (Rubber) | Flat Roofs | 25-30 Years | Extremely durable and UV resistant |
| TPO/PVC | Commercial/Modern | 20-25 Years | Reflective, energy-efficient |
| Liquid Membranes | Complex Shapes | 10-15 Years | Seamless, easy to retrofit |
| Bituminous | Industrial/Concrete | 15-20 Years | Heavy-duty, multi-layered |
For a deeper dive into these options, see The Ultimate Guide to Professional Roof Leak Inspection and Repair.
Advanced Liquid Membranes for Roof Leakage Waterproofing
Liquid-applied membranes are the “Swiss Army Knife” of modern roofing. These systems cure into a single, rubber-like sheet that has zero seams. Because seams are where most leaks start, removing them entirely is a game-changer.
These hybrid polymers are particularly effective for retrofit projects in places like Algonquin or Huntley, where we can apply them directly over an existing roof to extend its life by 10–15 years. They are cold-applied, meaning there are no dangerous torches or hot asphalt involved. If you’re dealing with an EPDM roof specifically, you might find the How to Find and Fix a Leak in an EPDM Roof (Late Winter Guide) – EPDM Roof Coatings Blog helpful for understanding how these coatings chemically bond to rubber.
Specialized Sealants for Roof Leakage Waterproofing in High-Movement Areas
Not all sealants are created equal. Traditional “caulk” often dries out and cracks within a year. For lasting results, we use high-performance elastomeric sealants like butyl rubber or silicone. These materials can stretch up to 400% of their original size without breaking. This is vital for our Illinois climate, where a metal roof can expand significantly between a freezing January morning and a hot July afternoon. For more on targeted fixes, see our Roof Repair services.
The Professional Process for Applying Waterproof Coatings
Applying a waterproof coating isn’t just about “painting” the roof. It’s a technical process that requires precision. If you skip a step, the coating will peel off like a bad sunburn.
- Surface Preparation: We start by pressure washing the roof to remove dirt, algae, and loose debris. A coating will only stick as well as the surface it’s applied to.
- Substrate Repair: Before coating, we fix the underlying issues. This means replacing damaged shingles, prying up and resealing old flashing, and ensuring the roof deck is structurally sound.
- Primer Application: Much like painting a car, a primer acts as the “glue” between the roof and the waterproofing layer. It prevents oils in the old roof from bleeding through and weakening the new membrane.
- Reinforcement Mesh: At seams, joints, and around vents, we embed a polyester reinforcement mesh into a “wet” layer of the coating. This provides extra strength at the most vulnerable points.
- Multi-Layer Application: We apply the coating in at least two layers (base coat and top coat). This ensures there are no “pinholes” and provides the necessary thickness (usually measured in “mils”) to withstand the elements.
For a look at the broader context of these repairs, our Roofing Complete Guide offers a wealth of information, while How to Repair a Roof Leak – This Old House provides a great perspective on the DIY vs. Professional balance.
Need Help With Your Home?
TJ Builders & Developers handles roofing, siding, gutters, windows, home additions, and fire damage restoration for homes and businesses in Lakewood, Crystal Lake, Schaumburg, and nearby McHenry County towns.
- Free, no-obligation estimates
- Licensed & insured
- 20+ years of local experience
The Importance of Professional Maintenance and Inspections
The best way to fix a leak is to never have one in the first place. Properly applied waterproofing can reduce leak-related repairs by up to 80%, but it isn’t a “set it and forget it” solution.
In the Village of Lakewood and surrounding areas, our roofs face extreme environmental stress. Between heavy snow loads, spring hail, and intense summer UV rays, your roof is constantly under attack. We recommend a “bi-annual milestone” approach:
- Spring Inspection: After the freeze-thaw cycles of winter, we check for shingle granules in the gutters and ensure ice dams haven’t pried up any edges.
- Fall Preparation: We clear gutters and downspouts. A single handful of leaves can cause a backup that leads to a thousand-dollar leak.
- Post-Storm Check: If we get a major windstorm (above 50 mph) or hail, a quick visual check is essential.
Scientific research on roof membrane aging shows that proactive maintenance can extend a roof’s lifespan by 10–15 years. For a comprehensive checklist, the The Homeowner’s Guide to Roof Leak Repair is an excellent resource for staying ahead of the curve.
Frequently Asked Questions about Roof Waterproofing
What are the most common signs of a hidden roof leak?
Look for “ghosting” on ceilings (faint, yellowish stains), peeling paint near the tops of walls, a musty smell in the attic, or a sudden, unexplained increase in your energy bills. Often, a leak will saturate your insulation, destroying its R-value long before water actually drips onto your floor.
How long does a professional waterproofing treatment last?
A high-quality liquid-applied membrane or professional sealant application typically lasts between 10 and 15 years. However, this depends on the material used and the level of exposure. Silicone coatings are particularly known for their longevity and resistance to ponding water.
Why do flat roofs require more frequent waterproofing than sloped roofs?
Because gravity isn’t on their side. On a sloped roof, water sheds quickly. On a flat roof, water tends to “pond.” This standing water creates hydrostatic pressure, which can force moisture through the tiniest imperfections in a seam or seal.
Conclusion
Dealing with roof leakage waterproofing issues can feel overwhelming, but it doesn’t have to be. By understanding the common failure points—like flashing and penetrations—and choosing high-performance materials like hybrid polymers and elastomeric sealants, you can protect your home for decades.
At TJ Builders & Developers Inc, we take pride in providing the residents of Lakewood, Crystal Lake, Schaumburg, and the surrounding suburbs with reliable, professional workmanship. Whether you need a minor repair or a complete waterproofing system, our goal is your long-term property protection.
Don’t wait for the next storm to test your roof’s integrity. If you’ve noticed the signs of a leak or simply want to ensure your home is ready for the seasons ahead, we’re here to help. Explore our professional roofing services today and let’s make sure your home stays dry, safe, and sound.