
Why Roof Leak Repair Deserves Immediate Attention
Roof leak repair is one of the most urgent home maintenance tasks you can face — and the five most effective fixes are:
- Replace damaged vent boots — cracked rubber collars are the single most common leak source
- Reseal or upgrade step flashing — especially around chimneys and dormers
- Clear and repair roof valleys — debris buildup blocks water flow and causes pooling
- Patch shingles and nail holes — small gaps allow water entry for years before you notice
- Improve attic ventilation and insulation — reduces condensation and ice dam formation
A slow drip after a hard rain can feel minor. It rarely is. Water travels along rafters and sheathing before it ever shows up as a stain on your ceiling — meaning the damage inside your home is almost always further along than it looks. Left unaddressed for even one season, a small leak can cause structural rot, mold growth, and insulation damage worth thousands of dollars to fix.
According to industry data, roof leaks account for roughly 25% of all homeowners insurance claims filed each year — making them the most common source of home damage claims. And mold can begin growing in as little as 48 hours after moisture enters your home, adding health risks on top of structural ones.
The good news: most roof leaks follow predictable patterns. They almost always start at the same handful of weak points — pipe boots, flashing, valleys, and shingle edges. Once you know where to look and what to fix, many repairs are straightforward.
I’m Thomas Pruszynski of TJ Builders & Developers Inc, and with over 20 years of hands-on experience in roof leak repair and exterior restoration across Northern Illinois, I’ll walk you through the five key changes that stop most leaks for good.
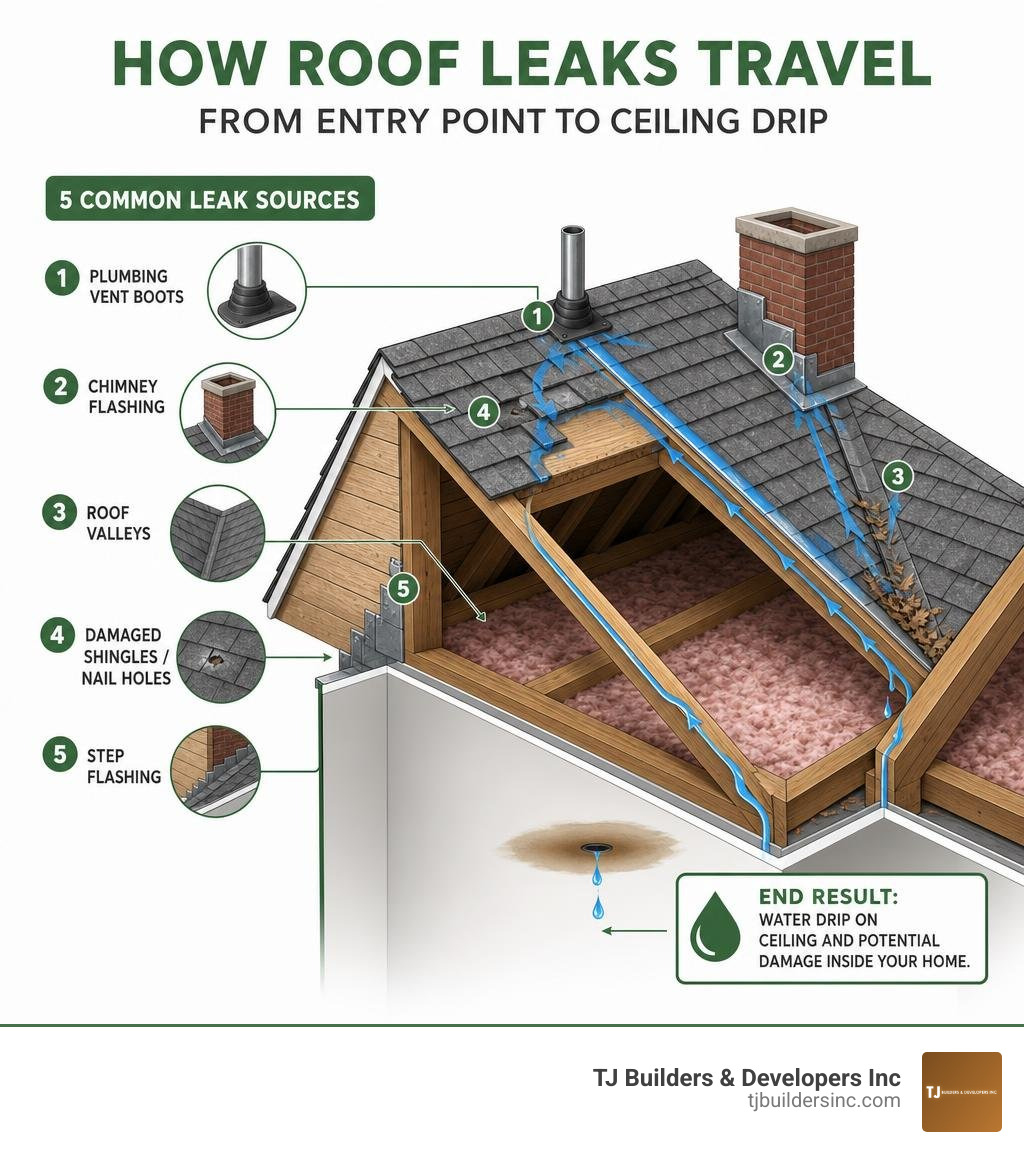
Roof leak repair terms simplified:
Finding the Source: How to Identify a Roof Leak
Before you can fix a leak, you have to find it. This is often the trickiest part of the entire process. Water is incredibly patient and devious; it rarely travels in a straight line from the roof to your ceiling. Instead, it enters through a compromise in the shingles or flashing, runs down the slope of the roof deck, clings to a rafter, and finally drips onto your drywall several feet away from the initial entry point.
To find the true origin of the water intrusion, you need to conduct a systematic search. If you have active dripping, your first priority is interior triage: place a bucket under the drip and, if the drywall is sagging or bulging, use a small nail or screwdriver to puncture a hole in the center of the bulge. This relieves the water pressure and prevents a sudden, messy ceiling collapse. Once the immediate interior threat is controlled, you can transition to finding the actual source of the leak on the roof deck. For an in-depth look at how we perform these diagnostic services, read our guide on Emergency Roof Repair Leak Detection.
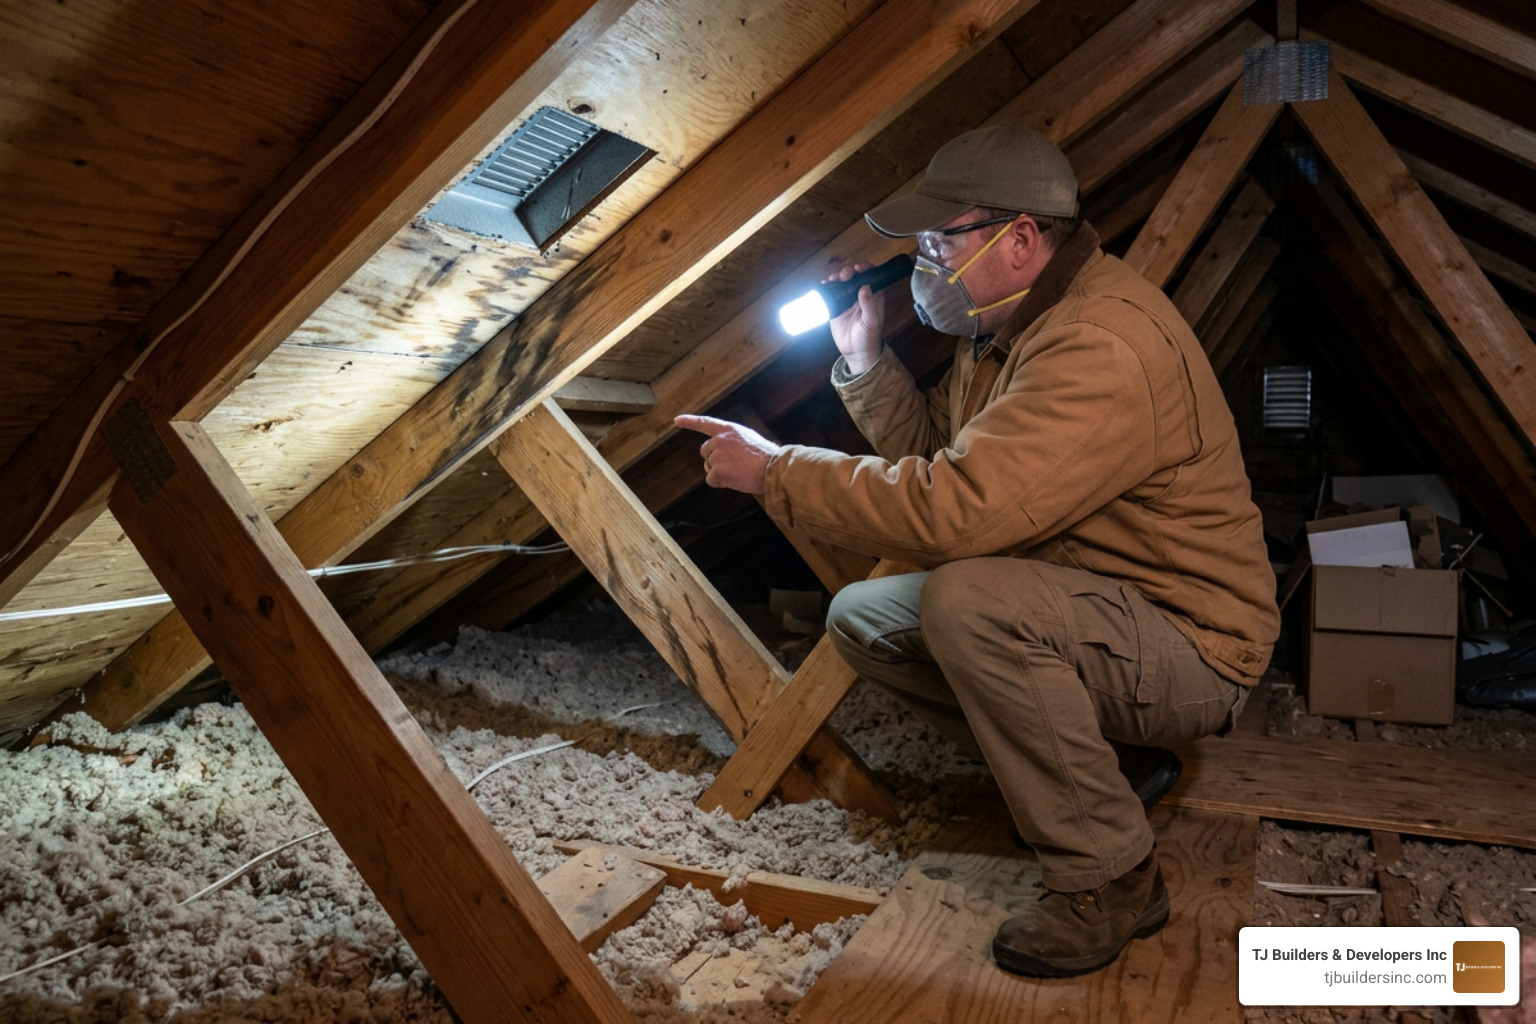
Tracing Water Trails in the Attic
The safest and most effective place to start your search is in the attic. Grab a bright flashlight and head upstairs during or immediately after a rainstorm.
Turn off the attic lights and look for any visible daylight shining through the roof deck. Next, turn on your flashlight and examine the underside of the roof sheathing and the vertical rafters. Look for:
- Dark water stains or damp spots on the wood.
- White, powdery mineral deposits (efflorescence) left behind by evaporating water.
- Active mold growth or black mildew spots on the sheathing.
- Soft, rotting wood that yields to the touch.
Water stains on the plywood sheathing almost always point to the entry source. Trace these stains “uphill” to the highest point of moisture. This highest point is typically where the water is penetrating the roof’s exterior layer, often directly beneath a roof penetration like a vent pipe, chimney, or skylight. If the wood is dry but you suspect an intermittent leak, using a professional moisture meter can help you detect hidden dampness within the wood fibers.
The Garden Hose Test for Accurate Detection
If a visual inspection in the attic doesn’t reveal the source, you can recreate a rainstorm using a standard garden hose. This test requires two people: one on the roof with the hose and one in the attic with a flashlight and a phone to communicate.
When performing a hose test, follow these safety precautions and steps:
- Never go onto a wet roof or conduct this test during active rain or high winds.
- Start low and work your way up. If you start spraying at the top of the roof, water will run down and mask the exact location of the leak.
- Isolate one area at a time. Begin by spraying the lowest roof penetrations, such as a plumbing vent boot. Spray the area for 5 to 10 minutes while your helper watches the attic sheathing directly below.
- Use sufficient water volume to mimic a heavy downpour, but do not use a high-pressure nozzle that could force water upward under shingles artificially.
- Be patient. It can take several minutes for water to seep through the layers of shingle, underlayment, and deck before it becomes visible inside.
For more detailed troubleshooting tips during this test, refer to the step-by-step instructions in this guide on How to Fix a Leaky Roof.
Five Key Changes for Effective Roof Leak Repair
Once you have identified the source of the leak, it’s time to address the root cause. Most residential roof leaks are caused by failures in flashing, damaged shingles, compromised valleys, or poor ventilation.

By focusing on these five critical areas, you can resolve existing water intrusion issues and reinforce your roof against future storms. For a comprehensive overview of how these solutions prevent water damage, explore our resource on How to Fix Roof Leakage Waterproofing Issues for Lasting Results.
1. Replacing Damaged Vent Boots
Plumbing vent pipes exit your roof to exhaust sewer gases, and they are sealed using a specialized piece of flashing called a vent boot. The base of the boot is usually made of metal or plastic, while a flexible rubber collar hugs the pipe to create a watertight seal.
Because these boots are constantly exposed to intense UV rays and extreme temperature swings in Northern Illinois, the rubber collar is highly susceptible to UV degradation. Over a period of 8 to 15 years, the rubber dries out, becomes brittle, and splits. This creates a direct path for rainwater to run down the outside of the pipe and straight into your ceiling.
Physically flexing the rubber collar with your hand during an inspection will often reveal hairline cracks that are invisible from the ground. If the rubber is split or rotted, the entire boot should be replaced.
For temporary relief, a slip-on replacement collar can be installed over the existing damaged boot, but a full replacement of the vent boot is the only reliable long-term solution. To learn more about the differences between temporary and permanent fixes for vent boots, see How to Fix a Roof Leak: Temporary & Permanent Repairs 2026.
2. Upgrading and Resealing Step Flashing
Flashing is the unsung hero of your roof. These thin pieces of metal are installed at intersections where the roof meets vertical surfaces, such as chimneys, dormers, and walls. Step flashing consists of individual L-shaped metal cards that overlap each other and “step” up the roof line beneath the shingles and siding.
Step flashing fails when:
- High winds pull the flashing away from the wall.
- Nails rust out or loosen.
- The original installer failed to overlap the pieces correctly (which accounts for roughly 30% of flashing failures).
- The sealants between the metal and masonry degrade.
To repair minor gaps in step flashing, you can clean out the old, dried sealant and apply a high-quality polyurethane sealant. Never use silicone sealant on masonry or painted surfaces; silicone does not bond well to these materials and will peel away after a single winter freeze-thaw cycle. If the metal flashing itself is rusted through or severely warped, the surrounding shingles and siding must be carefully loosened so new step flashing cards can be slid into place and secured with roofing cement.
3. Clearing and Repairing Roof Valleys
A roof valley is the V-shaped channel formed where two sloping roof sections meet. Because valleys channel massive volumes of water down to your gutters, they are highly vulnerable to wear and tear.
The two main issues that plague roof valleys are:
- Debris accumulation: Leaves, pine needles, and twigs naturally gather in valleys. This debris acts as a dam, slowing down the water flow and forcing water to pool. Over time, pooling water can back up under the shingles.
- Ice dams: In Northern Illinois, snow melts on the warmer upper sections of the roof and refreezes in the colder valleys and eaves. This ice buildup prevents melting snow from draining, forcing water backward under the shingles and underlayment.
To prevent valley leaks, clear out debris at least twice a year. If the valley lining (either metal or a heavyweight roll-membrane) is punctured or worn out, a professional repair is required to lift the surrounding shingles, install a self-adhering ice-and-water shield membrane, and lay down new valley lining.
4. Patching Minor Shingle and Nail Hole Issues
Shingles can become cracked, curled, or completely blown off during severe weather. Additionally, small nail holes left behind by old satellite dish mounts, roof brackets, or loose shingle nails can allow water to slowly seep into your roof deck for years before the damage becomes visible inside.
For minor shingle repairs, you can apply a specialized roofing cement underneath cracked or curling shingles to seal them back down. If a shingle is severely damaged or missing, it must be removed and replaced:
- Use a flat pry bar to carefully release the sealant strip of the shingles in the row above the damaged one.
- Remove the nails securing the damaged shingle and slide it out.
- Slide a new, color-matched shingle into place, secure it with hot-galvanized roofing nails, and apply a small dab of roofing cement to the nail heads.
For small nail holes, sliding a small piece of metal flashing underneath the shingle and securing it with a dab of sealant is an effective way to prevent water from reaching the sheathing. For more practical tips on managing minor shingle fixes safely, check out Stop the Drip with These Simple DIY Roof Repair Tips.
5. Improving Attic Ventilation and Insulation
It might surprise you to learn that some “roof leaks” don’t actually come from rain or snow. Instead, they are caused by excess humidity and condensation within your attic.
When warm, humid air from your living space escapes into a poorly insulated attic during the winter, it hits the freezing cold underside of the roof deck. This causes the moisture to condense into water droplets or frost, mimicking an active roof leak. Furthermore, poor ventilation contributes directly to the formation of ice dams by allowing the roof deck to warm up unevenly.
To resolve these issues:
- Upgrade attic insulation to block heat transfer from your home.
- Ensure intake vents (soffits) and exhaust vents (ridge or box vents) are clear and balanced to maintain a cold, uniform roof temperature.
- Seal bypasses where warm air leaks into the attic around light fixtures, pipes, and attic hatches.
Professional vs. DIY: When to Call an Expert
While cleaning out gutters or sealing a minor shingle crack are manageable tasks for many homeowners, roof repair can quickly become dangerous and complex.
Understanding your limits is crucial for your safety and the long-term health of your home. For a detailed breakdown of when to hire a specialist, read The Ultimate Guide to Professional Roof Leak Inspection and Repair.
Safety and Structural Limits of DIY Roof Leak Repair
Working on a roof presents significant safety hazards. Before attempting any DIY work, consider the following structural and physical limitations:
- Roof Pitch: Steeply sloped roofs require specialized fall protection equipment, including harnesses, ropes, and roof anchors. If you do not have OSHA-compliant safety gear, do not walk on your roof.
- Soft Decking: If you feel soft or spongy spots underfoot while walking on the roof, get off immediately. This indicates that the plywood decking beneath the shingles is rotted and could collapse under your weight.
- Mold and Water Damage: If a leak has been active for a while, the attic insulation and drywall may be saturated. Handling extensive water damage and mold remediation requires professional containment and drying equipment to prevent health risks.
The Long-Term Value of Professional Roof Leak Repair
Hiring a professional roofer ensures that both the visible symptoms and the underlying causes of your leak are addressed correctly. Professional repairs offer:
- Workmanship and Durability: Experienced roofers use premium materials and proven installation techniques that stand up to Northern Illinois’ harsh weather.
- Warranties: Professional repairs often come with warranties that protect your investment.
- Advanced Diagnostics: Roofers use tools like thermal imaging cameras and moisture meters to find hidden leaks that are easily missed during a basic DIY inspection.
To learn more about how we protect homes in our local community, see Expert Roof Repair Services in Lakewood Protecting Your Home.
Understanding Repair Costs and Insurance Coverage
The cost of roof leak repair varies depending on the materials used, the extent of the damage, and the complexity of the structure. Knowing what to expect can help you budget effectively. For more details, explore The Price of a Dry Ceiling and Other Roof Repair Costs.
| Roof Material Type | Average Repair Cost | Typical Lifespan |
|---|---|---|
| Flat Roof (Membrane) | $300 – $600 | 15 – 20 Years |
| Asphalt Shingles | $300 – $1,000 | 20 – 25 Years |
| Wood Shakes | $500 – $1,200 | 30 – 40 Years |
| Metal Roofing | $500 – $1,500 | 50+ Years |
| Tile (Clay/Concrete) | $600 – $1,800 | 50 – 100 Years |
| Slate | $1,000 – $2,500 | 100+ Years |
Factors Influencing Repair Expenses
Several variables will determine where your repair falls on the price spectrum:
- Labor Costs: Local labor rates and the complexity of the roof design (such as multiple dormers or steep pitches) affect the total cost.
- Extent of Damage: A simple pipe boot replacement is far less expensive than repairing structural rafters and replacing rotted roof decking.
- Material Compatibility: Matching existing specialty materials like slate, concrete tile, or custom metal panels requires specialized craftsmanship and higher material costs.
Navigating Homeowners Insurance Claims
Whether your homeowners insurance covers a roof leak depends entirely on the cause of the damage:
- Covered Events: Insurance typically covers repairs if the leak was caused by a sudden, accidental event, such as a severe hailstorm, high winds, or a fallen tree limb.
- Excluded Events: Leaks caused by gradual wear and tear, lack of maintenance, or an aging roof that has outlived its natural lifespan are generally not covered.
- Documentation: If you suspect storm damage, document everything immediately. Take clear, dated photographs of the damage on the roof and any interior water stains before repairs begin.
Frequently Asked Questions About Roof Leaks
Can I temporarily fix a roof leak from the inside?
You can perform temporary interior mitigation to stop active dripping by applying a fast-drying roofing cement or a bituminous patch to the underside of the roof deck from inside the attic. However, this is only a temporary measure to protect your ceilings. Water will continue to rot the wood from the outside until the exterior entry point is properly repaired.
How quickly does mold grow after a leak starts?
Mold spores can begin to colonize and grow in as little as 24 to 48 hours once they find a moisture source. Because mold poses serious respiratory health risks and spreads quickly through drywall and insulation, addressing leaks immediately is critical.
What preventive maintenance avoids future leaks?
To prevent future leaks, we recommend:
- Cleaning gutters twice a year to ensure water drains freely away from your roof line.
- Trimming overhanging tree branches to prevent them from scraping shingles or falling during high winds.
- Scheduling professional inspections annually (ideally in spring or fall) to catch cracked sealants, loose flashing, or damaged shingles before they turn into active leaks.
Conclusion
A leaking roof is a serious threat to your home’s structural integrity, but addressing the issue doesn’t have to be overwhelming. By understanding the common failure points — such as vent boots, step flashing, and valleys — you can take proactive steps to protect your property.
At TJ Builders & Developers Inc, we have spent decades providing reliable, high-quality exterior residential improvements and restoration services throughout Lakewood, Crystal Lake, and the surrounding Northern Illinois communities. We pride ourselves on professional workmanship, durable materials, and long-term property protection.
If you are dealing with an active leak, suspect hidden water damage, or simply want to schedule a professional inspection to safeguard your home, we are here to help. Contact us today to secure your home’s envelope and enjoy the peace of mind that comes with a dry, secure roof. Explore our comprehensive services at Roof Repair.