
Dealing with roof issues in Lakewood can feel like a real headache, right? Whether it’s a sudden leak during a storm or just that nagging drip you’ve been ignoring, getting it fixed properly is super important. This article dives into what you need to know about roof repair in Lakewood, from understanding when it’s an emergency to making sure the job gets done right, and even how to avoid problems down the road. We’ll cover everything from insurance claims to permits and what to look for in a good local roofer.
Key Takeaways
- When a storm hits Lakewood, be ready for emergency roof repair needs, including identifying leaks and understanding common causes like heavy snow or falling branches.
- Familiarize yourself with your insurance policy and how to provide clear documentation, like digital reports with photos, to support your roof damage claims.
- Understand that permits are usually required for significant roofing work in Lakewood, and know the exemptions for minor repairs to avoid issues.
- Ensure any roof repair or replacement meets technical code requirements and material standards for wind resistance to pass inspections.
- Choose experienced local roofers in Lakewood by checking their licenses, insurance, and understanding their local knowledge to ensure quality workmanship and warranties.
Addressing emergency roof repair needs in Lakewood
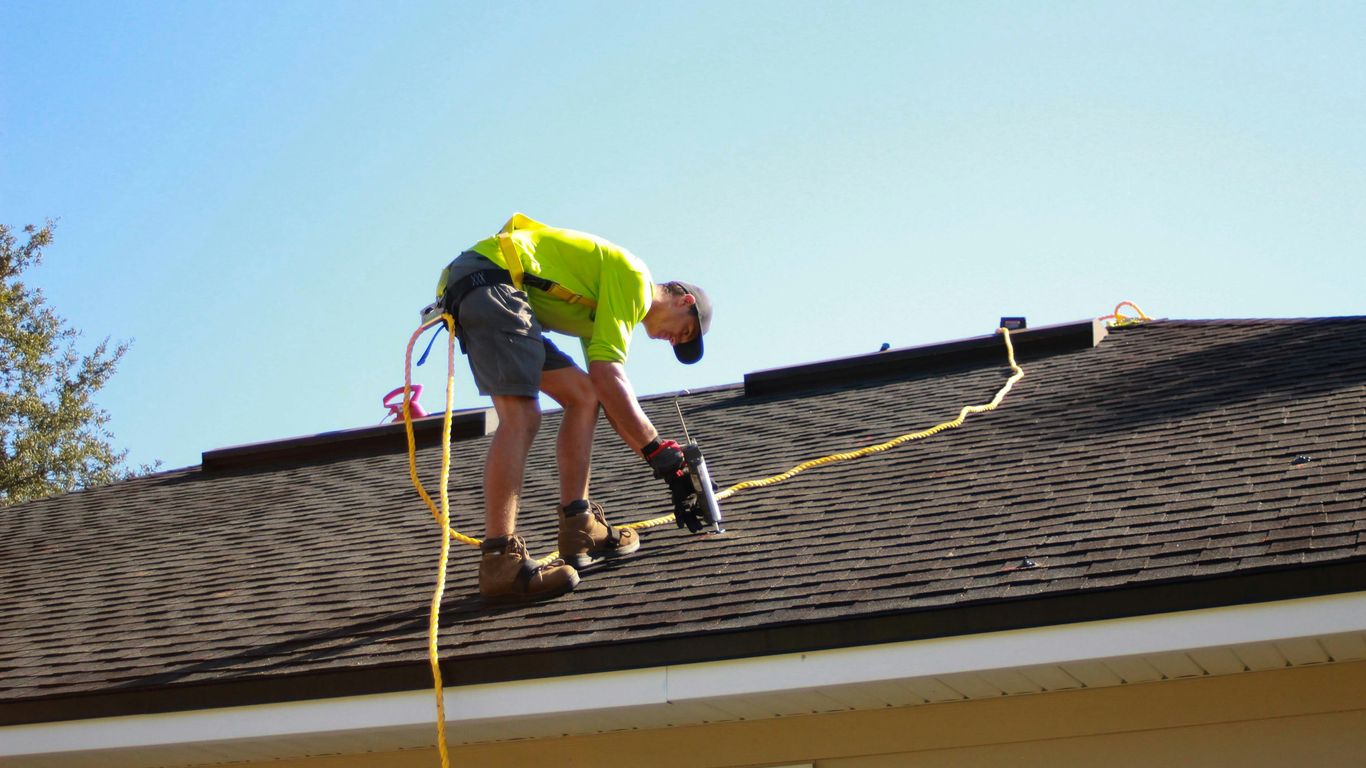
When a storm rolls through Northern Illinois, it doesn’t always leave a polite calling card. Sometimes, it leaves a gaping hole or a steady drip in your living room. Identifying when a situation has crossed the line from a “weekend project” to a true roofing emergency is the first step in protecting your home. In our experience, a roofing emergency is any event that compromises the structural integrity of the roof or allows water to enter the home’s interior.
Identifying the need for emergency roof repair
Structural damage is perhaps the most obvious sign. If a heavy tree limb comes crashing down, you aren’t just looking at broken shingles; you’re looking at potential rafters snapping and a direct path for the elements to enter. Water intrusion is the silent enemy. While a massive branch is loud, a failed flashing or a wind-stripped section of shingles can be quiet until the ceiling starts to sag. We utilize advanced emergency roof repair leak detection techniques to find the entry point, which isn’t always directly above the spot where the water is dripping. Because of the way roofs are constructed, water can travel along rafters for several feet before finally showing its face on your drywall. Prompt stabilization is the only way to prevent secondary issues like rot and electrical shorts.
Common causes of emergency roof repair
In Lakewood and the surrounding Chicago suburbs, our weather is nothing if not “enthusiastic.” We see several recurring themes when we get those midnight emergency calls:
- Active Leaks: Water is entering the living space or attic.
- Structural Compromise: A sagging roofline or a hole from a fallen tree.
- Exposed Decking: Large sections of shingles are missing, leaving the wood vulnerable.
- Fire Damage: The roof’s integrity has been compromised by heat or flames.
- Immediate Safety Risks: Anything that makes the home unsafe to occupy.
Winter-specific emergencies in Northern Illinois
Lakewood winters bring a different set of rules. While summer is about wind and rain, winter is about weight and ice.
- Ice Dams: These occur when heat from your attic melts snow on the roof, which then refreezes at the cold eaves. This creates a dam that forces liquid water up under your shingles. Professional ice dam removal is essential to stop this cycle without damaging the shingles.
- Heavy Snow Load: A cubic foot of wet snow can weigh up to 20 pounds. After a major blizzard, the sheer weight can cause older roofs to groan or sag. We provide roof snow removal to alleviate this pressure before a collapse occurs.
- Freeze-Thaw Cycles: Water expands when it freezes. If you have a small crack in your masonry or a loose shingle, the ice will widen that gap every night, turning a tiny flaw into a major leak by spring.
When we arrive for an emergency roof repair Lakewood call, our first priority is safety and securing the “envelope” of the home. If a tree has created a large hole, we don’t just use a tarp; we use 5/8″ exterior-grade plywood for a “board-up.” This prevents animals from entering and provides structural reinforcement.
| Feature | Emergency Tarping | Permanent Shingle Repair |
|---|---|---|
| Primary Goal | Stop active leaks immediately | Restore roof lifespan and aesthetics |
| Durability | 30–90 Days | 20–50 Years |
| Installation Time | 1–3 Hours | 1–2 Days |
| Material | Reinforced Polyethylene / Plywood | Asphalt, Metal, or Composite Shingles |
| Permit Required? | Usually No (Emergency Mitigation) | Yes (In Lakewood and most IL suburbs) |
A professional tarp job is designed to last between 30 and 90 days. This gives you enough time to meet with your insurance adjuster and choose the right materials for a permanent fix without worrying about every passing cloud. We use specific “sandbagging” or “fastening” techniques depending on the slope of your roof to prevent wind uplift, which is a common failure point for DIY tarping.
Navigating the insurance and restoration process
Understanding insurance policy clauses
Dealing with roof damage often means dealing with your insurance company, and that can feel like a whole other job. Most policies have what’s called a "reasonable steps" clause. Basically, it means you’re expected to do what you can to stop more damage from happening after something like a storm hits. This is why getting a tarp on a leaky roof quickly is super important – it shows your insurance company you’re being responsible. It’s always a good idea to actually read through your policy, or at least the parts about storm damage, so you know what’s covered and what they expect from you. Sometimes, leaks happen because of a lack of upkeep, and those might not be covered. It’s best to review your policy details and chat with a contractor who knows how to document things for insurance claims. Understanding insurance policy clauses can make a big difference in how smoothly your claim goes.
Providing comprehensive digital reports for claims
When you file a claim for storm damage, your insurance adjuster needs solid proof. That’s where we come in. We don’t just tell you what’s wrong; we show you. We put together detailed digital reports that include high-resolution photos of any damage we find, like missing shingles or dents. We also take moisture readings if water has gotten inside. This professional documentation makes the adjuster’s job easier and helps make sure you get the coverage you’re entitled to. It speeds things up and cuts down on back-and-forth.
Professional standards for emergency roof repair
When we show up for an emergency repair, our first job is to secure your home. If a tree has punched a big hole in the roof, we don’t just throw a tarp over it. We use sturdy plywood for a “board-up” to keep animals out and add some strength. A professional tarp job is meant to last a while, usually between 30 and 90 days. This gives you time to work with your insurance and pick out permanent materials without worrying about every little rain shower. We use specific techniques to make sure the tarp stays put, even in strong winds, which is something DIY jobs often struggle with. The goal is always to stop active leaks right away, and then we can work on permanent fixes that will last for years.
Here’s a quick look at what temporary tarping and permanent repairs involve:
| Feature | Emergency Tarping | Permanent Shingle Repair |
|---|---|---|
| Primary Goal | Stop active leaks immediately | Restore roof lifespan and aesthetics |
| Durability | 30–90 Days | 20–50 Years |
| Installation Time | 1–3 Hours | 1–2 Days |
| Material | Reinforced Polyethylene / Plywood | Asphalt, Metal, or Composite Shingles |
| Permit Required? | Usually No (Emergency Mitigation) | Yes (In Lakewood and most IL suburbs) |
When a roofing emergency happens, the main focus is stopping further damage. This means taking quick action to protect your home’s interior and structure from the elements. Documenting the damage thoroughly is key for insurance claims, and professional temporary measures like tarping are designed to provide a reliable, short-term shield.
Understanding permit requirements for Lakewood roofing inspections
When you’re dealing with roofing work, whether it’s a full replacement or a significant repair, you’ll likely need to get a permit from the city. It might seem like a hassle, but it’s actually a good thing. It means the city is making sure the work done meets safety standards and will hold up against our local weather. Skipping this step can lead to fines, problems when you try to sell your house, or even having to redo the work. So, it’s best to get it right from the start.
When a permit is mandatory for roofing work
Generally, if your roofing project involves anything more than just patching up a few small spots, you’ll need a permit. This usually includes:
- Full tear-offs: When all the old roofing material is removed down to the roof deck.
- Structural repairs: If you need to replace any damaged or rotted plywood or OSB decking.
- Material changes: Switching to a significantly different type of roofing material, like going from asphalt shingles to heavy tile, often requires a structural review.
Basically, if the work affects the structural integrity or the basic waterproofing system of your roof, expect to need official approval. It’s your best insurance policy to make sure the job is done correctly and documented. For example, in Lakewood, CO, a permit is typically required for full replacements and structural repairs.
Exemptions for minor repairs
Not every little fix requires a trip to the building department. There are some exceptions for smaller jobs. For instance, in Lakewood, CO, repairs that cover less than 100 square feet usually don’t need a permit. Also, minor shingle overlays on less than 25% of the roof area might be exempt. However, we generally advise against shingle overlays because they can trap heat and shorten the lifespan of your new shingles. It’s always a good idea to check with your local building department to be sure what qualifies as a "minor" repair in your specific area.
Regional variations in permit portals and fees
If you’ve dealt with permits in different towns, you know that each city has its own system. Some use online portals, while others might have different processes. For example, Lakewood, CO, uses the eTRAKiT portal for permit applications and inspections, often with a flat fee of around $110 for residential roofing. In Lakewood, OH, you might use CitizenServe, and fees can vary. Lakewood, CA, has moved to the OpenGov portal. It’s important to know which system your specific Lakewood uses, as well as the associated costs. This ensures you’re applying through the correct channels and budgeting accurately for the project.
Getting the permit process right is more than just paperwork; it’s a contract with the city that ensures your home’s safety and structural integrity are up to code. It’s a vital step that protects your investment and avoids costly headaches down the road.
Key technical code requirements and material standards
When you’re getting work done on your roof, it’s not just about making it look good. Inspectors are checking to make sure everything meets specific technical rules. These aren’t just suggestions; they’re there to make sure your roof can handle whatever the weather throws at it, from heavy snow to strong winds.
Ensuring compliance with the International Residential Code
The International Residential Code (IRC) is the big rulebook that most local building departments, including those in Lakewood, follow. It covers pretty much everything about how homes should be built, and that definitely includes your roof. When you get a permit for roofing work, you’re essentially agreeing to build according to these standards. This means things like how your roof deck is attached, the type of underlayment used, and how shingles are fastened all have to meet IRC requirements. It’s all about making sure your roof is structurally sound and can protect your home for years to come.
Material standards for wind resistance
Lakewood can get some serious wind, so your roofing materials need to be up to the task. For asphalt shingles, this usually means they need to meet certain classifications, like ASTM D 7158, specifically Class F or H. These ratings come from tests that show how well the shingles can stand up to high winds without blowing off. Using materials that meet these standards is super important, especially if you’re dealing with repairs after a storm. It’s not just about replacing what’s missing; it’s about making sure the new materials can handle the next gust.
Mid-roof inspection process for specific materials
For certain types of roofing, like tile or metal roofs (unless it’s standing seam), there’s an extra inspection step called a "mid-roof" inspection. This happens after the underlayment and flashing are in place, but before the actual tiles or metal panels are installed. The inspector needs to see that the foundation of your roof’s waterproofing system is correct. This is a really important check, especially after storm damage, because it verifies that the layers underneath are properly installed and ready to protect your home. It’s a way to catch potential problems before they get covered up.
Inspectors are looking for specific technical benchmarks, not just a pretty finish. They want to see that the roof is built to last and can withstand the local climate’s demands.
Here’s a quick look at what might be checked:
- Fastening Patterns: How many nails are used per shingle and where they are placed. Too few or misplaced nails are a common reason for inspection failure.
- Flashing: This is critical around chimneys, vents, and skylights to prevent water intrusion. Proper installation here is key.
- Drip Edge: This metal flashing at the edge of the roof helps direct water away from the fascia and into the gutters.
- Pipe Boots: Any vents that go through the roof need proper flashing and new rubber boots to prevent leaks. Reusing old ones is a no-go.
Getting these details right from the start means fewer headaches down the road and a roof that truly protects your home. If you’re unsure about any of these requirements, it’s always best to consult with experienced local roofers in Lakewood who understand the building codes.
Common violations and how to avoid failed inspections
Fastening and nailing pattern requirements
This is probably the most common reason a roof inspection doesn’t go as planned. It sounds simple, right? Just nail the shingles down. But there’s a specific way it needs to be done. Most asphalt shingles need about four to six nails per shingle. And it’s not just about the number; it’s where those nails go. They have to be in the designated "nailing strip." If the nails are too high, they won’t grip the shingle below properly. Too low, and they’re exposed to the weather, which can lead to rust and failure down the road. For heavier materials like tile, the rules get even stricter. It’s all about making sure the roof can handle the wind and weather it’s designed for.
Flashing and penetration error avoidance
Think of flashing as the waterproof "armor" for the vulnerable spots on your roof. These are the areas where something pokes through the roof, like chimneys, vent pipes, or skylights. If the flashing isn’t installed just right, water can sneak in. For chimneys wider than 30 inches, a "cricket" or saddle is often required to help direct water away. And don’t forget the drip edge – that metal strip needs to be on both the eaves (the lower edges) and the rakes (the sloped sides) to guide water away from the fascia and sheathing. Replacing old, cracked rubber boots on vent pipes is also a must; reusing them is a surefire way to fail an inspection.
Drip edge and pipe boot installation standards
When it comes to keeping water out, the details really matter. The drip edge, that metal flashing along the roof’s edge, needs to be installed correctly. It should overlap at the ends and extend down below the roof sheathing. This prevents water from getting behind the gutters or into the fascia board. Similarly, vent pipe boots, the rubber seals around plumbing vents, are critical. These rubber seals can crack over time due to sun exposure. Reusing old, worn-out boots is a common mistake that inspectors will catch. A proper repair or replacement involves removing the old flashing and installing new step flashing to create a watertight seal. It’s these small, detailed steps that make a big difference in passing inspection and preventing future leaks.
Inspectors are trained to spot these common oversights. They’re not just looking at the big picture; they’re examining the details that ensure your roof’s long-term performance and safety. Paying close attention to fastening patterns, proper flashing installation around all penetrations, and correctly installed drip edges are key to a smooth inspection process.
Choosing between roof repair and full replacement
Deciding whether to patch up your current roof or go for a complete overhaul can be a tough call. It’s not always obvious when a few repairs will do the trick and when it’s time for a whole new roof. We always aim to give you the straight scoop on what’s best for your home and your wallet.
Honest Advice on Fixing Versus Replacing
Sometimes, a small problem like a few missing shingles or a minor leak can be fixed without breaking the bank. These kinds of repairs can actually extend the life of your roof for several more years, which is great if you’re not quite ready for a big project. We’ll always look at the damage and tell you honestly if a repair is a solid, long-term solution or just a temporary band-aid. If the issues are isolated and the rest of your roof is in decent shape, patching it up might be the way to go. It’s all about assessing the situation realistically.
When Full Replacement is the Only Option
However, there are times when repairs just won’t cut it. If your roof is old and has reached the end of its typical lifespan (usually around 20-25 years for asphalt shingles), or if it’s suffered widespread damage from a major storm, a full replacement is often the more sensible and cost-effective choice in the long run. Trying to patch up a roof that’s fundamentally failing can lead to more problems down the road, costing you more in the end. A complete roof installation and replacement means we remove everything down to the deck, inspect for any underlying issues like rot, and then install a completely new, robust roofing system. This gives you peace of mind and a roof that’s built to last.
Careful Material Matching for Historic Homes
For older homes, especially those with historical significance, choosing between repair and replacement gets a bit more nuanced. We understand that maintaining the original character of a historic property is important. This means that if repairs are needed, we take extra care to source materials that match the existing ones as closely as possible. If a full replacement is necessary, we work diligently to select materials that are period-appropriate and meet modern building codes while preserving the home’s unique aesthetic. It’s a delicate balance, but one we’re experienced in handling.
The decision between repairing and replacing your roof isn’t just about the immediate cost; it’s about the long-term value and protection it offers your home. We’re here to help you make the most informed choice for your specific situation.
Professional tarping and board-up procedures
When a roofing emergency strikes, the immediate goal is to stop further damage. This is where professional tarping and board-up procedures come into play. It’s not just about throwing a sheet over the problem; it’s a critical stabilization step that protects your home’s interior from the elements until permanent repairs can be made. Think of it as a temporary bandage for your roof.
Effective temporary measures for stabilization
After a severe storm or unexpected damage, water can quickly find its way into your home. Professionals act fast to secure the structure. This often involves assessing the extent of the damage to determine the best course of action. For smaller breaches, a heavy-duty tarp might suffice. However, if there’s a significant hole, like one caused by a fallen tree limb, a more robust solution is needed.
- Assess the damage: A quick but thorough evaluation of the compromised area.
- Stop active leaks: Prioritize areas where water is actively entering the home.
- Prevent further intrusion: Implement measures to keep rain, snow, and wind out.
Professional tarping and board-up details
Professional tarping goes beyond what a homeowner might do. It involves using specialized, reinforced materials designed to withstand wind and weather for a specific period, typically 30 to 90 days. This gives you enough time to work with your insurance adjuster and plan for lasting repairs. The process includes:
- Securing the tarp: Using wooden strips or specialized fastening techniques to anchor the tarp firmly, preventing wind uplift. This is crucial, as a poorly secured tarp can become a hazard itself.
- Board-ups: For larger openings, exterior-grade plywood is used to create a solid barrier. This not only stops water but also prevents animals from entering the damaged structure.
- Detailing: Paying attention to edges, seams, and potential weak points to create a watertight seal.
Temporary tarp lifespan and maintenance
A professionally installed tarp is a temporary fix, not a permanent solution. Its lifespan depends on several factors:
- Weather exposure: High winds, intense sun (UV rays), and heavy precipitation can degrade the tarp material over time.
- Installation quality: How well the tarp was secured initially plays a big role.
- Material type: Heavy-duty, UV-resistant tarps last longer than standard ones.
It’s important to remember that even a professional tarp may need adjustments or minor repairs during its service life. If you notice any signs of wear, fraying, or shifting, it’s best to contact your roofer for a quick check-up. This proactive approach can extend the tarp’s effectiveness and prevent new leaks from developing before the permanent repairs are completed. For homeowners dealing with the aftermath of storm damage, understanding these temporary measures is key to protecting their property. If you’re in need of immediate assistance, local roofers in Lakewood can provide prompt emergency services.
Preventing future leaks with proactive maintenance
It’s easy to forget about your roof once the weather is nice, but a little bit of regular attention can save you a whole lot of trouble down the road. Think of it like taking your car in for oil changes – you do it to keep things running smoothly and avoid a breakdown. Your roof is no different.
Gutter cleaning schedule and importance
Gutters are like the drainage system for your house. If they get clogged up with leaves, twigs, and whatever else the wind blows in, water has nowhere to go. This can cause it to back up under your shingles, rot out the wood underneath, and even lead to water seeping into your walls. For most homes around here, cleaning them out twice a year is a good idea. If you’ve got a lot of big trees nearby, you might need to do it more often, maybe three or four times a year. It’s a small job that really makes a big difference in keeping water away from your home’s foundation and structure.
Tree trimming for roof protection
Those beautiful trees around your home are great, but their branches can cause problems for your roof. When branches hang too low, they can rub against your shingles, wearing them down over time. They also create shady spots where moisture can linger, encouraging moss or algae growth. Plus, if a big storm hits, a heavy branch could easily fall and cause serious damage. Keeping branches trimmed back at least 10 feet from your roof line is a smart move. It helps prevent that constant scrubbing and reduces the risk of a falling limb causing a roofing emergency.
Attic ventilation and skylight maintenance
Your attic needs to breathe, just like the rest of your house. Proper attic ventilation helps regulate temperature and moisture. Without it, condensation can build up, especially during those cold winter months. This moisture can then drip down, looking a lot like a roof leak, but it’s actually coming from inside. If you have skylights, they’re another spot where leaks can start. The seals around them can dry out and crack over time. Getting those seals checked and refreshed, or looking into a skylight repair if needed, can stop water from getting in before it becomes a bigger issue. It’s all about keeping that air flowing and those seals tight.
Taking care of these small maintenance tasks regularly is way less expensive and stressful than dealing with a major leak or structural damage later on. It’s about being proactive and protecting your biggest investment.
Spotting hidden damage after severe weather
Severe weather events, like those common in Northern Illinois, can leave behind damage that isn’t immediately obvious. Sometimes, the roof looks okay from the ground, but subtle issues are brewing that could cause big problems down the line. It’s really important to know what to look for after a big storm or even a significant hail event.
Immediate actions after storm and hail damage
After a storm passes and it’s safe to go outside, the first thing you should do is check your home’s interior for any signs of water intrusion. Look for new water spots on ceilings or walls, or any peeling paint that wasn’t there before. From the ground, use binoculars to get a closer look at your roof. Scan for any shingles that appear to be missing, lifted, or damaged. Don’t try to get on a wet or damaged roof yourself; that’s a job for the pros. If you see anything concerning, your next step should be to call a local roofing contractor for a professional inspection.
Spotting hidden hail damage on shingles
Hail can be sneaky. Large hailstones can bruise the asphalt matting underneath the shingle’s surface, even if the granule layer looks intact. This kind of damage might not cause an immediate leak, but it weakens the shingle and can lead to premature aging and failure. You might notice a lack of granules in your gutters or downspouts, which is a sign that the shingles are breaking down. Sometimes, you can see circular or oval-shaped bruises on the shingles from the ground with good binoculars. It’s also worth checking other exterior parts of your home, like siding and window screens, for dents and dings, as these can indicate the size and intensity of the hail that fell. Remember, you typically have about a year to file an insurance claim after a hailstorm, so acting promptly is key inspect your home for hail damage.
Identifying unseen roof damage before leaks start
Water intrusion is the real enemy after a storm. Even if you don’t see a drip inside, water can be getting under shingles or through small punctures and traveling within your attic or wall cavities. This hidden moisture can lead to mold growth, rot in your wooden structures, and damage to your insulation. These secondary issues can become much more expensive to fix than the original roof damage. A professional inspection will look for:
- Granule Loss: As mentioned, this is a key indicator of shingle wear.
- Bruised or Cracked Shingles: These are signs of impact damage.
- Lifted or Missing Shingles: Wind can easily peel shingles back, exposing the underlayment.
- Damaged Flashing: The metal pieces around chimneys, vents, and in valleys are common leak points.
- Dents in Gutters or Downspouts: These can indicate the size of hail that fell and potential roof impacts.
Addressing roof damage quickly, even if it seems minor, is always the best approach. Waiting too long can turn a simple repair into a much larger, more costly project involving interior damage and potential structural issues. Getting a professional assessment soon after severe weather is a smart move to protect your home’s long-term health.
Why choose experienced local roofers in Lakewood
When it comes to something as important as your roof, picking the right crew makes a huge difference. It’s not just about slapping some shingles on; it’s about making sure your home stays protected from whatever the Illinois weather throws at it, year after year. Going with a local team means they already know the drill when it comes to our specific climate and building rules.
Verifying contractor licensing and insurance
This is non-negotiable, folks. You absolutely need to make sure any roofer you consider is properly licensed and insured. Why? Well, licensing means they’ve met the state’s requirements to do the job right. Insurance is your safety net. If a worker gets hurt on your property or something accidentally gets damaged, their insurance should cover it, not you. It’s a sign they’re serious about their business and protecting their clients.
- Check for a valid state license: Don’t be shy about asking for proof.
- Verify liability insurance: This protects your property.
- Confirm workers’ compensation insurance: This covers their crew.
Importance of material performance and warranties
Materials matter, and so do the promises that come with them. A good local roofer won’t just use any old shingles; they’ll use materials known to hold up well in our area. They should also be able to explain the difference between the manufacturer’s warranty (which covers defects in the shingles themselves) and the workmanship warranty (which covers their installation work). A solid combination of quality materials and a strong workmanship warranty is your best bet for long-term peace of mind.
| Warranty Type | What it Covers | Who Provides It |
|---|---|---|
| Manufacturer Warranty | Defects in the shingles (cracking, curling) | The Shingle Maker (e.g., GAF) |
| Workmanship Warranty | Errors made during installation | The Roofing Contractor |
| Extended/System | Both materials and labor for up to 50 years | Certified Contractors + Manufacturer |
Benefits of local knowledge and experience
Local roofers, like those at TJ Builders & Developers, have been working in Lakewood for years. They understand the common issues that pop up here, whether it’s dealing with heavy snow loads in winter or preparing for those sudden summer thunderstorms. They know which materials perform best against our specific weather patterns and can spot potential problems that an out-of-town company might miss. This kind of hands-on, local experience is invaluable when it comes to protecting your home.
Choosing a contractor who understands the local landscape, from the specific challenges of Illinois weather to the nuances of local building codes, is a significant advantage. It means they’re not just doing a job; they’re investing in the long-term well-being of your home within your community.
When you need reliable exterior services in Lakewood, IL, looking for a team with deep roots in the area can make all the difference. This company emphasizes this local advantage, ensuring your home is protected by professionals who truly know the territory.
Choosing roofers who know Lakewood well is a smart move. They understand the local weather and building styles, which means they can do the best job for your home. Don’t settle for less when it comes to protecting your house. Visit our website today to learn more about how our local experts can help you!
Your Roof’s Future Starts Now
Look, taking care of your roof isn’t just about fixing things when they break. It’s about keeping your whole house safe and sound, year after year. Whether you’re dealing with a sudden leak after a big storm or just want to get ahead of potential problems, having a reliable local team on your side makes a huge difference. Don’t wait for that drip to turn into a bigger mess. Getting a professional inspection or tackling those needed repairs now is a smart move that saves you headaches and money down the road. Your home is a big deal, and its roof is a huge part of that. Let the experts handle it so you can relax.
Frequently Asked Questions
What should I do if I notice a leak in my roof after a storm?
If you see water coming into your home, the first thing to do is stay calm and try to protect your belongings. Don’t go up on a wet roof yourself, as it can be very dangerous. Call a professional roofing company right away. They can come out quickly to put a temporary tarp on the damaged area to stop more water from getting in. This temporary fix helps prevent further damage while you figure out the next steps for a permanent repair.
How often do gutters in Lakewood need to be cleaned?
In our area, it’s a good idea to clean your gutters at least twice a year. If you have a lot of trees around your house, especially big ones, you might need to clean them three or even four times a year. This is because leaves and twigs can pile up quickly and clog them, which can cause water to back up and damage your roof and foundation.
When do I need a permit for roof work in Lakewood?
Generally, you’ll need a permit if you’re doing a full roof replacement or major structural repairs. Smaller fixes, like replacing just a few shingles or a small section of the roof (less than 100 square feet in some areas), might not require a permit. It’s always best to check with your local city building department to be sure, as rules can differ.
What’s the difference between a roof repair and a full replacement?
A roof repair is for fixing smaller issues, like a few damaged shingles or a small leak. A full replacement means taking off the old roof and putting on a completely new one. We usually suggest a repair if it can solve the problem and save you money. But if the damage is widespread, or the roof is very old, a replacement is often the better, long-term solution.
How long does an emergency roof tarp usually last?
A temporary tarp put on by professionals is meant to protect your home for a short time, usually between 30 and 90 days. It’s made of strong material, but things like strong winds and constant sun can wear it out faster. This temporary cover gives you time to work with your insurance company and plan for the final repairs without worrying about every rain shower.
What are common mistakes that cause a roof inspection to fail?
Inspectors look closely at how shingles are attached. Using too few nails or putting them in the wrong spot is a common problem. Another big issue is flashing, which is the material used to seal around things like chimneys and vents. If flashing isn’t installed correctly, water can get in. Also, making sure drip edges and pipe boots are installed right is important.
Why is it important to hire local roofers in Lakewood?
Local roofers know the area well. They understand the local weather patterns, building codes, and common issues that homes in Lakewood face. They are also more likely to be licensed and insured in your specific area, and they have a reputation to maintain within the community. This local knowledge helps ensure the job is done right and passes inspections.
What are some signs of hidden roof damage after a storm?
Sometimes, damage isn’t obvious right away. Look for things like missing or cracked shingles, especially after hail. You might also see dents or bruises on the shingles where the granules have been knocked off. Checking your attic for water stains or damp spots can also reveal leaks that aren’t visible from the ground.