When Water Strikes: What Every Homeowner Needs to Know About Water Damage Mitigation
Water damage mitigation is the emergency process of stopping water intrusion, removing standing water, and drying out your home to prevent further destruction — before any repairs begin.
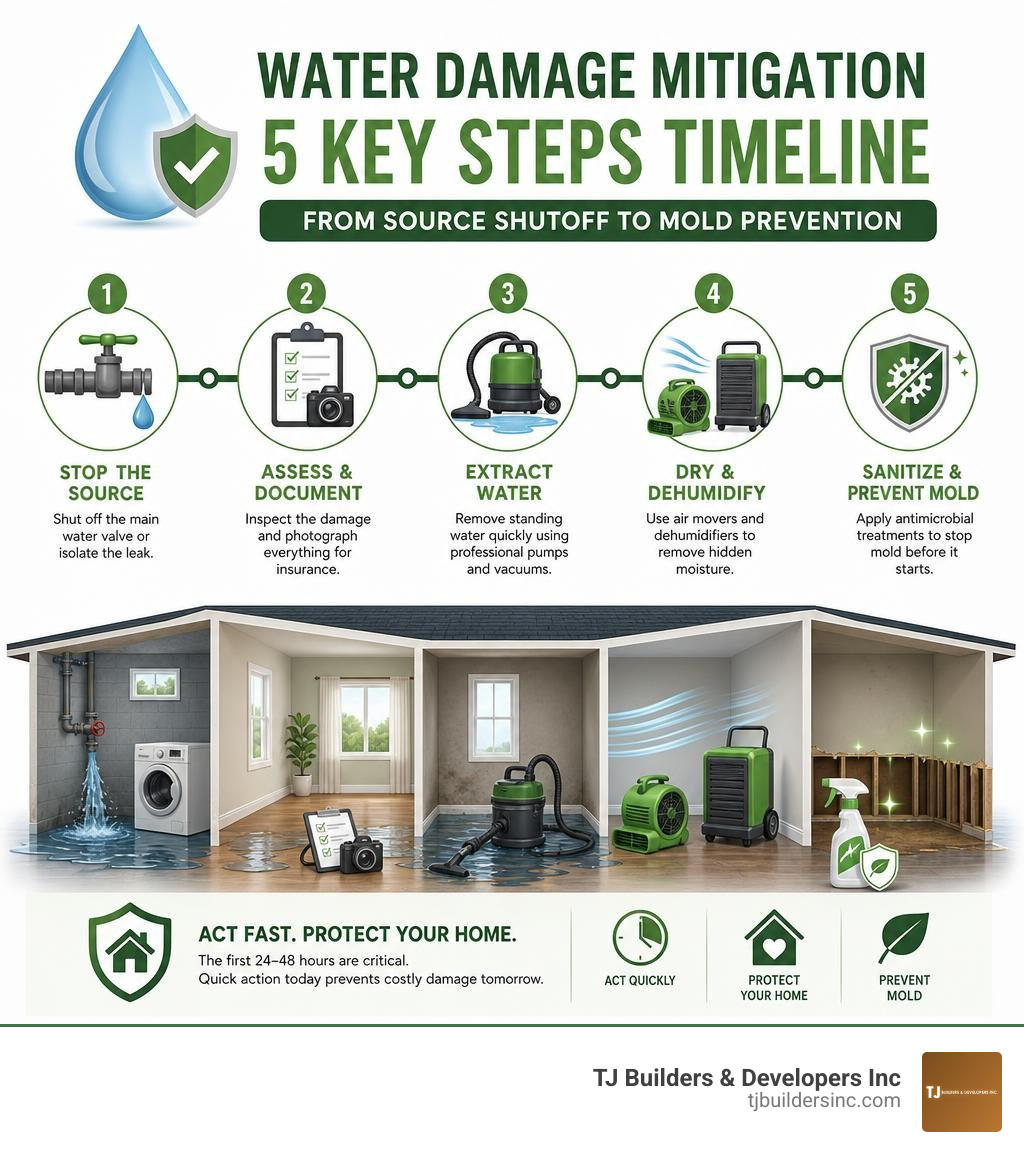
Here’s a quick overview of what it involves:
- Stop the water source — shut off the main water valve or isolate the leak
- Assess and document — inspect the damage and photograph everything for insurance
- Extract standing water — use professional pumps and wet vacuums to remove water fast
- Dry and dehumidify — deploy air movers and dehumidifiers to pull hidden moisture from walls, floors, and ceilings
- Sanitize affected areas — apply antimicrobial treatments to stop mold before it starts
- Prepare for restoration — stabilize the structure so repairs can begin
This is not the same as restoration, which is the rebuilding phase that comes later.
Water damage is one of the most common and costly emergencies a homeowner can face. Roughly 1 in 60 households files a water damage claim every year, with average costs approaching $14,000. And if you don’t act within 24 to 48 hours, mold can begin colonizing wet surfaces — turning a manageable problem into a serious health hazard.
A burst pipe at 2 AM. A washing machine that overflowed while you were at work. A slow roof leak you didn’t notice for weeks. However water gets in, what you do in the first few hours determines how bad the damage gets.
I’m Thomas Pruszynski, owner of TJ Builders & Developers, and over more than 20 years of helping homeowners across Northern Illinois recover from property damage, water damage mitigation has been one of the most time-sensitive challenges we help families navigate. In the sections below, I’ll walk you through everything you need to know — from emergency steps to long-term prevention.
Understanding Water Damage Mitigation vs. Restoration
When water invades a living room in Lakewood or leaks into a basement in Crystal Lake, terms like mitigation, remediation, and restoration get thrown around quickly. While they sound similar, they represent distinct stages of emergency crisis response and property recovery. Understanding these differences helps homeowners know exactly what to expect and why immediate stabilization comes first. For a foundational breakdown of policyholder responsibilities and basic concepts, review Water Mitigation: A Complete Guide for U.S. Homeowners.
Think of water damage mitigation as emergency first aid for your house. If someone sustains a injury, medics stop the bleeding and stabilize the patient before scheduling reconstructive surgery. Mitigation is that emergency response—stopping active water, containing spread, removing standing moisture, and preventing structural collapse.
Defining Water Damage Mitigation
The primary purpose of water damage mitigation is loss prevention and hazard containment. It focuses on immediate action to limit the ultimate scope of property loss.
When active water enters building assemblies, structural framing, subflooring, and drywall begin absorbing moisture immediately. Water damage mitigation interventions include:
- Shutting down active water lines or installing temporary containment barriers.
- Extracting bulk standing water using high-capacity liquid pumps.
- Removing water-logged, non-salvageable materials like wet carpet padding or insulation to accelerate air movement.
- Setting up commercial dehumidifiers and high-velocity air movers to extract bound water trapped deep within wall cavities and timber framing.
By stabilizing humidity levels and extracting excess water rapidly, mitigation preserves structural integrity, prevents rot, and stops fungal colonization in its tracks.
How Restoration Differs
While mitigation focuses on stopping destruction, water damage restoration focuses on permanent reconstruction. Restoration is the post-crisis phase where damaged building components are repaired, replaced, or completely rebuilt to return your property to pre-loss condition.
Restoration activities typically occur after the structure has reached documented dry-standard levels. These tasks include:
- Installing new drywall, taping, mudding, and painting interior surfaces.
- Replacing ruined subflooring, hardwood, tile, or carpeting.
- Rebuilding structural framing, roof trusses, or exterior sheathing damaged by long-term moisture intrusion.
- Refinishing cabinetry and trim work.
If a severe storm or ice dam damages your roof overhead, understanding How to Restore Your Roof After Water and Flood Damage provides vital clarity on transitioning smoothly from emergency roof tarping and moisture containment to permanent roof repair.
Need Help With Your Home?
TJ Builders & Developers handles roofing, siding, gutters, windows, home additions, and fire damage restoration for homes and businesses in Lakewood, Crystal Lake, Schaumburg, and nearby McHenry County towns.
- Free, no-obligation estimates
- Licensed & insured
- 20+ years of local experience
Water Damage Categories and Classes
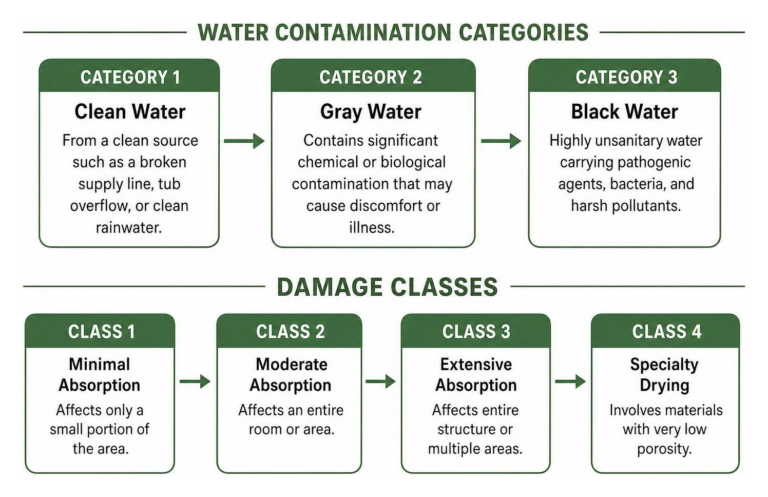
Restoration professionals and insurance adjusters classify water intrusion events using standards established by the Institute of Inspection, Cleaning and Restoration Certification (IICRC S500). Water damage is categorized by contamination risk (Categories 1–3) and classified by moisture absorption rate and affected surface area (Classes 1–4).
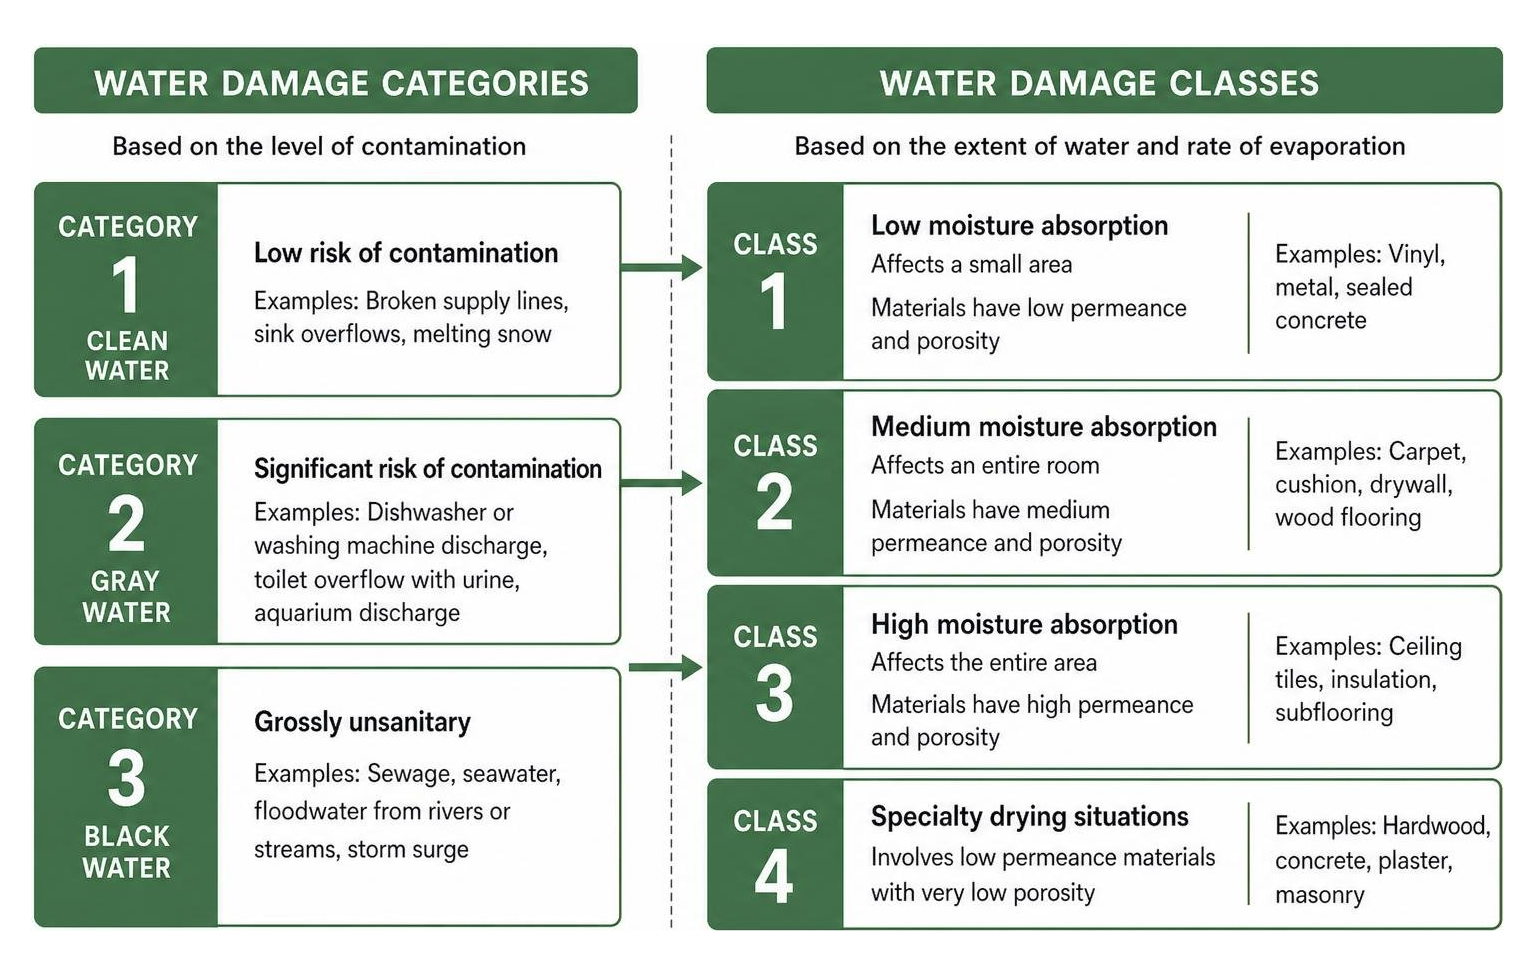
The table below breaks down how these standard categories and classes are defined across the industry:
| Classification Parameter | Severity Tier | Source & Description | Required Safety Protocols |
|---|---|---|---|
| Water Category | Category 1 (Clean Water) | Broken supply lines, sink overflows, melting snow. | Standard extraction and rapid structural drying. |
| Category 2 (Gray Water) | Dishwasher/washing machine discharge, sump pump failure. | Personal protective equipment (PPE), carpet pad removal, antimicrobial application. | |
| Category 3 (Black Water) | Sewage backup, river/surface floodwaters, standing Cat 1/2 water >48 hrs. | Full containment, extensive tear-out of porous materials, specialized biohazard sanitization. | |
| Water Class | Class 1 (Slow Evaporation) | Affects <5% of room surface area; low-porosity materials (concrete, tile). | Basic air movement and target dehumidification. |
| Class 2 (Fast Evaporation) | Affects 5%–40% of room surface; carpet, drywall, cushions saturated. | High-capacity dehumidification and industrial air movers. | |
| Class 3 (Fastest Evaporation) | Affects >40% of room surface area; overhead leaks, ceiling/wall saturation. | Wall-cavity ventilation, intense structural drying setups across multiple rooms. | |
| Class 4 (Specialty Drying) | Trapped moisture in dense materials (hardwood, brick, plaster, concrete subfloors). | Specialty desiccant dehumidifiers, targeted floor-mat drying systems. |
Categories 1 through 3
Water categories reflect the degree of biological or chemical contamination in the water source.
- Category 1 (Clean Water): Originates from sanitary sources such as burst clean-water supply pipes, overflowing toilet tanks without waste, or rainwater leaking directly through clean roof decking. Category 1 water poses minimal initial health risk to human occupants. However, if left untreated in warm environments for longer than 24 to 48 hours, clean water rapidly transitions into Category 2 gray water due to bacterial growth upon contact with dirty building surfaces.
- Category 2 (Gray Water): Contains significant physical, chemical, or biological contamination capable of causing illness upon human contact. Typical sources include washing machine overflows, dishwasher discharge, broken aquariums, or sump pump basin bypasses. Porous materials like carpet padding saturated with gray water usually cannot be salvaged and must be discarded.
- Category 3 (Black Water): Grossly contaminated water containing pathogenic microorganisms, toxic chemicals, heavy metals, or raw sewage. Common examples include toilet overflows containing feces, municipal sewer backups, and overland storm runoff spilling into basements in low-lying suburban communities. Category 3 water poses severe biohazard threats. All porous structural elements saturated by black water—including drywall, insulation, subfloors, and carpets—must be cut out, removed, and disposed of under strict personal safety guidelines.
Classes 1 through 4
Water classes determine the expected evaporation rate based on the porosity of materials affected and the total volume of moisture absorbed.
- Class 1: The slowest rate of evaporation. Water affects only a small section of a space (less than 5% of combined floor, wall, and ceiling surface areas). Materials involved are low-porosity surfaces like sealed concrete or ceramic tile that absorb minimal moisture.
- Class 2: Fast evaporation rate. Moisture affects an entire room or between 5% and 40% of total surface area. Water has absorbed into carpets, underlayment, and lower sections of drywall.
- Class 3: Fastest evaporation rate. Water usually comes from overhead—such as a major roof failure, attic plumbing burst, or second-story line break. Water saturates over 40% of total room surface area, thoroughly soaking ceilings, insulated walls, subfloors, and underlying framing timber.
- Class 4: Specialty deep-bound drying situations. Water has penetrated deep into dense, low-porosity building assemblies like solid hardwood flooring, brick masonry, plaster walls, or structural concrete slabs. Removing trapped bound water in Class 4 situations requires high-performance desiccant dehumidification and long drying durations.
Crucial Steps in the Water Damage Mitigation Process
When emergency water intrusion strikes a residence in Lake in the Hills or Schaumburg, timing is everything. Following a structured, professional workflow ensures that water spread is halted immediately and moisture levels are lowered safely.
Step-by-Step Water Damage Mitigation Process
Professional emergency technicians follow six systematic steps to control damage, protect health, and prepare structures for ultimate restoration. For a detailed breakdown of what technicians perform on-site, read Water Damage Mitigation Process: Steps And What To Expect.
- Source Identification and Shutoff: The absolute top priority is stopping active water entry. This involves shutting down main water lines, turning off localized shutoff valves, repairing emergency pipe splits, or installing temporary tarping over compromised roof sections.
- Comprehensive Assessment and Moisture Mapping: Technicians inspect affected zones using non-invasive moisture meters and thermal imaging cameras to map hidden moisture boundaries behind wall assemblies and underneath flooring materials.
- Bulk Water Extraction: High-powered truck-mounted liquid pumps and industrial wet extractors remove standing surface water. Removing bulk liquid mechanically is up to 10 times faster and vastly more energy-efficient than attempting to dry standing water with air movement alone.
- Controlled Demolition and Material Containment: Porous building components that cannot be safely dried—such as saturated carpet padding, water-logged ceiling drywall, sagged wall insulation, or vinyl baseboards trapping water inside wall cavities—are carefully cut out and discarded.
- Structural Drying and Dehumidification: Heavy-duty air movers blow high-velocity dry air across damp structural surfaces to promote evaporation, while industrial dehumidifiers continuously extract water vapor from the ambient air to keep relative humidity below critical mold-growth thresholds.
- Sanitization and Antimicrobial Treatment: All remaining structural framing, subfloors, and hard surfaces are thoroughly cleaned, disinfected, and treated with EPA-registered antimicrobial solutions to prevent bacterial spread and mold growth.
Professional Equipment Used in Water Damage Mitigation
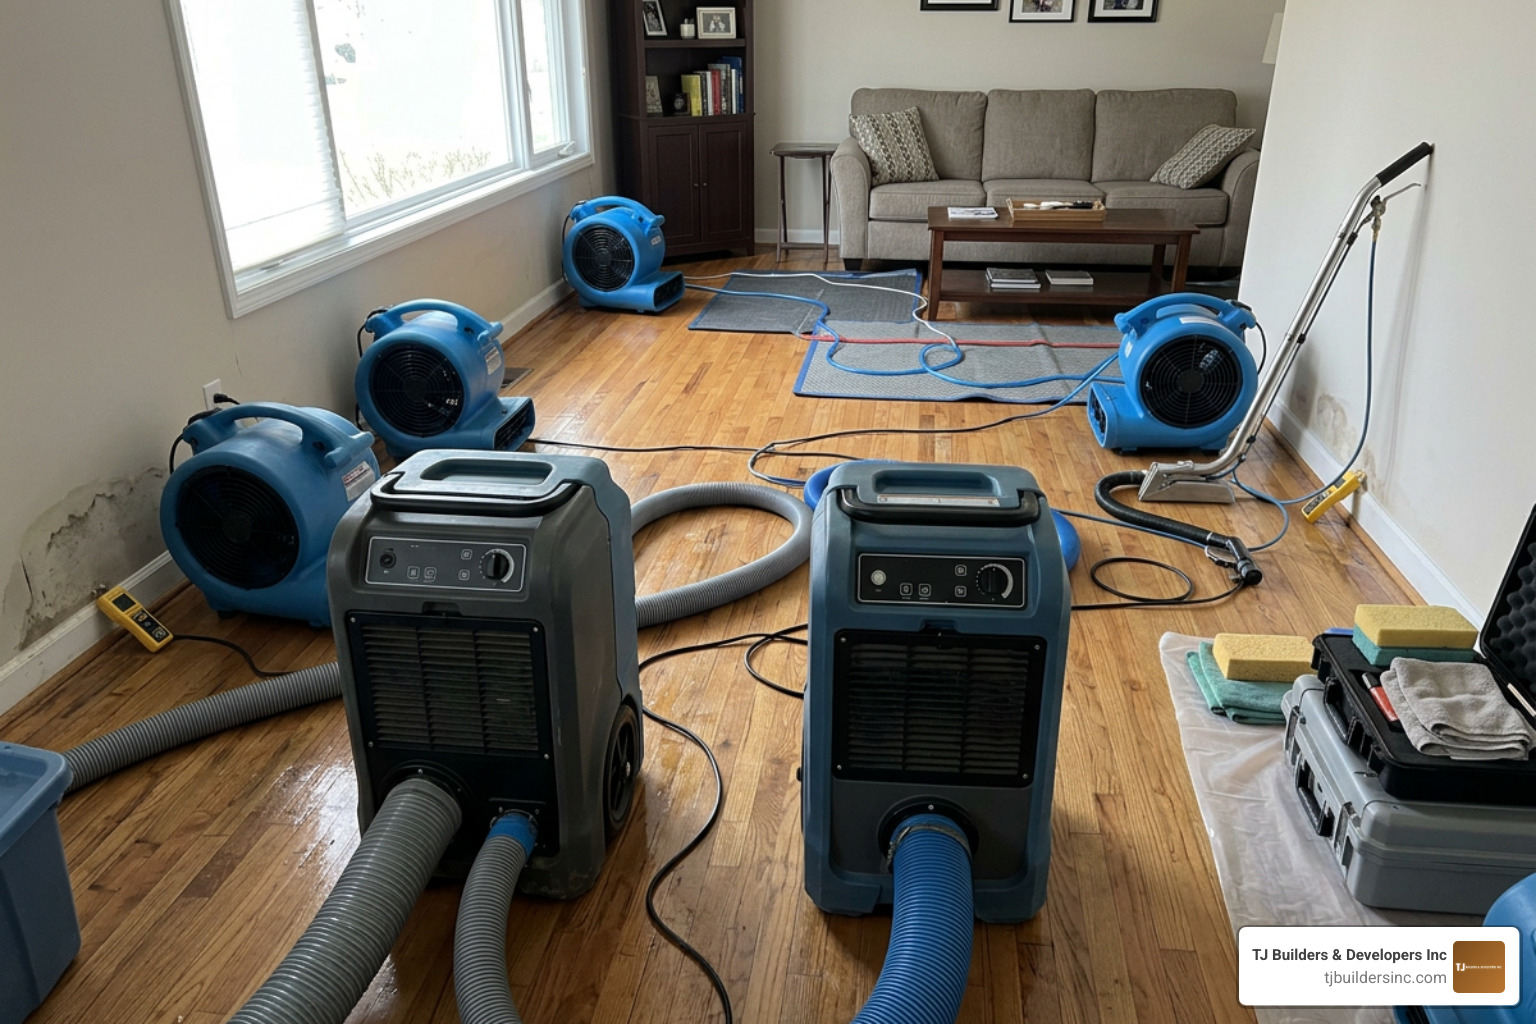
Proper water damage mitigation relies on commercial equipment engineered to move vast volumes of air and extract gallons of bound moisture from dense construction materials. Standard household fans and domestic dehumidifiers simply lack the capacity to dry structural framing before mold takes hold.
Key equipment deployed includes:
- Low-Grain Refrigerant (LGR) Dehumidifiers: LGR units cool ambient air well below standard refrigerant models, allowing them to pull moisture out of deeply saturated timber, concrete, and wall framing even in very low-humidity environments.
- Axial and Centrifugal Air Movers: These specialized industrial blowers force continuous currents of dry air directly along floors, subfloors, and open wall studs to accelerate surface evaporation.
- Sub-Surface Extraction Tools: Heavy-duty motorized floor extractors (often called weighted extraction tools) roll over carpets and underlayment to squeeze water out of dense pile and backing layers before pad removal or drying.
- Thermal Imaging Moisture Cameras: Infrared cameras detect surface temperature differentials caused by evaporative cooling, allowing technicians to locate hidden pockets of water behind intact drywall or tiled shower walls without knocking holes into every surface.
- Injectidry Systems and Wall Cavity Blowers: Specialized hose manifolds blow warm, low-humidity air directly into sealed wall cavities and under cabinetry through small, easily repairable drill holes.
Insurance Coverage and Immediate Actions for Homeowners
When unexpected water pooling threatens your basement or living areas, staying calm and following an organized action plan protects both your family’s safety and your financial recovery through your insurance policy.
Immediate Emergency Steps for Homeowners
Before emergency mitigation technicians arrive, taking immediate, safe steps at home minimizes property destruction:
- Prioritize Electrical Safety: Never step into rooms with standing water if power outlets, extension cords, or electrical appliances are submerged. If your main electrical breaker box is safely accessible in a dry area, shut off power to wet zones immediately.
- Stop the Water Source: Locate your home’s main water shutoff valve (typically located where the main service line enters the home, near your water meter or pressure tank) and turn it firmly clockwise to stop incoming water.
- Notify Your Insurance Carrier: Contact your insurance agent or claims department to report the incident, initiate a claim number, and confirm policy requirements for emergency mitigation work.
- Meticulously Document the Damage: Take extensive wide-angle and close-up photographs and high-definition video of all damaged structural areas, soaked personal belongings, standing water lines, and the suspected origin point before moving or clearing anything.
- Protect Valuables: Move dry personal items, electronics, furniture, and family heirlooms out of wet rooms. Place aluminum foil, plastic caps, or wooden blocks under heavy furniture legs touching damp carpet to prevent wood stain from bleeding into carpet fibers.
- Seek Professional Structural Inspection: If roof leaks or heavy ceiling saturation are involved, consult certified exterior contractors for rapid assistance. Learn how to respond quickly by following guidelines for Emergency Roof Repair Leak Detection.
Homeowners Insurance and Coverage Exclusions
A common source of confusion during property losses is what standard homeowners insurance covers regarding water intrusion.
Standard HO-3 homeowners insurance policies generally cover sudden and accidental internal water discharge. Examples of covered perils include:
- A supply pipe suddenly bursting inside a wall stud during a winter cold snap.
- A water heater tank suddenly rupturing and spilling hot water across a utility room floor.
- A washing machine supply hose snapping during an active cycle.
- Sudden structural roof failure caused by falling tree limbs or severe storm wind damage allowing rainwater ingress.
Conversely, standard policies almost universally exclude water damage caused by:
- Gradual Leakage and Maintenance Neglect: Slow drips behind sinks, unaddressed roof leaks operating for months, or long-failing caulk around tubs that homeowners ignored over extended periods.
- Overland Surface Flooding: Surface water entering ground-level doors or basement windows due to heavy rain, overflowing creeks, or ground saturation. True flood damage requires a separate flood policy (such as through the National Flood Insurance Program).
- Sewer Line and Drain Backups: Municipal sewer backups or main drain line clogs pushing black water into basements are excluded under basic policies unless you have purchased an optional “Sewer and Drain Backup” policy endorsement.
Crucially, insurance policies contain a standard contractual clause requiring policyholders to exercise reasonable care to mitigate further loss immediately following an incident. Failing to secure fast mitigation services after a burst pipe can give adjusters grounds to deny secondary mold or structural decay claims on the basis of post-event neglect.
Need Help With Your Home?
TJ Builders & Developers handles roofing, siding, gutters, windows, home additions, and fire damage restoration for homes and businesses in Lakewood, Crystal Lake, Schaumburg, and nearby McHenry County towns.
- Free, no-obligation estimates
- Licensed & insured
- 20+ years of local experience
Preventing Water Damage and Mold Colonization
While knowing how to manage water emergencies is vital, preventing water from penetrating your building envelope in the first place is always the most effective strategy.

The 24-to-48-Hour Mold Window
In damp environments, microscopic mold spores present in ambient air find ideal conditions to germinate on cellulose-rich building materials such as drywall paper, wood framing, subflooring, and carpet backing. Mold colonization begins quickly—often within 24 to 48 hours after moisture saturation occurs.
Once fungal hyphae establish root structures inside drywall or structural studs, simple surface cleaning is no longer effective. At that point, non-salvageable materials must be torn out under specialized remediation protocols. Installing proper attic ventilation and roof exhaust accessories ensures high humidity and indoor dampness escape your home safely. For details on roof cowl performance, see Don’t Let It Mold Why Your Ceiling Air Extractor Needs a Proper Roof Cowl.
Preventive Exterior Maintenance
Your roof, gutters, siding, and foundation grading form your home’s primary defenses against uncontrolled moisture ingress. Implementing routine seasonal exterior maintenance stops water before it gets inside:
- Clean Gutters and Downspouts Routinely: Clogged, overflowing gutters drop thousands of gallons of roof runoff directly against foundation walls, causing subterranean basement seepage or fascia rot. Clean gutters every fall and spring, and ensure downspout extensions discharge water at least 5 to 10 feet away from foundation walls.
- Schedule Annual Roof Inspections: Inspect shingles for cracking, curling, wind displacement, or deteriorated chimney and valley flashing. Discovering small leaks early prevents hidden timber rot overhead. If you’re tackling exterior maintenance, learn How to Fix Roof Leakage Waterproofing Issues for Lasting Results.
- Check Plumbing and Appliance Hoses: Replace rubber washing machine supply lines with braided stainless-steel flex hoses every 5 years. Inspect water heater relief valves and install smart leak detectors under dishwashers, sinks, and water heaters.
- Maintain Foundation Grading: Ensure perimeter soil slopes downward away from your home’s foundation at a minimum pitch of 6 inches over the first 10 feet to direct surface water safely away from basements and crawl spaces.
Frequently Asked Questions About Water Damage Mitigation
How long does the water mitigation process take?
The structural extraction and drying phase of water damage mitigation typically takes between 3 to 5 days to complete. However, exact timelines vary based on the class of water damage, total affected surface area, ambient weather conditions, and how quickly professional drying equipment was installed after the initial leak occurred. Dense structural materials like solid hardwood or concrete subfloors (Class 4 water damage) may require 7 to 10 days of continuous desiccant dehumidification to reach safe baseline dry standards.
Can clean water turn into gray or black water?
Yes, clean water (Category 1) degrades rapidly into gray water (Category 2) or black water (Category 3) over time. When clean supply line water comes into contact with soiled subfloors, dusty wall cavities, carpet padding, or organic building debris, stagnant water collects bacteria, organic matter, and microbes. In warm indoor environments, Category 1 water typically degrades into Category 2 gray water within 24 to 48 hours, and can turn into Category 3 black water beyond 48 hours.
Is water damage mitigation covered by standard home insurance?
Standard homeowners insurance policies generally cover emergency water damage mitigation costs if the underlying cause of the water loss is deemed a sudden and accidental internal discharge—such as a burst plumbing pipe, water heater rupture, or sudden appliance line failure. Standard policies typically exclude coverage for gradual leaks caused by poor maintenance, ongoing seepage, external river or storm flooding, and sewer backups (unless a specific sewer backup endorsement was added to your policy).
Conclusion
When water intrusion threatens your property, taking immediate, decisive action makes all the difference between a minor drying project and a massive, costly structural rebuild. By stopping the source, extracting standing water fast, deploying commercial drying equipment, and sanitizing affected materials within the critical 24-to-48-hour window, you safeguard both your family’s health and your home’s long-term value.
At TJ Builders & Developers, we bring over two decades of residential exterior construction, roofing, and restoration expertise to homeowners in Lakewood, Crystal Lake, Algonquin, Schaumburg, and across surrounding Northern Illinois communities. Protecting your home begins at the top—ensuring your roof deck, gutters, and exterior siding remain watertight year-round.
For complete exterior defense and leak prevention before bad weather hits, explore our specialized Roof Waterproofing Services Because Your Attic Isn’t a Swimming Pool. If your property has suffered recent water intrusion or storm damage, reach out to our team today to schedule an expert structural inspection and secure your home’s envelope.