What Is a Hip and Valley Roof?
A hip and valley roof combines outward-sloping roof sections with inward corners called valleys. Hips form raised lines where two slopes meet; valleys form channels where rain and melting snow flow toward the gutters. This design often covers L-shaped homes and additions that a simple hip roof cannot cover without another roof intersection.
Those intersections need careful framing and waterproofing. In Northern Illinois, a poorly supported or flashed valley can become a trouble spot when snow and water collect there. This guide explains what homeowners should look for and why the details matter.
I’m Thomas Pruszynski, owner of TJ Builders & Developers Inc. Our team has worked on roofing and exterior projects across Northern Illinois for over 20 years, and that experience informs this guide to hip and valley roof design.
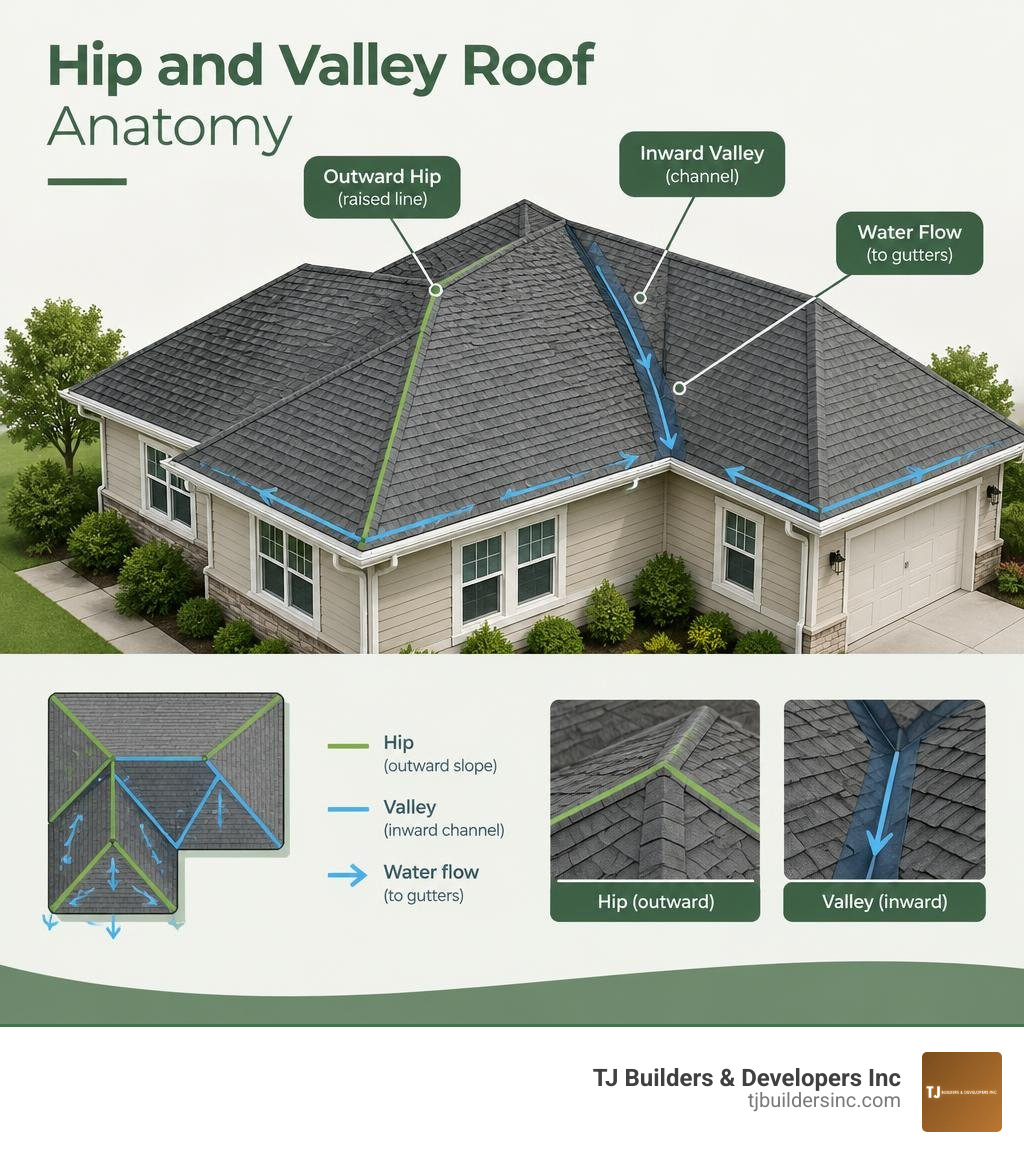
Important hip and valley roof terms:
Anatomy and Geometry of Hip and Valley Architecture
Understanding the anatomy of a complex roof profile helps homeowners see how distinct planes work together to shed water and resist high winds. Unlike standard rectangular footprints that rely on straightforward gables, homes with custom wings, projecting garages, and multi-directional extensions require a sophisticated blend of hips and valleys.
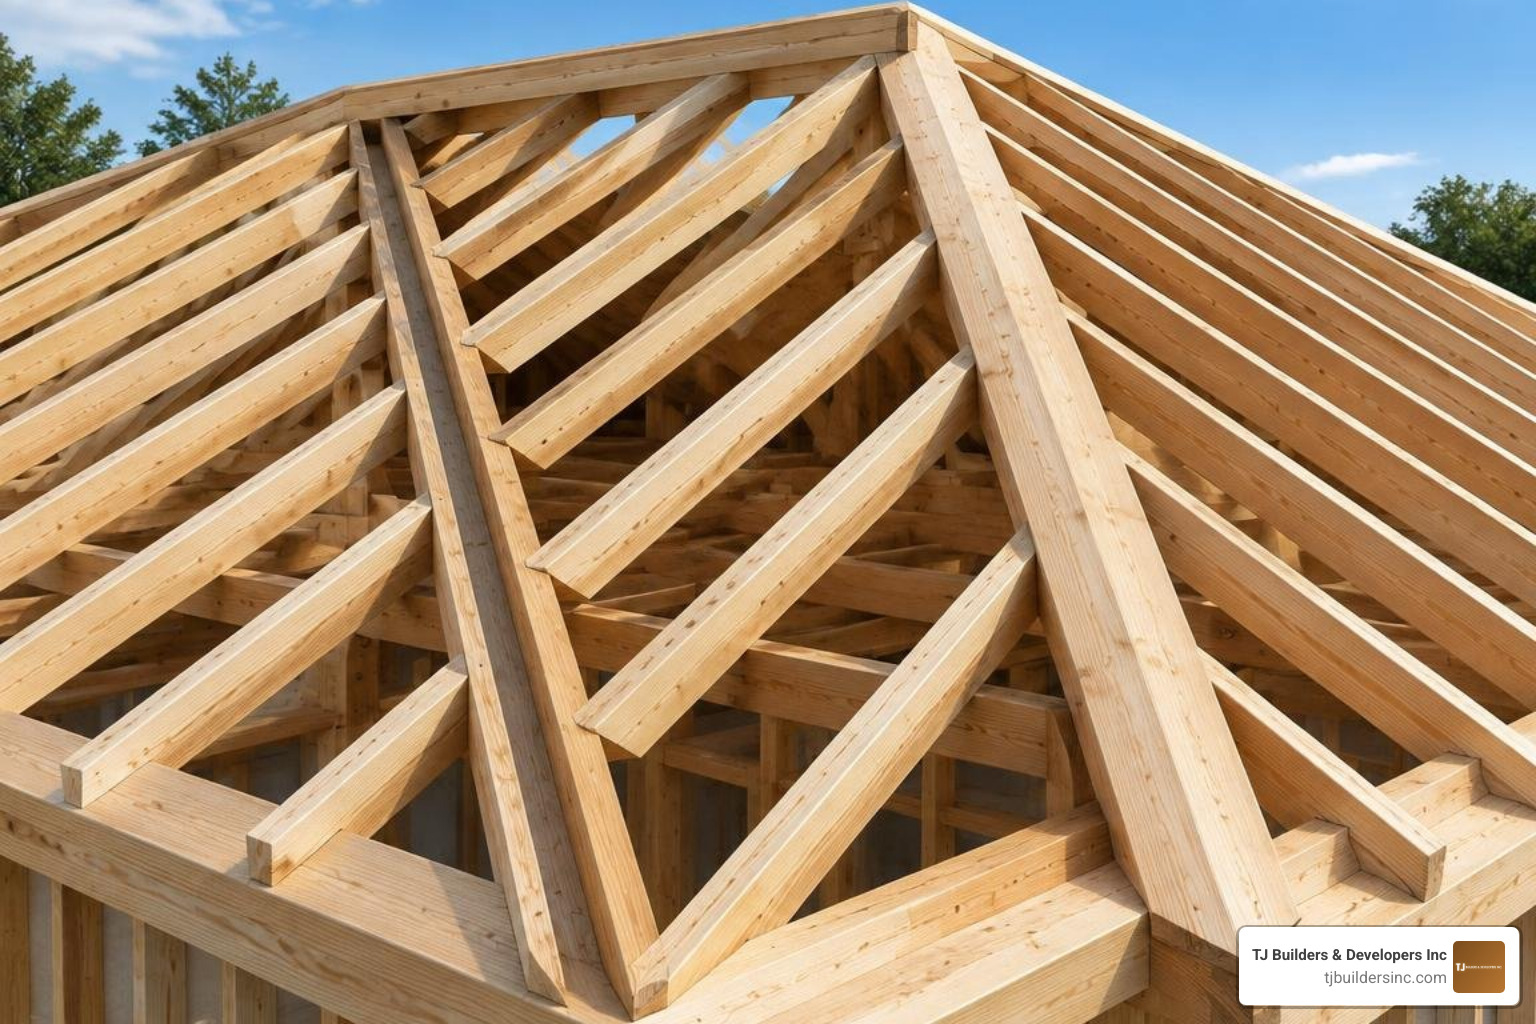
When planning custom exterior updates or evaluating residential and commercial roofing systems, understanding the structural skeleton of your roof ensures you make informed decisions about maintenance, longevity, and structural safety.
How a Hip and Valley Roof Compares to Gable and Simple Hip Styles
Every roof silhouette presents distinct structural behaviors, interior volume profiles, and exterior lines.
- Gable Roofs: Feature two sloping planes meeting at a central ridge with vertical triangular end walls. They offer generous attic space but present flat surfaces that experience higher uplift forces during severe windstorms.
- Simple Hip Roofs: Feature four sloping planes meeting at a central ridge or point, eliminating vertical wall faces. The outward hips provide natural self-bracing qualities, making hip systems resilient against high winds.
- Hip and Valley Roofs: Created when two or more hip roof sections intersect at an angle—most often on L-shaped, T-shaped, or customized multi-wing floor plans. They provide the aerodynamic, self-bracing advantages of traditional hips while accommodating complex architectural footprints and directing runoff through inward valleys.
| Feature | Gable Roof | Simple Hip Roof | Hip and Valley Roof |
|---|---|---|---|
| Wind Uplift Resistance | Moderate (flat vertical ends catch wind) | High (slopes deflect wind on all sides) | High (self-bracing across all wings) |
| Water Drainage Efficiency | High (straightforward two-plane runoff) | High (sheds water in four directions) | High volume channeled via valleys |
| Framing Complexity | Low (standard common rafters or trusses) | Moderate (hip rafters and jack rafters) | High (compound cuts, valleys, creeper rafters) |
| Attic Usable Space | Maximum headroom throughout | Reduced at all sloping ends | Variable; generous under main intersections |
| Best Architectural Fit | Simple rectangular structures | Compact, symmetrical homes | L-shaped, T-shaped, and custom wings |
Key Structural Components and Load Distribution
The framework of a hip and valley system relies on interlocking timber members cut at precise compound angles:
- Ridge Board: The horizontal timber at the highest point of the roof where common and hip rafters connect.
- Hip Rafter: A diagonal beam spanning from an external wall corner upward to the ridge board, forming an outward, convex corner.
- Valley Rafter: A diagonal timber spanning from an internal wall corner upward to the ridge, creating an inward, concave drainage trough.
- Jack Rafters: Short rafters that span between a wall plate and a hip rafter (hip jacks) or between a ridge board and a valley rafter (valley jacks).
- Creeper Rafters: Specialized framing members that connect directly between a hip rafter and a valley rafter without touching the ridge board or wall plate directly.
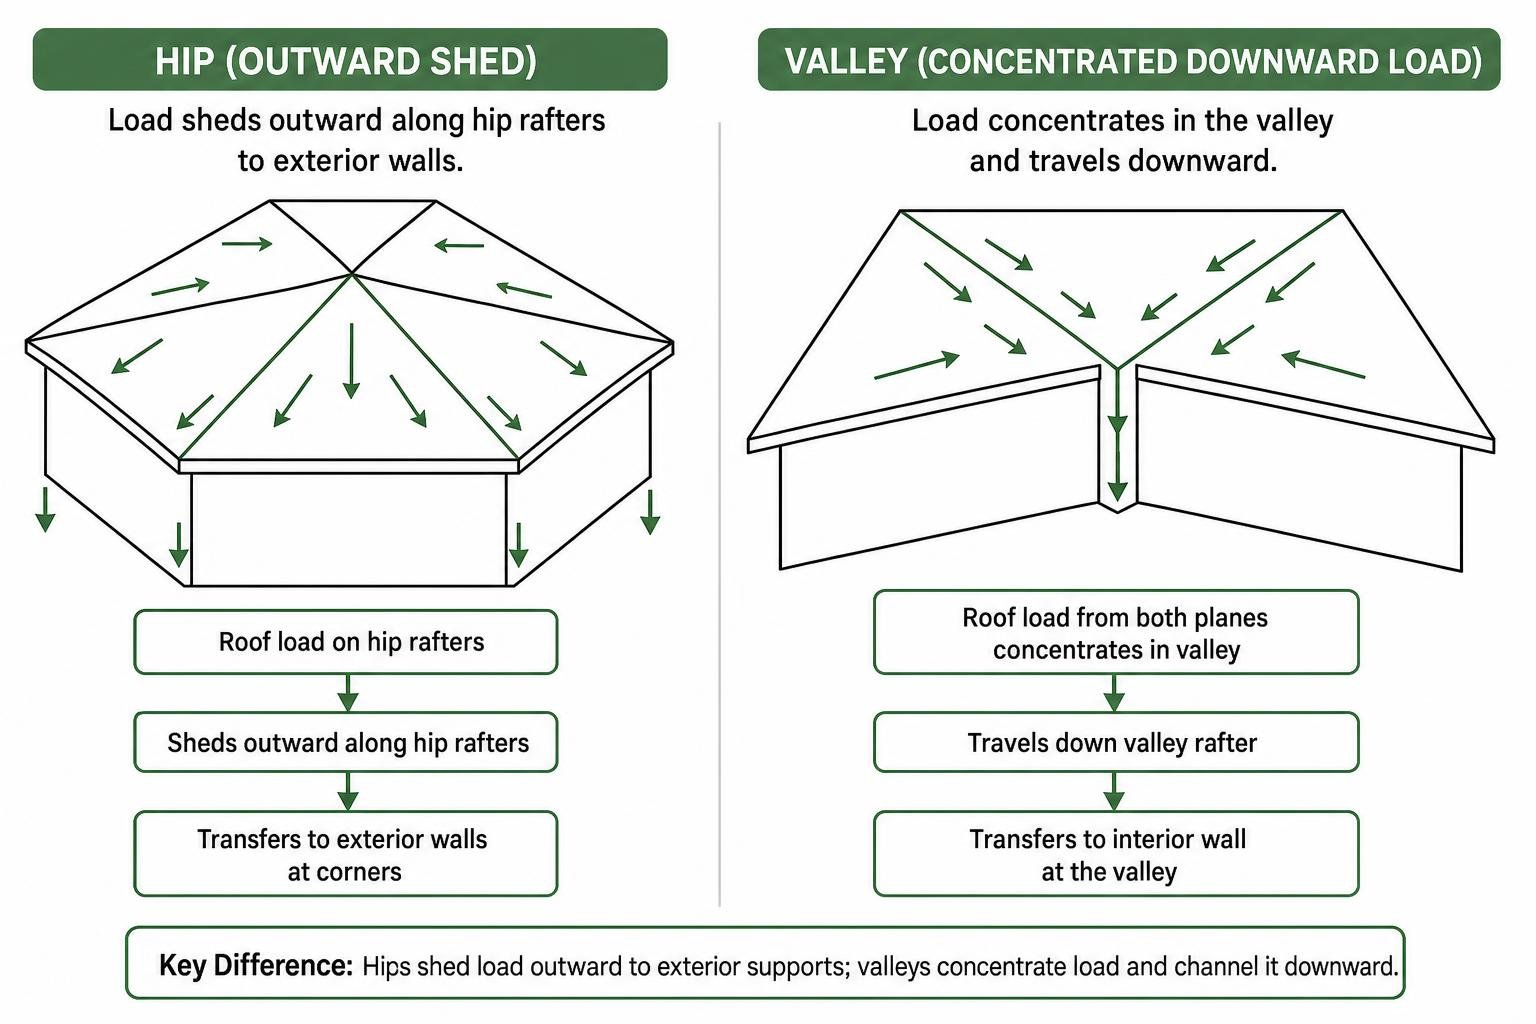
Because hips create convex exterior angles, they shed load outward. Conversely, valleys form concave troughs that collect and concentrate both dead weight and live environmental loads downward along their span. Proper load paths prevent sagging and moisture intrusion, underscoring the importance of our guide to comprehensive roof installation and replacement.
Need Help With Your Home?
TJ Builders & Developers handles roofing, siding, gutters, windows, home additions, and fire damage restoration for homes and businesses in Lakewood, Crystal Lake, Schaumburg, and nearby McHenry County towns.
- Free, no-obligation estimates
- Licensed & insured
- 20+ years of local experience
Structural Engineering and Framing of a Hip and Valley Roof
Framing a hip and valley roof requires rigorous structural calculations and adherence to traditional roof framing principles. Because valley members support jack rafters delivering weight from multiple roof planes, they function much like interior floor girders.
Sizing Valleys and Load Paths for a Hip and Valley Roof
A frequent framing oversight is treating a valley rafter as a non-structural nailing board. While a hip rafter on a steep pitch often acts as a non-structural tie when opposing rafters balance each other, a valley rafter carries significant tributary loads and must always be designed as a structural beam.
According to the Wood Frame Construction Manual (WFCM), sizing must account for both dead loads (such as heavy roof decking and multi-layer shingles) and live snow loads. For instance, on a roof with a 10-foot horizontal span, a design dead load of 10 pounds per square foot (psf), and a ground snow load of 30 psf typical of Midwestern winters, a valley beam must be sized as at least a double 2×10 member. Installing a single 2×6 in this position would leave the valley undersized by a factor of nearly five, risking severe deflection, cracked interior drywall, or joint separation.
IRC Code Compliance and Pitch Specifications
Building codes establish mandatory structural minimums for hip and valley assemblies. Under International Residential Code (IRC) Section R802.3:
- Member Dimensions: Hip and valley rafters must have a minimum nominal thickness of not less than 2 inches (51 mm).
- Depth Requirements: The depth of hip and valley rafters must not be less than the cut end of the adjoining jack rafters to maintain full structural bearing.
- Low-Slope Thresholds: Where the roof pitch is less than 3 units vertical in 12 units horizontal (a 25 percent slope or 3:12 pitch), hip and valley rafters must be engineered as structural beams supported by posts or load-bearing assemblies, as shallow slopes cannot rely on rafter thrust resistance alone.
- Bearing and Notching: Birdsmouth cuts at exterior wall plates must not exceed one-fourth of the total rafter depth, ensuring adequate wood stock remains above the seat cut.
Adhering to local municipal roofing guidelines ensures that every structural addition or replacement complies fully with safety ordinances across Northern Illinois communities like Lakewood, Crystal Lake, and McHenry.
Performance Advantages and Trade-Offs for Homeowners
Choosing a hip and valley configuration gives homeowners an elegant blend of functional weather defense and distinct curb appeal.

Wind Resistance, Snow Shedding, and Drainage Dynamics
Hip and valley profiles perform exceptionally well in high-wind regions:
- Aerodynamic Stability: By sloping inward from all exterior corners, hip faces deflect crosswinds upward and over the structure, minimizing wind uplift forces that frequently damage traditional gable overhangs.
- Self-Bracing Rigidity: The inward-leaning rafters support one another, creating an interconnected geometric shell that resists lateral racking during severe summer storms.
- Controlled Water Flow: Multiple roof planes divide heavy rainfall into manageable streams, directing water efficiently toward perimeter gutters.
However, valleys act as collection zones for snow accumulation and blowing autumn leaves. During deep winter freezes in Schaumburg or Algonquin, drifting snow packs tightly into internal roof valleys. If the roof lacks proper waterproofing, melting snow above warm attic spaces can refreeze at cold eaves, creating ice dams. Selecting professional asphalt roof installation paired with full ice-and-water barrier underlayment protects these vulnerable roof intersections.
Usable Attic Volume and Architectural Complexity
While hip roofs naturally pitch downward toward exterior walls—slightly reducing perimeter standing headroom compared to open gable designs—the intersecting ridges of a hip and valley roof create expansive center volumes. These elevated intersections accommodate vaulted ceilings, skylight shafts, or functional attic storage spaces.
The primary trade-off is construction complexity. Framing compound miters and managing multiple valleys increases labor time and material waste factors (often 15% or higher) compared to simpler roof designs.
Need Help With Your Home?
TJ Builders & Developers handles roofing, siding, gutters, windows, home additions, and fire damage restoration for homes and businesses in Lakewood, Crystal Lake, Schaumburg, and nearby McHenry County towns.
- Free, no-obligation estimates
- Licensed & insured
- 20+ years of local experience
Critical Moisture Protection: Valley Flashing, Ventilation, and Gutters
Valleys handle the highest water volume on the entire roof. Implementing multi-layered waterproofing is vital to preserve structural framing and prevent costly leaks.
When homeowners notice water stains along interior valley ceilings, scheduling prompt emergency and preventive roof repair protects roof decking from progressive rot.
Open vs Closed Valley Flashing Installation Methods
Two main methods exist for sealing roof valleys:
- Open Metal Valleys: A heavy-gauge, corrosion-resistant metal flashing trough (typically 24- to 26-gauge galvanized steel, aluminum, or copper) lines the center of the valley over a self-adhering waterproof membrane. Shingles are cut back on either side, leaving an open channel roughly 4 to 6 inches wide (or 125 mm). This allows water, leaves, and melting snow to flush quickly without catching on shingle edges.
- Closed-Cut or Woven Valleys: Shingles from one roof plane extend across the valley line, while shingles from the intersecting plane are trimmed parallel to the center. While closed valleys offer a uniform appearance, they can trap fine debris and ice along cut edges.
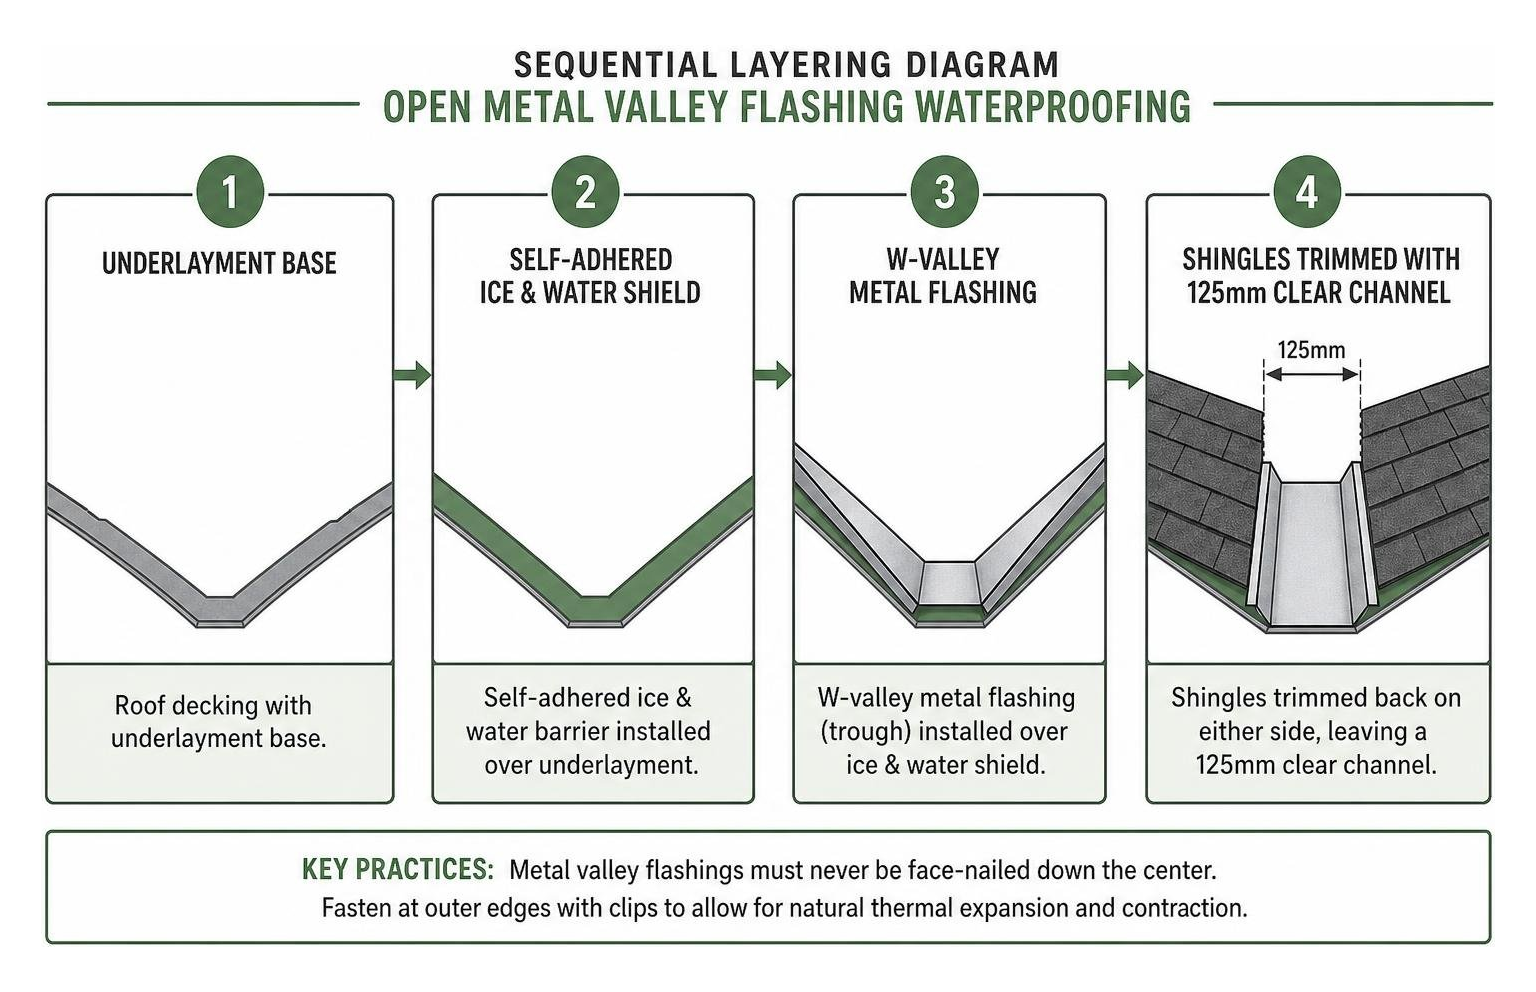
Metal valley flashings must never be face-nailed down their center; instead, they should be fastened at their outer edges with clips to allow for natural thermal expansion and contraction during seasonal temperature swings.
Perimeter Drainage and Attic Ventilation Best Practices
Because valleys concentrate runoff into specific sections of the eaves, perimeter drainage systems must be sized to handle high-velocity flow. Valley channels should project into the gutter trough by 50 mm (plus or minus 15 mm) to avoid water overshooting the gutter during downpours.
Proper airflow under complex rooflines is equally critical. Balancing continuous soffit intake vents with upper exhaust points prevents hot, moist air pockets from accumulating in unvented framing pockets. Implementing engineered attic and roof ventilation systems ensures consistent airflow beneath hip and valley rafters, preventing winter condensation and prolonging shingle life.
Frequently Asked Questions About Hip and Valley Roofs
What is the structural difference between a hip rafter and a valley rafter?
A hip rafter forms an outward, convex ridge where two slopes meet, shedding structural loads outward toward exterior corner walls and functioning largely as a non-structural tie when supported on standard pitches. A valley rafter forms an inward, concave trough where slopes converge. It carries downward tributary loads from adjoining jack rafters and must always be engineered as a structural load-bearing beam.
What are the most common construction errors in valley framing?
The most frequent framing defects include:
- Using undersized single lumber (such as a single 2×6 instead of a double 2×10) for valley spans.
- Omitting vertical bracing beneath the upper ridge connection on low-slope configurations.
- Over-notching rafter birdsmouths past building code depth limits.
- Rigidly face-nailing metal valley flashing, which prevents natural thermal expansion and leads to buckled metal and leaks.
Can solar panels be installed near roof hips and valleys?
Yes, but installations must adhere to solar panel clearance guidelines set by modern building and fire safety codes. Solar panels must generally maintain an 18-inch setback clearance from hips and valleys to allow emergency fire department pathway access and prevent disruption of valley drainage channels. Roof slopes of 2:12 or less are frequently exempt from these specific clearance setbacks.
Conclusion
A hip and valley roof represents an exceptional combination of architectural elegance, wind resistance, and structural longevity. However, because valleys carry concentrated water flow and snow loads, success depends on precision framing, accurate structural sizing, and multi-layered waterproofing.
For homeowners throughout Lakewood, Crystal Lake, Huntley, and across Northern Illinois, TJ Builders & Developers Inc delivers reliable exterior craftsmanship built to withstand Midwest weather. Whether you are planning a custom home addition, reroofing a multi-wing home, or seeking an expert exterior inspection, explore our professional residential roofing services to ensure your property remains protected for decades to come.