Primary Causes of a Bay Roof Leaking
Bay windows are an architectural highlight, but their unique position makes them a focal point for water damage. Because these structures extend outward from the exterior thermal envelope, they face severe weather exposure from three sides. When dealing with a bay roof leaking, the root cause almost always traces back to a breakdown in waterproofing at structural transitions or materials worn out by physical age. To protect your home’s integrity, check our complete guide on the ultimate guide to professional roof leak inspection and repair.
Flashing and Joint Deterioration
Proper flashing installation at the junction between the main house wall and the bay roof prevents up to 90% of water infiltration issues. However, because metal and wood expand and contract at different rates during Northern Illinois temperature swings, the seal along these joints eventually weakens.
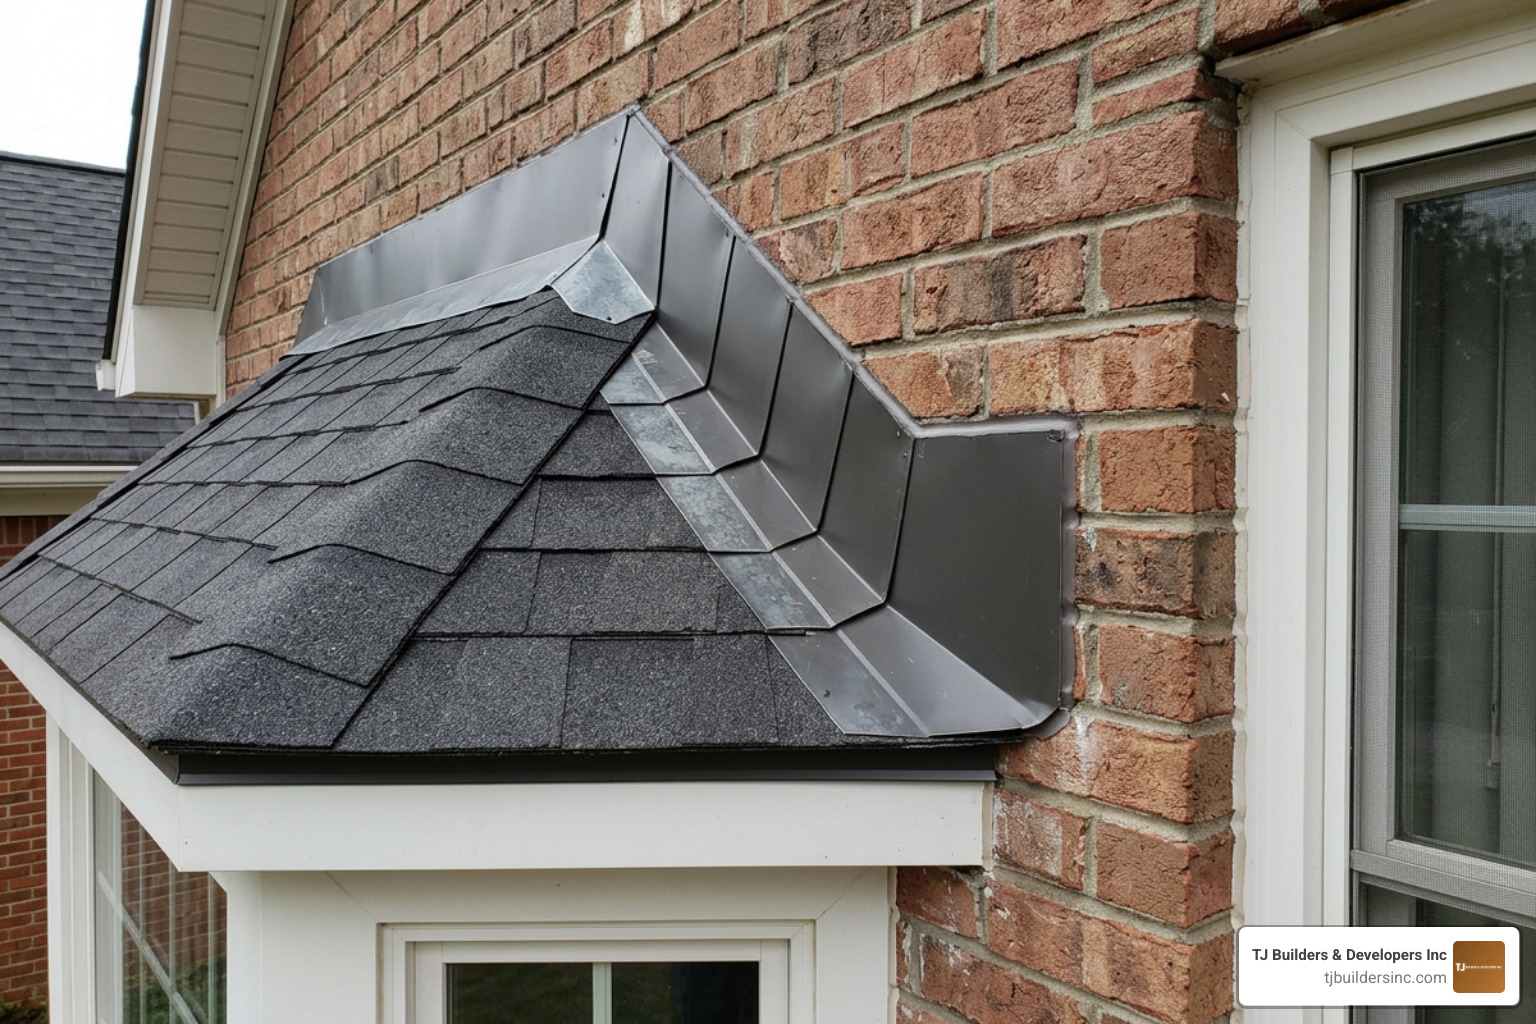
Step flashing and counterflashing must work together seamlessly to divert running water away from the wall. When counterflashing breaks away from masonry mortar joints, or when sealant along siding wall transitions dries up and splits, rain driving against the house wall slides straight behind the flashing. Once water slips past this primary barrier, it channels directly into the interior ceiling of your bay window.
Low-Slope Flat Roof Degradation
Many classic bay windows are constructed with shallow pitch angles or completely flat caps. These low-slope surfaces cannot shed water as quickly as a steeply pitched main roof.
If your bay roof uses an EPDM rubber membrane, modified bitumen, or roll felt, standing water slowly breaks down the bonded seams. During winter in places like Lakewood or Crystal Lake, melted snow refreezes along unheated bay overhangs, forming ice dams. These ice dams force liquid water upward underneath roof coverings and sealants, causing sudden indoor leaks during spring thaws.
Clogged Gutters and Wall Cavity Infiltration
Sometimes, the bay roof covering itself is totally sound, but water enters from directly above it. Because bay windows sit below the primary roofline, they collect all the overflow when main house gutters clog with leaves and debris.
When gutters spill over, water sheets down the exterior siding or brick veneer directly above the bay window. Cracked brick pointing or unsealed mortar joints allow wind-driven rain to enter the wall cavity. Water then travels downward along internal blockwork, metal lintels, or framing studs, dripping onto the bay ceiling and perfectly mimicking an actual roof canopy leak.
How to Diagnose Water Intrusion Around Your Bay Window
Finding the exact entry point of a leak takes methodical inspection. Water rarely travels in a straight line; it can enter near the main wall, run along a rafter, and drop onto your window sill several feet away.
Step 1: Locating the Source of a Bay Roof Leaking
Start your diagnostic process inside the house. Look closely at the ceiling inside the bay projection and the top corners where the bay frame joins the outer home wall.
- Early signs include faint yellow or brown water stains, peeling paint, or bubbling drywall tape.
- Advanced signs include sagging ceiling plaster, soft, rotting wood framing around the upper window trim, and damp insulation inside the window header.
Systematic Water Testing Techniques
If visual checks don’t pinpoint the failure, perform a controlled water test with two people—one outside with a garden hose and one inside with a flashlight.
- Start Low: Begin spraying water at the lowest edge of the bay roof (the drip edge) for 5 minutes while the interior observer checks for moisture.
- Move Upward Slowly: Gradually move the water stream upward to the roof surface, then to the side wall flashings, and finally to the brickwork or siding above the bay.
- Isolate Transitions: Spray one section at a time so you know exactly which component failed when water appears indoors.
- Use Inspection Tools: For hidden voids inside the bay soffit, insert a small borescope camera through a drywall opening to trace internal moisture paths without tearing down the entire ceiling.
Need Help With Your Home?
TJ Builders & Developers handles roofing, siding, gutters, windows, home additions, and fire damage restoration for homes and businesses in Lakewood, Crystal Lake, Schaumburg, and nearby McHenry County towns.
- Free, no-obligation estimates
- Licensed & insured
- 20+ years of local experience
Temporary Emergency Measures for Active Leaks
When rain is falling and water is actively dripping into your living room, long-term structural fixes must wait. Your top priority is stopping active water entry and preventing secondary property damage. For immediate help during severe weather, explore our emergency roof repair leak detection options.
Exterior Tarping and Temporary Patching
If it is safe to access the exterior during a pause in the storm, install temporary physical protection over the bay roof:
- Waterproof Tarping: Cover the entire bay canopy with a heavy-duty waterproof tarp. Ensure the top edge of the tarp extends at least 2 feet up the main house wall, tucked underneath the siding if possible, and secure the edges with wooden furring strips.
- Emergency Caulk Application: For small visible gaps along flashing seams or mortar joints, apply an exterior-grade polyurethane or silicone caulk. If you are bridging a wide gap, push a foam backer rod into the joint first so the caulk has a solid base to adhere to.
Interior Mitigation and Moisture Control
Inside your home, take fast action to capture water and dry out the structure. Place buckets underneath active drips and move nearby furniture or window treatments away from the area.
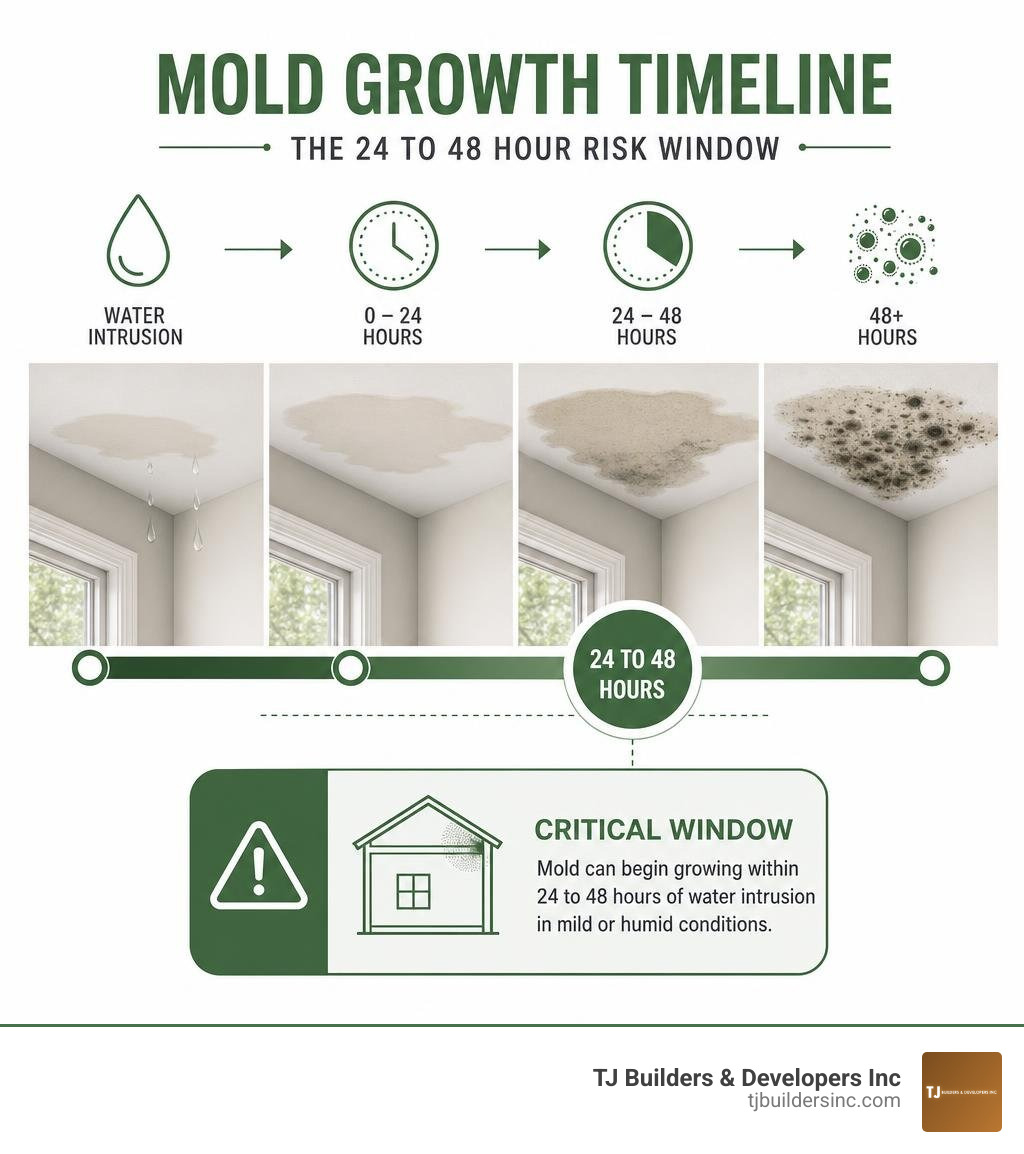
Toxic mold can begin growing within 24 to 48 hours of water intrusion in mild or humid interior conditions. Run a high-capacity dehumidifier and positioning air-mover fans directly at the damp ceiling framing. If drywall is severely saturated or bulging, poke a small pinhole in the center of the bulge to drain pooled water safely into a bucket, preventing a sudden, messy ceiling collapse.
Long-Term Structural Repair and Material Solutions
Temporary patches buy you time, but lasting protection requires permanent repair techniques tailored to your roof structure.
Flashing Integration and Masonry Sealing
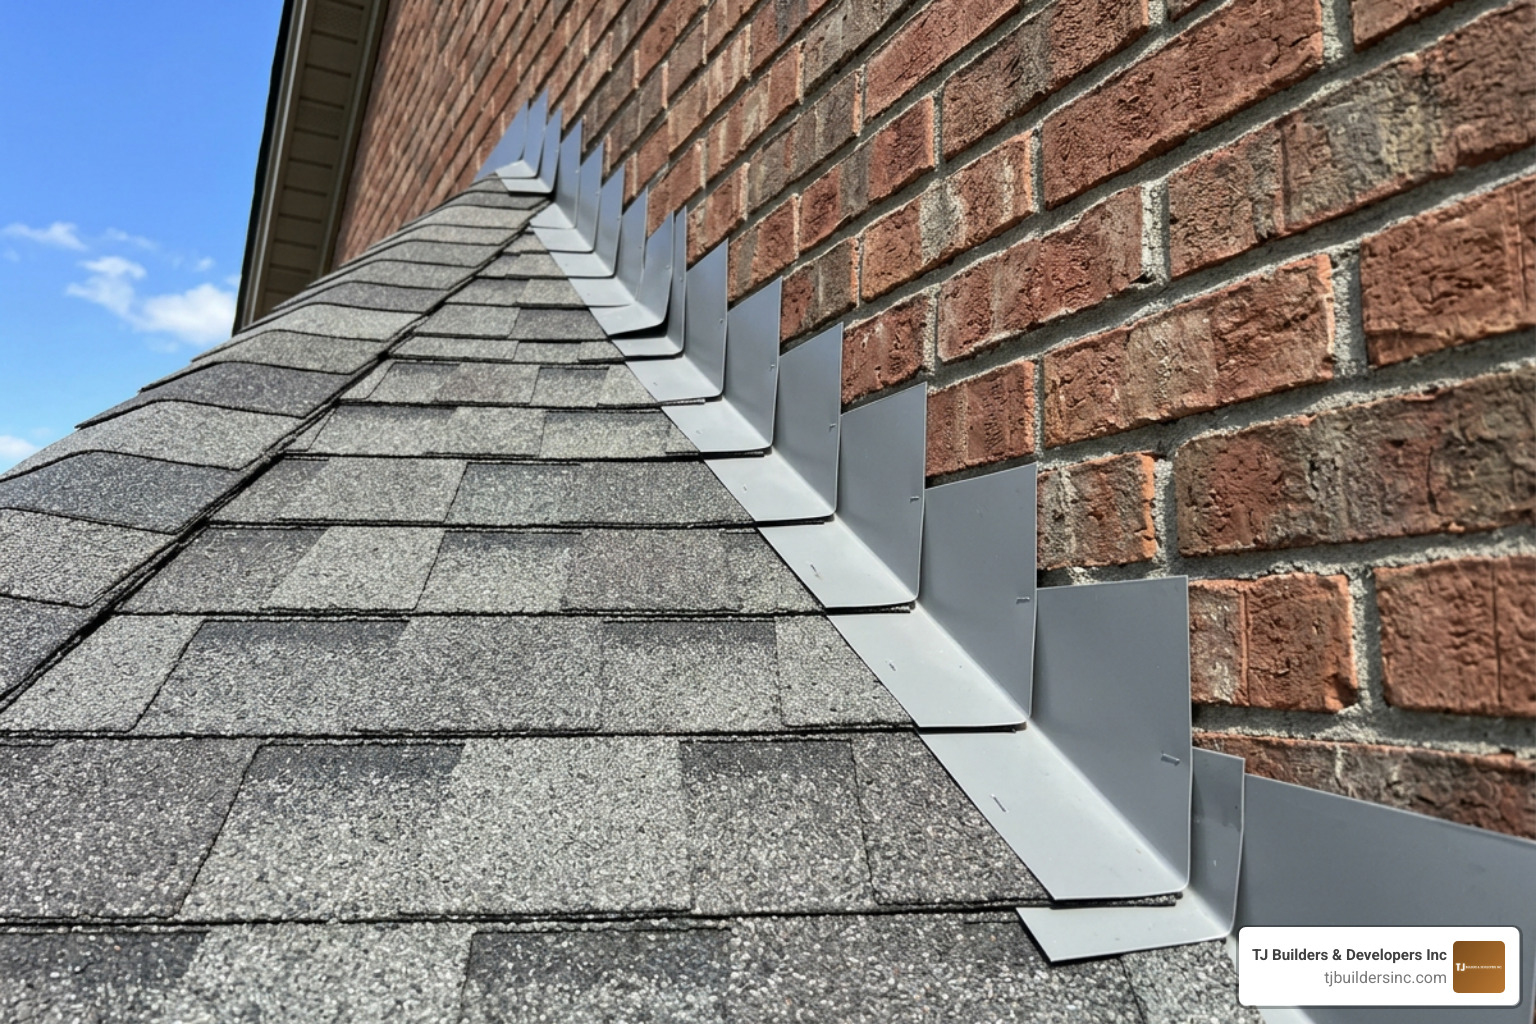
To stop recurrent wall-junction leaks, properly step-flash the bay roof. Step flashing weaves individual metal pieces into every course of shingles along the side wall, ensuring water sheds over each layer rather than sliding behind it.
For complete wall-to-roof waterproofing standards, refer to established guidelines on bay window roofing materials and flashing techniques. When connecting to a brick wall, cut a clean reglet channel directly into the mortar joints. Insert a custom-bent Z-flashing or counterflashing strip straight into the cut, secure it with drive pins, and seal the top edge with high-grade elastomeric masonry sealant. Avoid using rigid mortar along flashing edges—masonry expands at a different rate than metal, which causes rigid mortar to crack and fail within a few seasons.
Converting Flat Structures to Pitched Roofs
If your flat bay roof constantly pools water or forms winter ice dams, consider converting the flat structure into a pitched roof framing system. Learn more about structural conversions through pitched roof design over bay windows.
A sloped canopy with a 4:12 to 6:12 pitch sheds heavy Midwestern snow and rain effortlessly. This upgrade extends the overall lifespan of the window extension by 15 to 20 years and raises home appraisal value by 3% to 5%.
| Roofing Material | Expected Lifespan | Slope Compatibility | Ideal Application |
|---|---|---|---|
| Asphalt Shingles | 20–30 Years | Pitched (3:12 or higher) | Matches main roof aesthetics; cost-effective. |
| Metal (Standing Seam/Copper) | 40–50+ Years | Pitched or Low-Slope | Exceptional durability; high curb appeal; leak resistant. |
| EPDM Rubber Membrane | 20–25 Years | Flat / Low-Slope | Seamless protection for non-visible flat caps. |
| GRP Fibreglass | 20–30 Years | Flat / Low-Slope | Tough, rigid, single-unit waterproof membrane. |
Comprehensive Waterproofing Applications
Underneath whatever surface material you choose, a high-performance underlayment is non-negotiable. Peel-and-stick ice and water shield should cover the entire deck of a bay roof, extending at least 6 to 8 inches up the vertical wall before any flashing is installed. Combine this with specialized coating treatments by reading our steps on how to fix roof leakage waterproofing issues for lasting results.
Need Help With Your Home?
TJ Builders & Developers handles roofing, siding, gutters, windows, home additions, and fire damage restoration for homes and businesses in Lakewood, Crystal Lake, Schaumburg, and nearby McHenry County towns.
- Free, no-obligation estimates
- Licensed & insured
- 20+ years of local experience
Preventative Maintenance and Long-Term Protection
Taking care of your bay window roof with routine maintenance prevents sudden structural failures and saves thousands of dollars in emergency restoration fees. Review standard service budgets using the price of a dry ceiling and other roof repair costs.
Preventing a Bay Roof Leaking with Routine Care
Add these three crucial steps to your biannual home maintenance checklist every spring and autumn:
- Clean Main Roof Gutters: Clear leaves, needles, and debris from all gutters directly above the bay window so water never overflows onto the bay canopy.
- Extend Downspouts: Verify that upper-roof downspouts empty directly into lower gutter channels rather than dumping streams of runoff right onto your bay roof shingles.
- Inspect Sealants Annually: Check all exterior silicone, caulk, and metal flashing seams for signs of peeling, drying, or cracking, touching up minor gaps immediately.
Protecting Home Value and Preventing Mold
Unrepaired roof leaks can reduce a property’s market value by $10,000 to $30,000 or more during home inspections and appraisals. Water seeping into hidden wall spaces destroys insulation performance, rots structural timber studs, and breeds hidden mold spores that circulate throughout your home’s HVAC ductwork. Staying proactive preserves your structural framing and protects indoor air quality.
Frequently Asked Questions About Bay Window Roof Leaks
What is the typical cost range to repair a bay window roof?
Minor repairs like replacing step flashing, sealing mortar joints, or patching localized membrane tears usually cost between $300 and $1,200. If the damage requires a complete bay roof replacement—including new plywood sheathing, membrane or custom metal flashing, and underlayment—the total cost typically ranges from $1,500 to $6,000, depending on material choices like standing seam copper versus standard asphalt shingles.
When should I replace my bay window roof instead of repairing it?
You should opt for full replacement if the underlying plywood deck feels soft, springy, or rotted, if the current roof covering is over 20 years old, or if you have experienced repeated leaks despite replacing sealants and flashing. Severe sagging or structural deformation in the bay header also indicates that the entire covering must be removed to rebuild damaged interior framing.
Can gutter issues really cause water to leak into my bay window roof?
Yes, absolutely. Because bay windows project outward beneath the primary roofline, clogged gutters directly above them will spill heavy volumes of water down the exterior siding. This excess water overpowers standard wall flashings and seeps into unsealed brick mortar joints, flowing down internal wall cavities and bursting through the bay window’s interior ceiling.
Protect Your Northern Illinois Home with Professional Workmanship
A bay roof leaking might start as a tiny spot on the ceiling, but it quickly evolves into a major threat to your home’s structure, energy efficiency, and overall market value. Diagnosing the exact path of water intrusion takes patience, quality materials, and a deep understanding of exterior home construction.
At TJ Builders & Developers Inc, we bring over two decades of hands-on experience to every project. Serving homeowners in Lakewood, Crystal Lake, Schaumburg, McHenry, Huntley, and across Northern Illinois, our team specializes in long-term exterior solutions. Whether you need an emergency leak diagnosis, custom step flashing, or a complete bay roof redesign, we build to protect your home for decades to come.
If you are dealing with a stubborn leak above your bay window, don’t wait for the next heavy rainstorm to cause costly drywall damage. Contact us today for reliable, expert professional roof repair tailored specifically to your home.