
Gutter Guard Installation Starts With a Clean, Secure Gutter System
Gutter guard installation works best when you clean and repair the gutters first, then match the guard’s mounting method to your roof pitch. Measure each run, cut the sections on the ground, secure them with approved tape or self-tapping screws, and make sure the mesh trough sits at least 1/8 inch below the gutter’s front lip. That small clearance helps direct rainwater into the gutter instead of over it.
Micro-mesh guards can reduce leaves, twigs, and other debris entering the gutter while still allowing water through. But they are not a substitute for sound gutters, secure fascia, proper slope, and safe ladder work. This guide explains how to choose the right method for your roof, handle corners and end caps, eliminate overflow gaps, and maintain the system through Northern Illinois weather.
I am Thomas Pruszynski, owner of TJ Builders & Developers Inc, and our team has helped homeowners protect and improve their properties with quality exterior work for more than 20 years. This gutter guard installation guide draws on the same careful preparation and water-management principles we use for lasting gutter and exterior improvements.
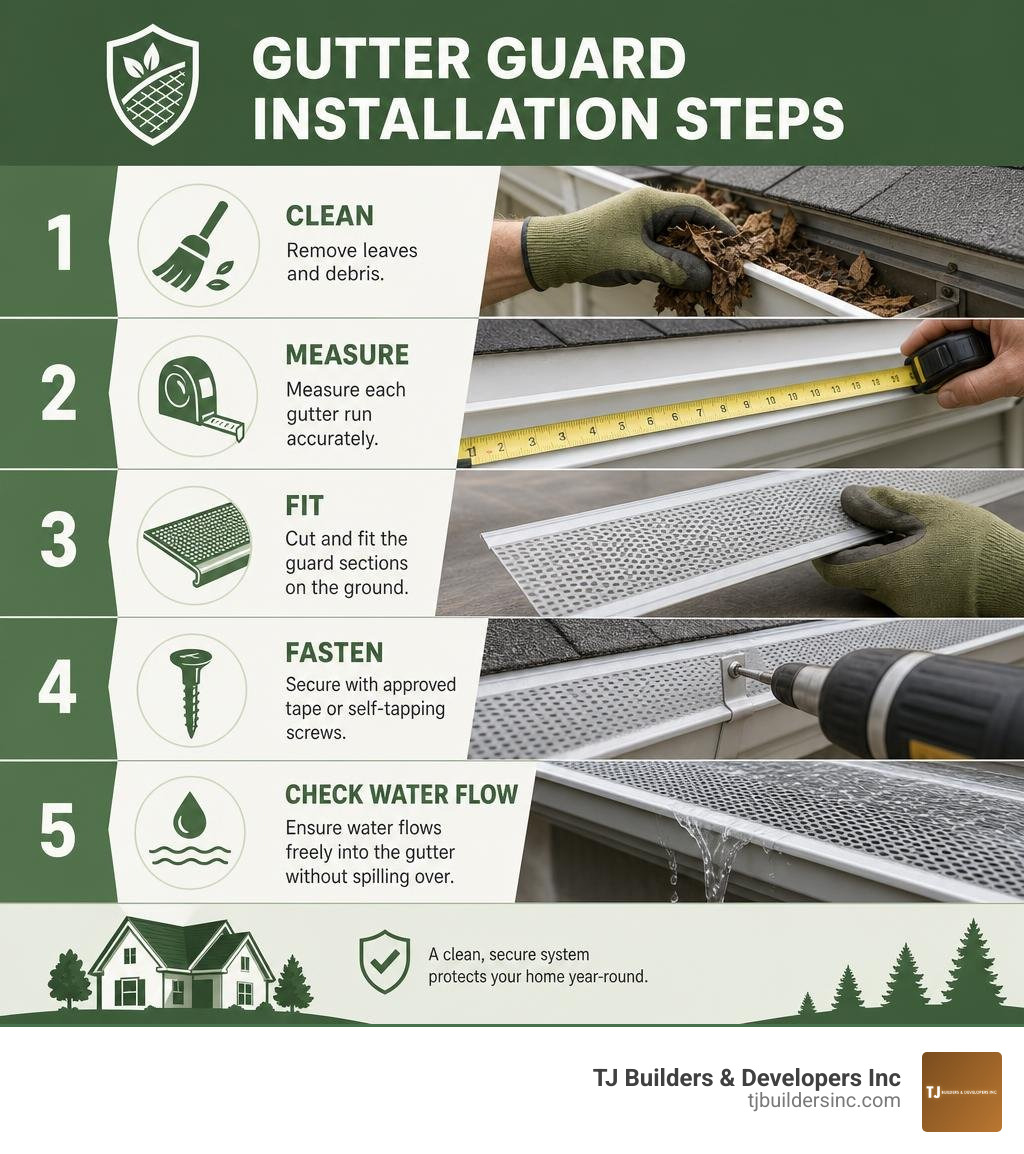
Discover more about Gutter guard installation:
Essential Tools, Safety, and System Preparation

A successful gutter guard project depends on utilizing commercial-grade equipment and specialized safety gear. Professional installers rely on precision cutting tools, calibrated bending apparatuses, and structural fasteners to ensure that panels integrate seamlessly along the roofline without compromising surrounding roofing materials.
Professional exterior crews utilize dedicated installation equipment and safety systems:
- Heavy-duty personal protective equipment, including cut-resistant gloves and ANSI-approved safety glasses
- Commercial extension ladders equipped with OSHA-compliant ladder standoff stabilizers to prevent gutter crushing
- High-leverage compound tin snips and commercial metal shears for precise miter cuts
- Variable-torque cordless drills paired with magnetic hex head driver bits
- Precision measuring tools and commercial clamping straightedges for custom pitch adjustments
- Chemical surface cleaners, such as pure acetone, for high-bond adhesive preparation
Working at elevation demands rigorous adherence to exterior safety protocols. Commercial ladder standoffs span the gutter channel to distribute ladder weight directly onto exterior siding or roof rafters, maintaining structural stability and preventing crushed eaves. All metal fabrication, custom miter slicing, and panel bending are performed at ground-level workstations to maintain optimal leverage and precision.
Before adding guards to any roofline, a comprehensive evaluation of existing drainage channels is critical. If troughs are sagging, pulling loose, or holding standing water, performing comprehensive gutter repair and realigning is necessary to establish structural soundness. For older, damaged channels suffering from chronic joint leaks, upgrading to a modern seamless gutter installation ensures that your newly protected system performs reliably for decades.
Preparing Rooflines for Professional Gutter Guard Installation
Installing guards over an uncleaned or compromised gutter creates hidden drainage blockages that can lead to wood rot along the fascia board. Certified technicians execute a thorough preparation sequence before mounting any guard panels:

- Debris Removal: Clearing out all accumulated leaves, pine needles, organic silt, and decomposed matter from the entire gutter run.
- System Flush: Washing the gutter channels with a high-pressure hose nozzle directed toward the downspouts to confirm water discharges rapidly without pooling in the midsections.
- Slope Verification: Verifying that gutters maintain a downward slope of at least 1/4 inch for every 10 feet toward the downspout outlets, adjusting mounting brackets if standing water is detected.
- Joint and Seam Sealing: Inspecting all end caps, corner miters, and outlet joints to strip away deteriorated caulking and apply a high-grade exterior gutter sealant that prevents leaks behind the fascia.
- Drainage Path Assessment: Ensuring downspouts flow away from the foundation wall. Installing proper downspout extension drainage protects basements and structural footings from heavy stormwater concentration.
Comparing Attachment Hardware and Materials
Gutter guard systems, especially stainless steel micro-mesh designs, utilize either mechanical self-tapping screws or high-bond adhesive tape to lock panels into place. Understanding how these fastening systems compare helps homeowners select the most durable approach for their property.
| Fastening Feature | Self-Tapping Screws (Hex Head) | 3M High-Bond Adhesive Tape |
|---|---|---|
| Material Composition | 410 or 304 Stainless Steel Screws | Industrial Acrylic Foam Core Tape |
| Installation Requirement | 3 self-tapping screws per 4-foot section | Applied to clean lip with acetone prep |
| Temperature Constraint | Can be installed in freezing conditions | Requires ambient temps of 65°F or warmer |
| Curing Window | Immediate structural hold | Requires 12 hours for full bond strength |
| Pre-Drilling Needed? | No pre-drilling required | None |
| Serviceability | Easy to remove for deep maintenance | Permanent bond; difficult to reposition |
| Wind & Ice Resistance | Maximum mechanical hold against ice lift | Strong hold; vulnerable to surface grime |
Most premium micro-mesh systems feature heavy-duty extruded aluminum frames paired with marine-grade 304 stainless steel mesh. This construction resists rust, prevents warping under heavy snow loads in Northern Illinois communities like Crystal Lake and McHenry, and blocks roof grit while permitting high-volume water capture.
Selecting the Right Method Based on Roof Pitch and Configuration
Determining your roof slope is essential for choosing the correct installation method. To calculate roof pitch, measure the vertical rise in inches over a horizontal 12-inch run using a standard level.
A standard slope ranges from 1-pitch to 6-pitch (approximately 5° to 25°). Steeply pitched roofs measure 7-pitch or greater (over 30°). Matching the guard angle to your roof configuration ensures that water flows naturally across the micro-mesh rather than overshooting the front lip, giving you effective gutter guard leaf protection in every storm. For detailed manufacturer parameters, review the official manufacturer install guide.
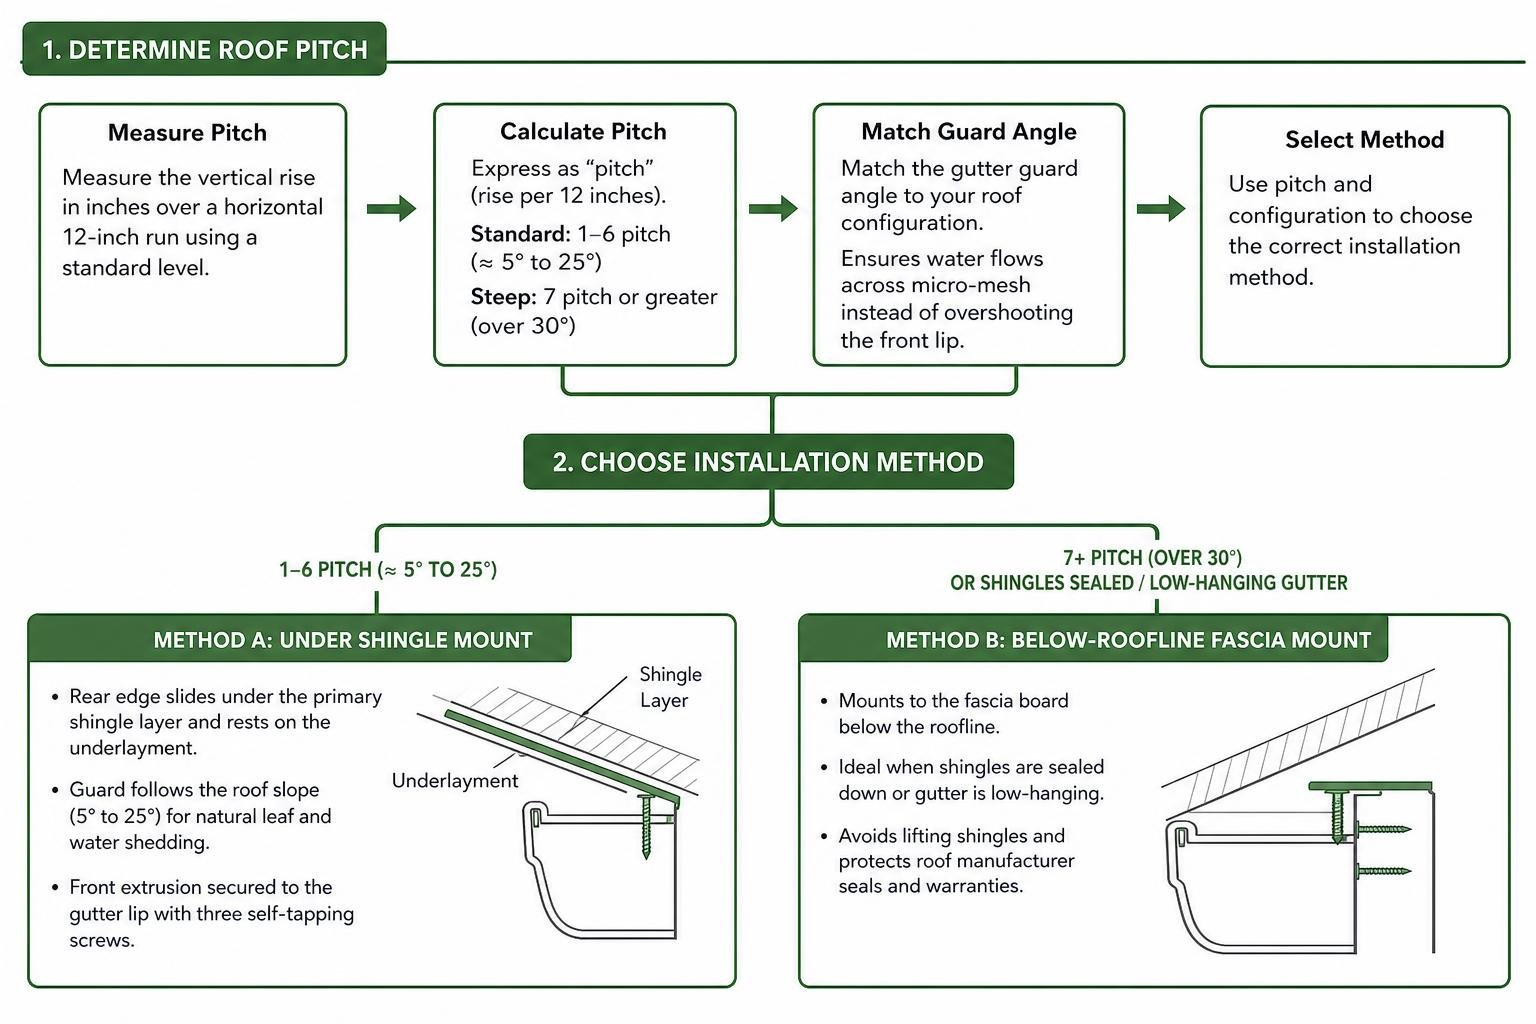
Method A and Method B: Standard Slopes and Below-Roofline Mounts
For homes with mild to moderate slopes (1-pitch to 6-pitch), Method A (Under Shingle Mount) provides a streamlined installation. In this setup, the rear edge of the guard slides gently beneath the primary asphalt shingle layer and rests on top of the underlayment. The guard maintains the same 5° to 25° slope as the roof deck, allowing leaves to shed naturally with the wind. The front aluminum extrusion is then secured to the gutter lip using three self-tapping screws.
When shingles are firmly sealed down, or on low-hanging gutter setups, prying shingles upward can break the manufacturer seal and void roof warranties. In these instances, Method B (Below-Roofline Fascia Mount) is recommended:
- The rear extrusion is lowered below the roofline and fastened directly to the fascia board or the back wall of the gutter trough.
- The rear rail of micro-mesh guards is intentionally designed shorter than the front rail, creating a structural settling allowance that accommodates natural roof expansion and contraction.
Method C and Method D: Steep Roof Bending and Direct Fastening
Steep roofs (7-pitch and higher) generate rapid water velocity down the roof plane. If a gutter guard is installed at this steep angle, rushing water can skim straight across the mesh and spill over the front edge.
Method C (Steep Roof Bending) resolves this challenge:
- The stainless steel micro-mesh is bent downward along its length using a bending brake or two straight boards clamped to a workbench.
- Bending the mesh flattens the guard profile, establishing a target slope of 5° to 10° (a 1-pitch to 2-pitch slope) across the gutter opening.
- This level transition slows incoming water, pulling it down through the mesh while deflecting heavy debris.
Method D (Alternative Direct Fastening) is used for metal roofs, Spanish tile, or slate where sliding material underneath is impossible. The guard is secured directly to the front lip and back edge of the gutter using specialized mounting brackets or self-drilling screws, maintaining a rigid, independent barrier that preserves the roof covering.
Professional Gutter Guard Installation and Fastening Standards
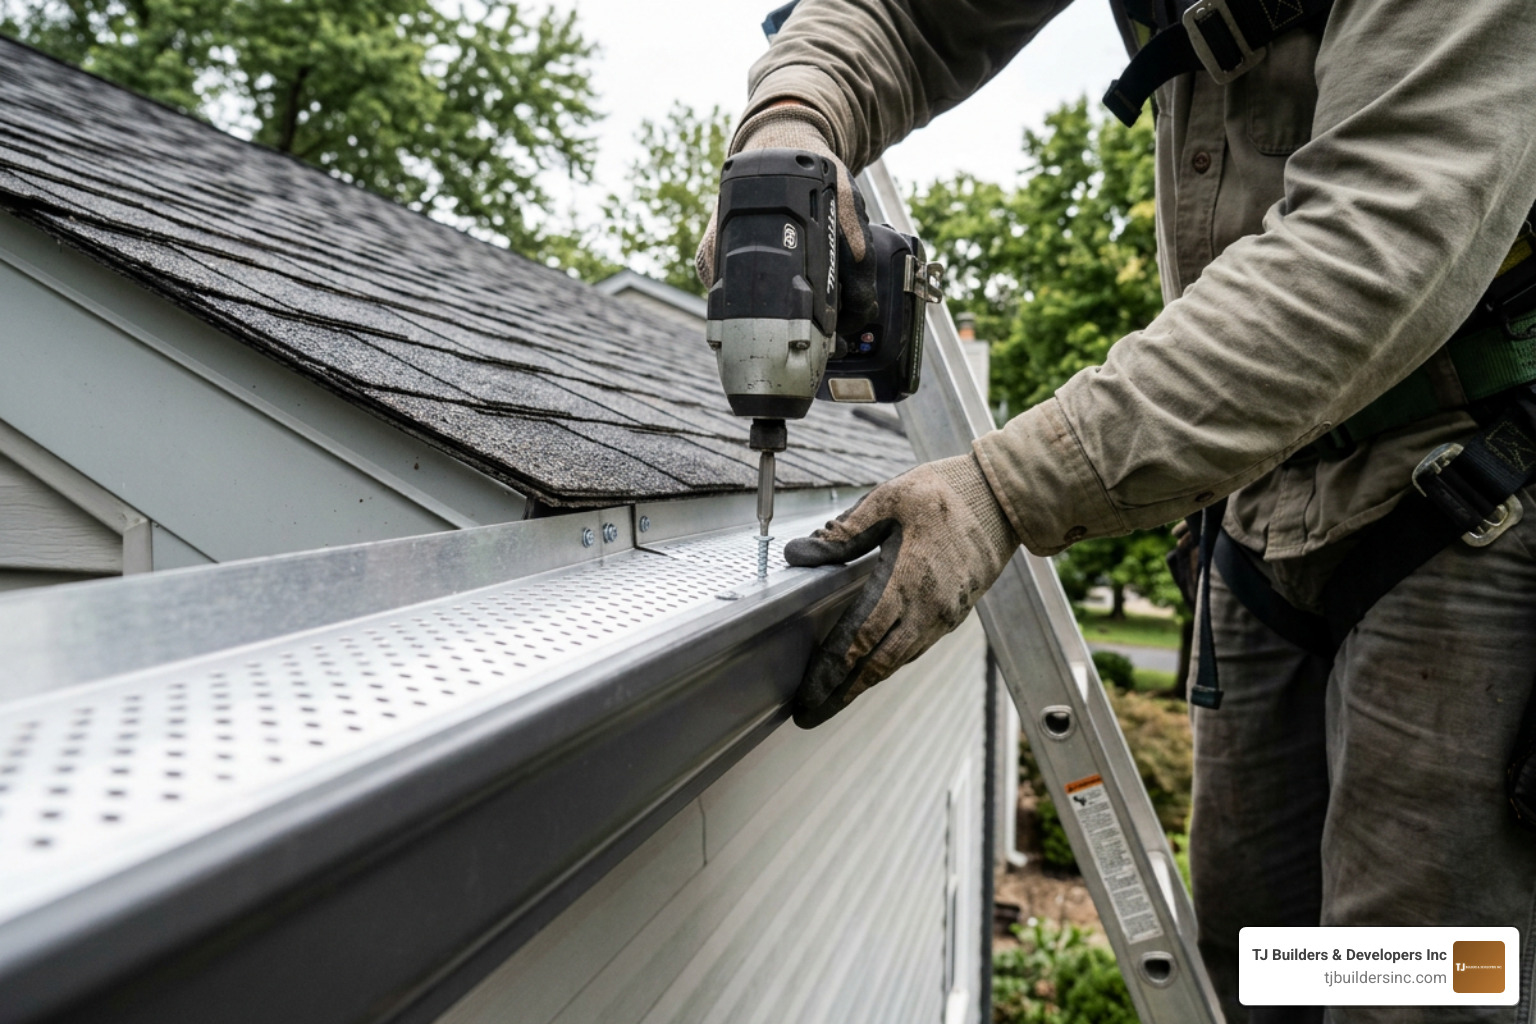
Executing a lasting installation requires meticulous panel placement and systematic fastening standards. Professional contractors consult detailed product specifications outlined in the stainless steel micro-mesh manual to maintain strict compliance with warranty terms.
The professional installation procedure follows a standardized multi-step workflow:
- Establishing the Origin Point: Installation begins at an inside corner miter or the end of the gutter run opposite the downspout to ensure seamless water transit.
- Panel Positioning: Installers position the back edge of the guard beneath the shingles (Method A) or flush against the fascia (Method B), ensuring the front aluminum frame rests flat across the outer gutter lip.
- Section Alignment: Adjoining panels are aligned with flush, tight seams. Quality micro-mesh guards utilize a notched end profile allowing adjacent mesh screens to overlap slightly, establishing an unbroken barrier that stops debris penetration.
- Front Lip Mechanical Fastening: Installers drive three self-tapping hex head screws evenly across the front extrusion of each 4-foot section, tapping directly into the aluminum gutter hem without pre-drilling.
- Adhesive Bonding Protocol: When specified with high-bond adhesive tape, installation occurs in ambient temperatures of 65°F or warmer. Crews clean the gutter lip with acetone to remove grease and oxidation, press the guard firmly against the lip, and allow a 12-hour curing cycle for maximum bond strength.
Mastering Corners and End Caps in Gutter Guard Installation
Corner miters and gutter terminals require precision fabrication to prevent pest entry and manage concentrated water flow.
- Inside Miter Corners: Valleys channel massive volumes of rainwater during heavy storms. Installers cut the rear frame at a 45-degree angle using precision shears while leaving the front edge intact to bridge the corner seam. An aluminum valley splash guard (diverter) is positioned along the outer gutter rim to catch high-velocity water exiting the roof valley.
- Outside Miter Corners: Installers miter adjoining guard ends at 45-degree angles so the frames meet in a continuous seam, fastening the overlapping mesh joint with a stainless steel stitch screw.
- End Caps: The final panel of a run is measured to extend 1/2 inch past the gutter end cap. Technicians notch away the front and rear aluminum extrusions, bend the remaining stainless steel mesh flap downward over the end cap opening, and fasten it securely. This eliminates structural gaps that could invite birds, bees, or squirrels to nest inside the trough.
Critical Gap Removal and Water Flow Calibration
The final calibration step prevents stormwater from overshooting the gutter system. After fastening the front frame, technicians inspect the mesh trough running along the front edge of the panel.
The mesh trough must sit at least 1/8 inch below the upper edge of the gutter lip. If the mesh is level with or higher than the front lip, surface tension causes fast-moving rainwater to ride over the guard and spill onto the foundation below. Installers calibrate the center mesh channel until the trough sits uniformly 1/8 inch below the outer rim, creating a natural water brake that directs stormwater straight into the gutter.
Post-Installation Maintenance, Warranties, and Winter Protection
Micro-mesh gutter guards significantly reduce maintenance, but periodic inspections keep the system operating at peak performance. In wooded neighborhoods throughout Algonquin, Barrington, and Huntley, fine pollen, roof granules, and pine sap can accumulate on top of the screen over time.
- Routine Brushing: Use a soft-bristled brush attached to a telescoping extension pole to clear dry leaves and pine needles from the mesh surface from ground level once or twice a year.
- Warranty Requirements: Top manufacturers offer a 25-year limited parts warranty covering material defects, cracking, and rust. In coastal zones (within 5 miles of salt water), this coverage is typically reduced to 5 years due to salt-air corrosion. Warranties cover manufactured parts but exclude issues resulting from improper installation, lack of routine maintenance, or severe weather events.
- Winter Protection in Northern Illinois: In cold winter climates, surface snow can freeze across the top of micro-mesh screens. To manage severe icicle buildup along cold eaves, homeowners can have licensed contractors install self-regulating roof de-icing heating cables along the roof overhang and gutter trough. For properties equipped with steep metal rooflines, installing snow guards for metal roofs prevents sudden snow slides from damaging gutters and guard frames.
Frequently Asked Questions About Gutter Protection
Can gutter guards be installed on steep or metal roofs without damaging shingles?
Yes. On steep roofs (7-pitch or greater), panels should not be slid beneath the shingles at an extreme angle. Instead, use the mesh bending technique (Method C) to create a gentle 5° to 10° guard slope, or mount the rear frame directly to the fascia board (Method B or D). This completely preserves shingle underlayment seals and protects manufacturer roof warranties while maximizing water capture.
Should I secure my gutter guards with 3M adhesive tape or self-tapping screws?
Self-tapping stainless steel screws provide the strongest, most dependable long-term mechanical attachment. They can be installed in any temperature and allow panels to be easily removed if needed. 3M high-bond adhesive tape provides a clean, screwless appearance, but it requires thorough acetone cleaning, dry conditions, and ambient temperatures of at least 65°F during installation, followed by a 12-hour curing period.
How do I maintain micro-mesh gutter guards and protect my 25-year warranty?
Maintenance is straightforward: inspect roof valleys and downspout exits seasonally, and remove dried debris from the mesh using an extension pole equipped with a specialty gutter brush. To protect your 25-year parts warranty, ensure the product is registered with the manufacturer following installation, follow recommended mounting methods, and verify that guards are installed with the required 1/8-inch front trough drop.
Conclusion
A well-executed gutter guard installation provides essential protection for your home’s foundation, siding, and landscaping by keeping roof runoff flowing freely year-round. Taking the time to properly clean your gutters, select the right mounting method for your roof pitch, and secure each panel with the correct 1/8-inch trough clearance ensures trouble-free drainage through heavy downpours and changing seasons.
When you need professional exterior evaluations, durable gutter replacements, or comprehensive home improvements across Lakewood, Cary, Schaumburg, and surrounding communities, contact TJ Builders & Developers Inc for expert roofing and exterior solutions.